Product Updates | October 13th
This release brings a brand new home page for CSMs, more powerful playbooks, and a long list of improvements across the Customer 360, the Customer Portal, integrations, and general app behavior. Many of these updates come directly from your feedback. Below is an overview of the new features and improvements included in this release.
Release Spotlight
MyCustify
Every CSM starts the day with the same question: what needs my attention right now? Until now, answering it meant checking Tasks, Meetings, Renewals, Signals, and your inbox one by one. MyCustifyMyCustify answers it in a single view.
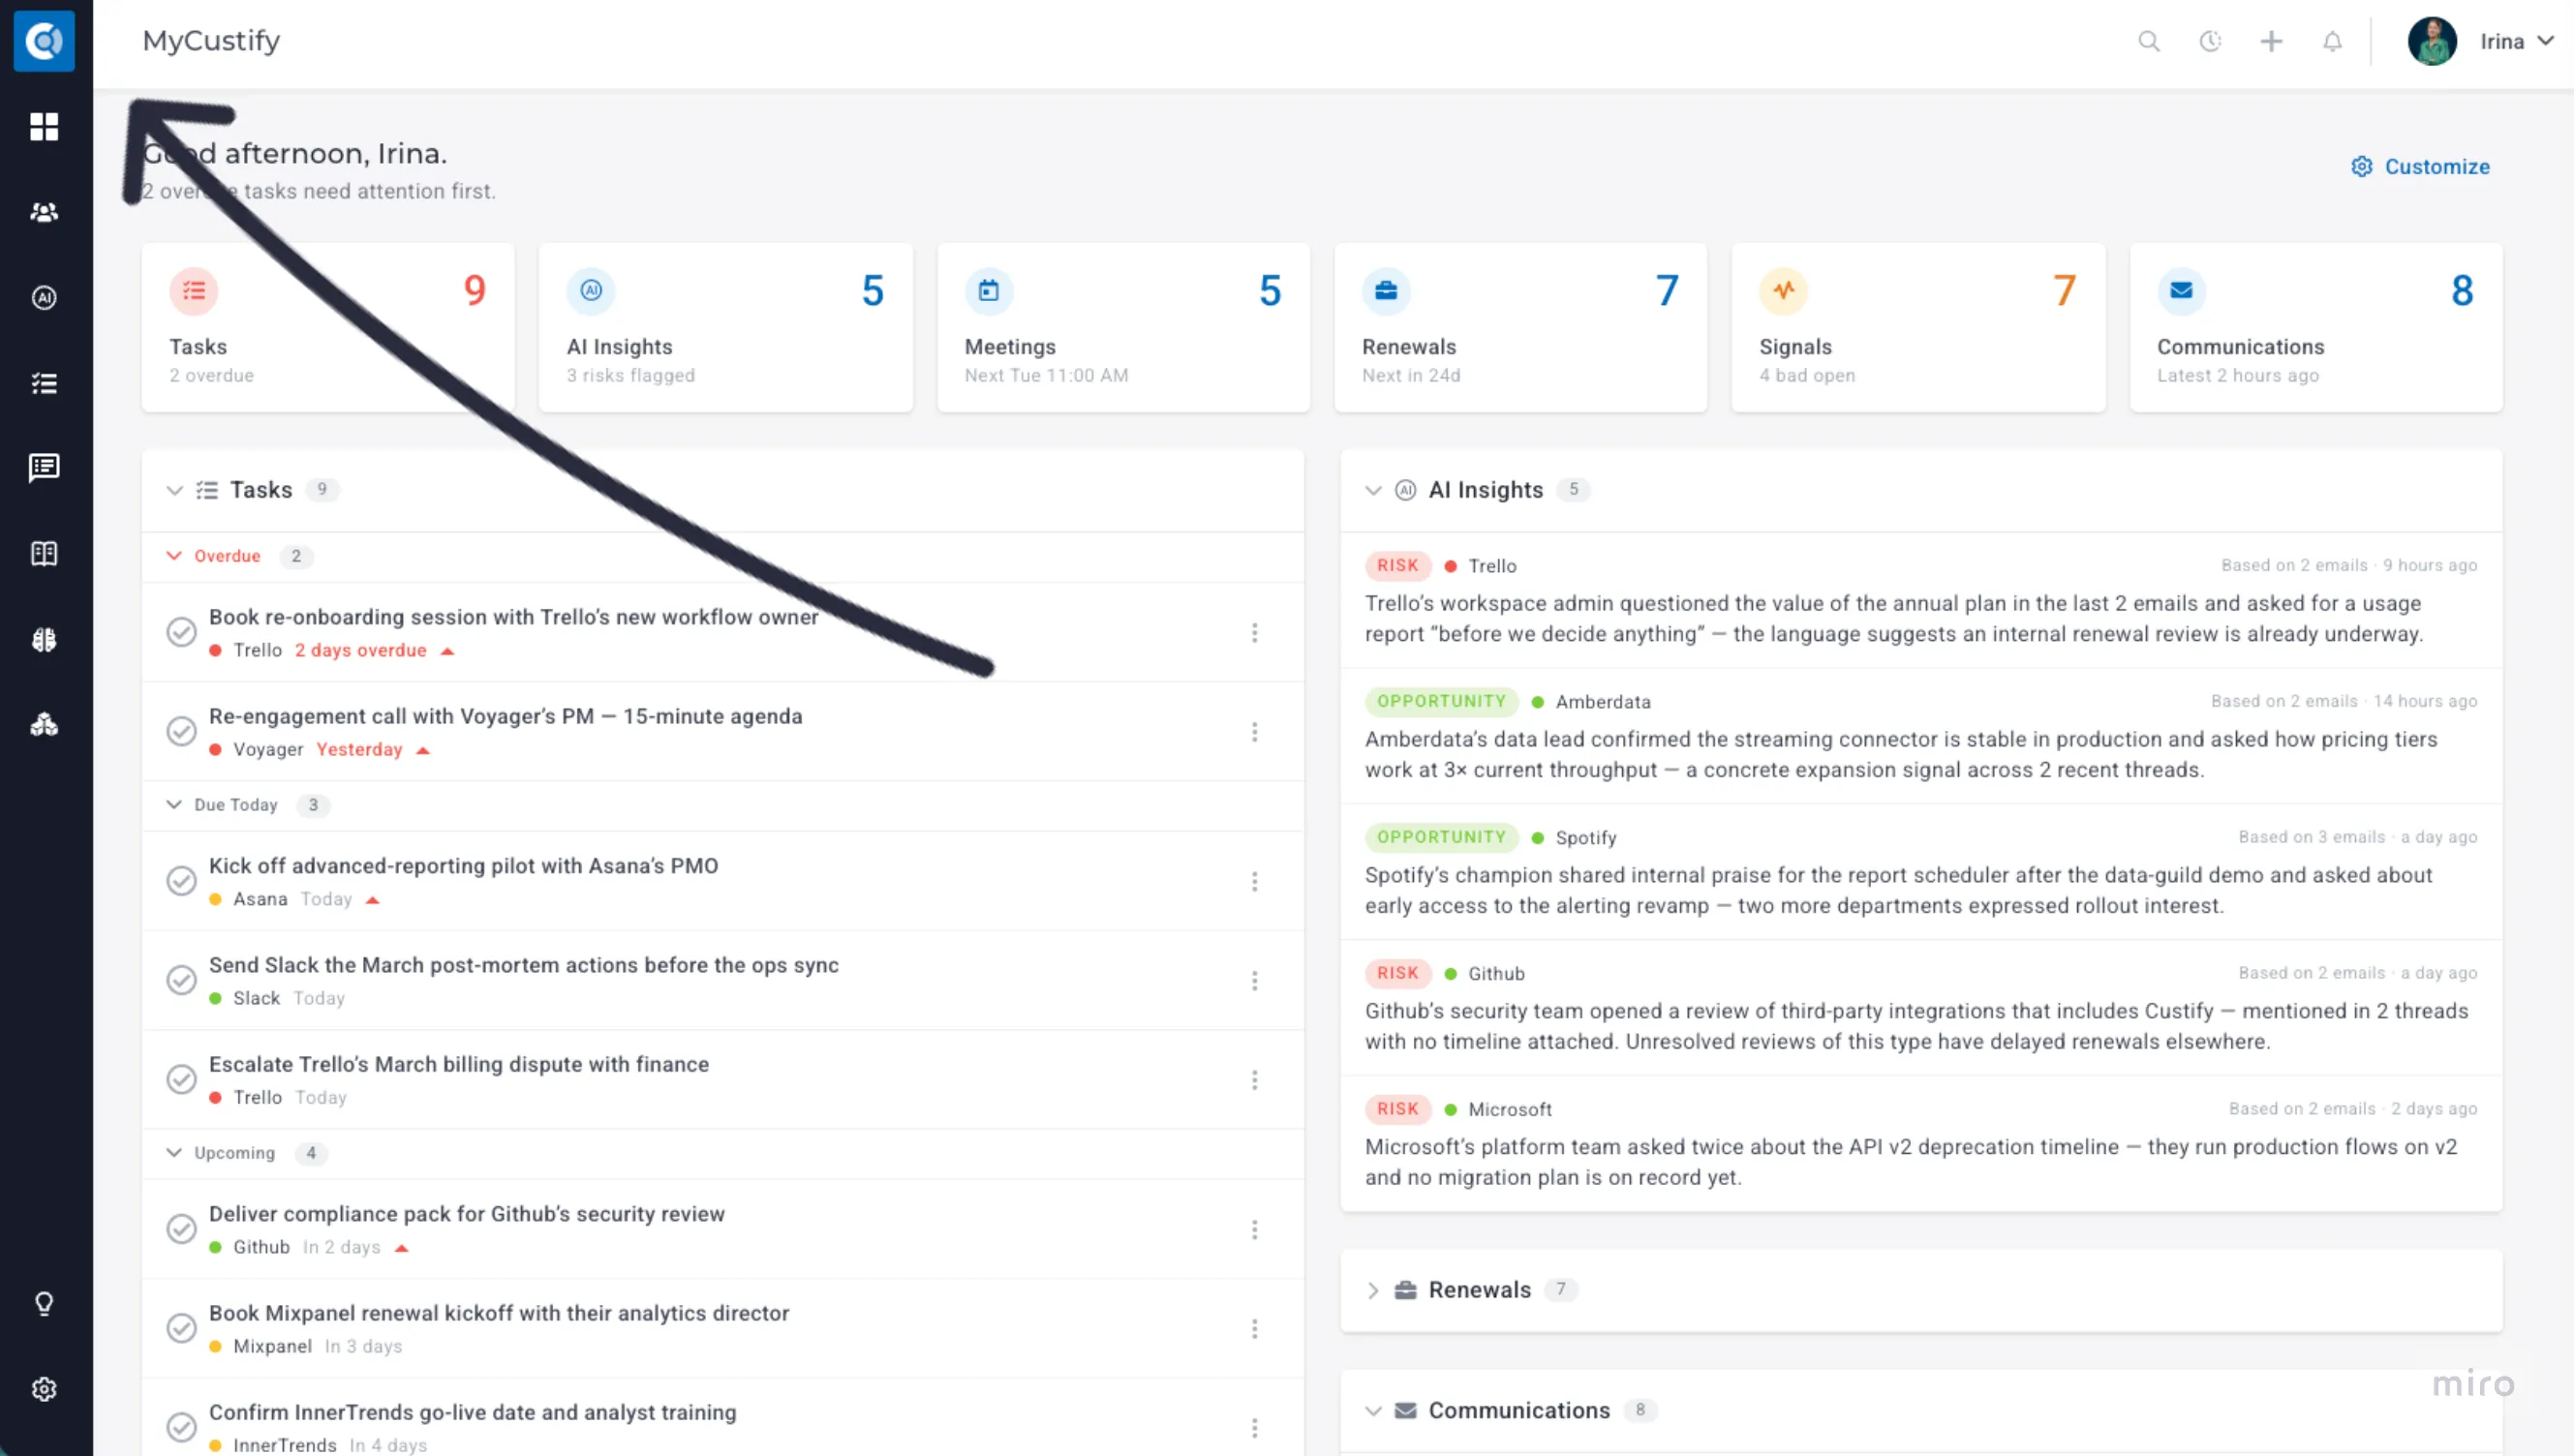
Your new home page brings together everything that needs your attention across your book of business: overdue tasks, accounts showing risk, renewals coming up, unanswered customer emails, and opportunities you might have missed. A personal greeting tells you what to tackle first, and a row of summary tiles shows where things stand before you even scroll.
And you don’t just see what needs attention; you can act on it right away. Complete or reassign tasks, turn an AI insight into a follow-up task, acknowledge a signal, or reply to a customer email, all without leaving the page.
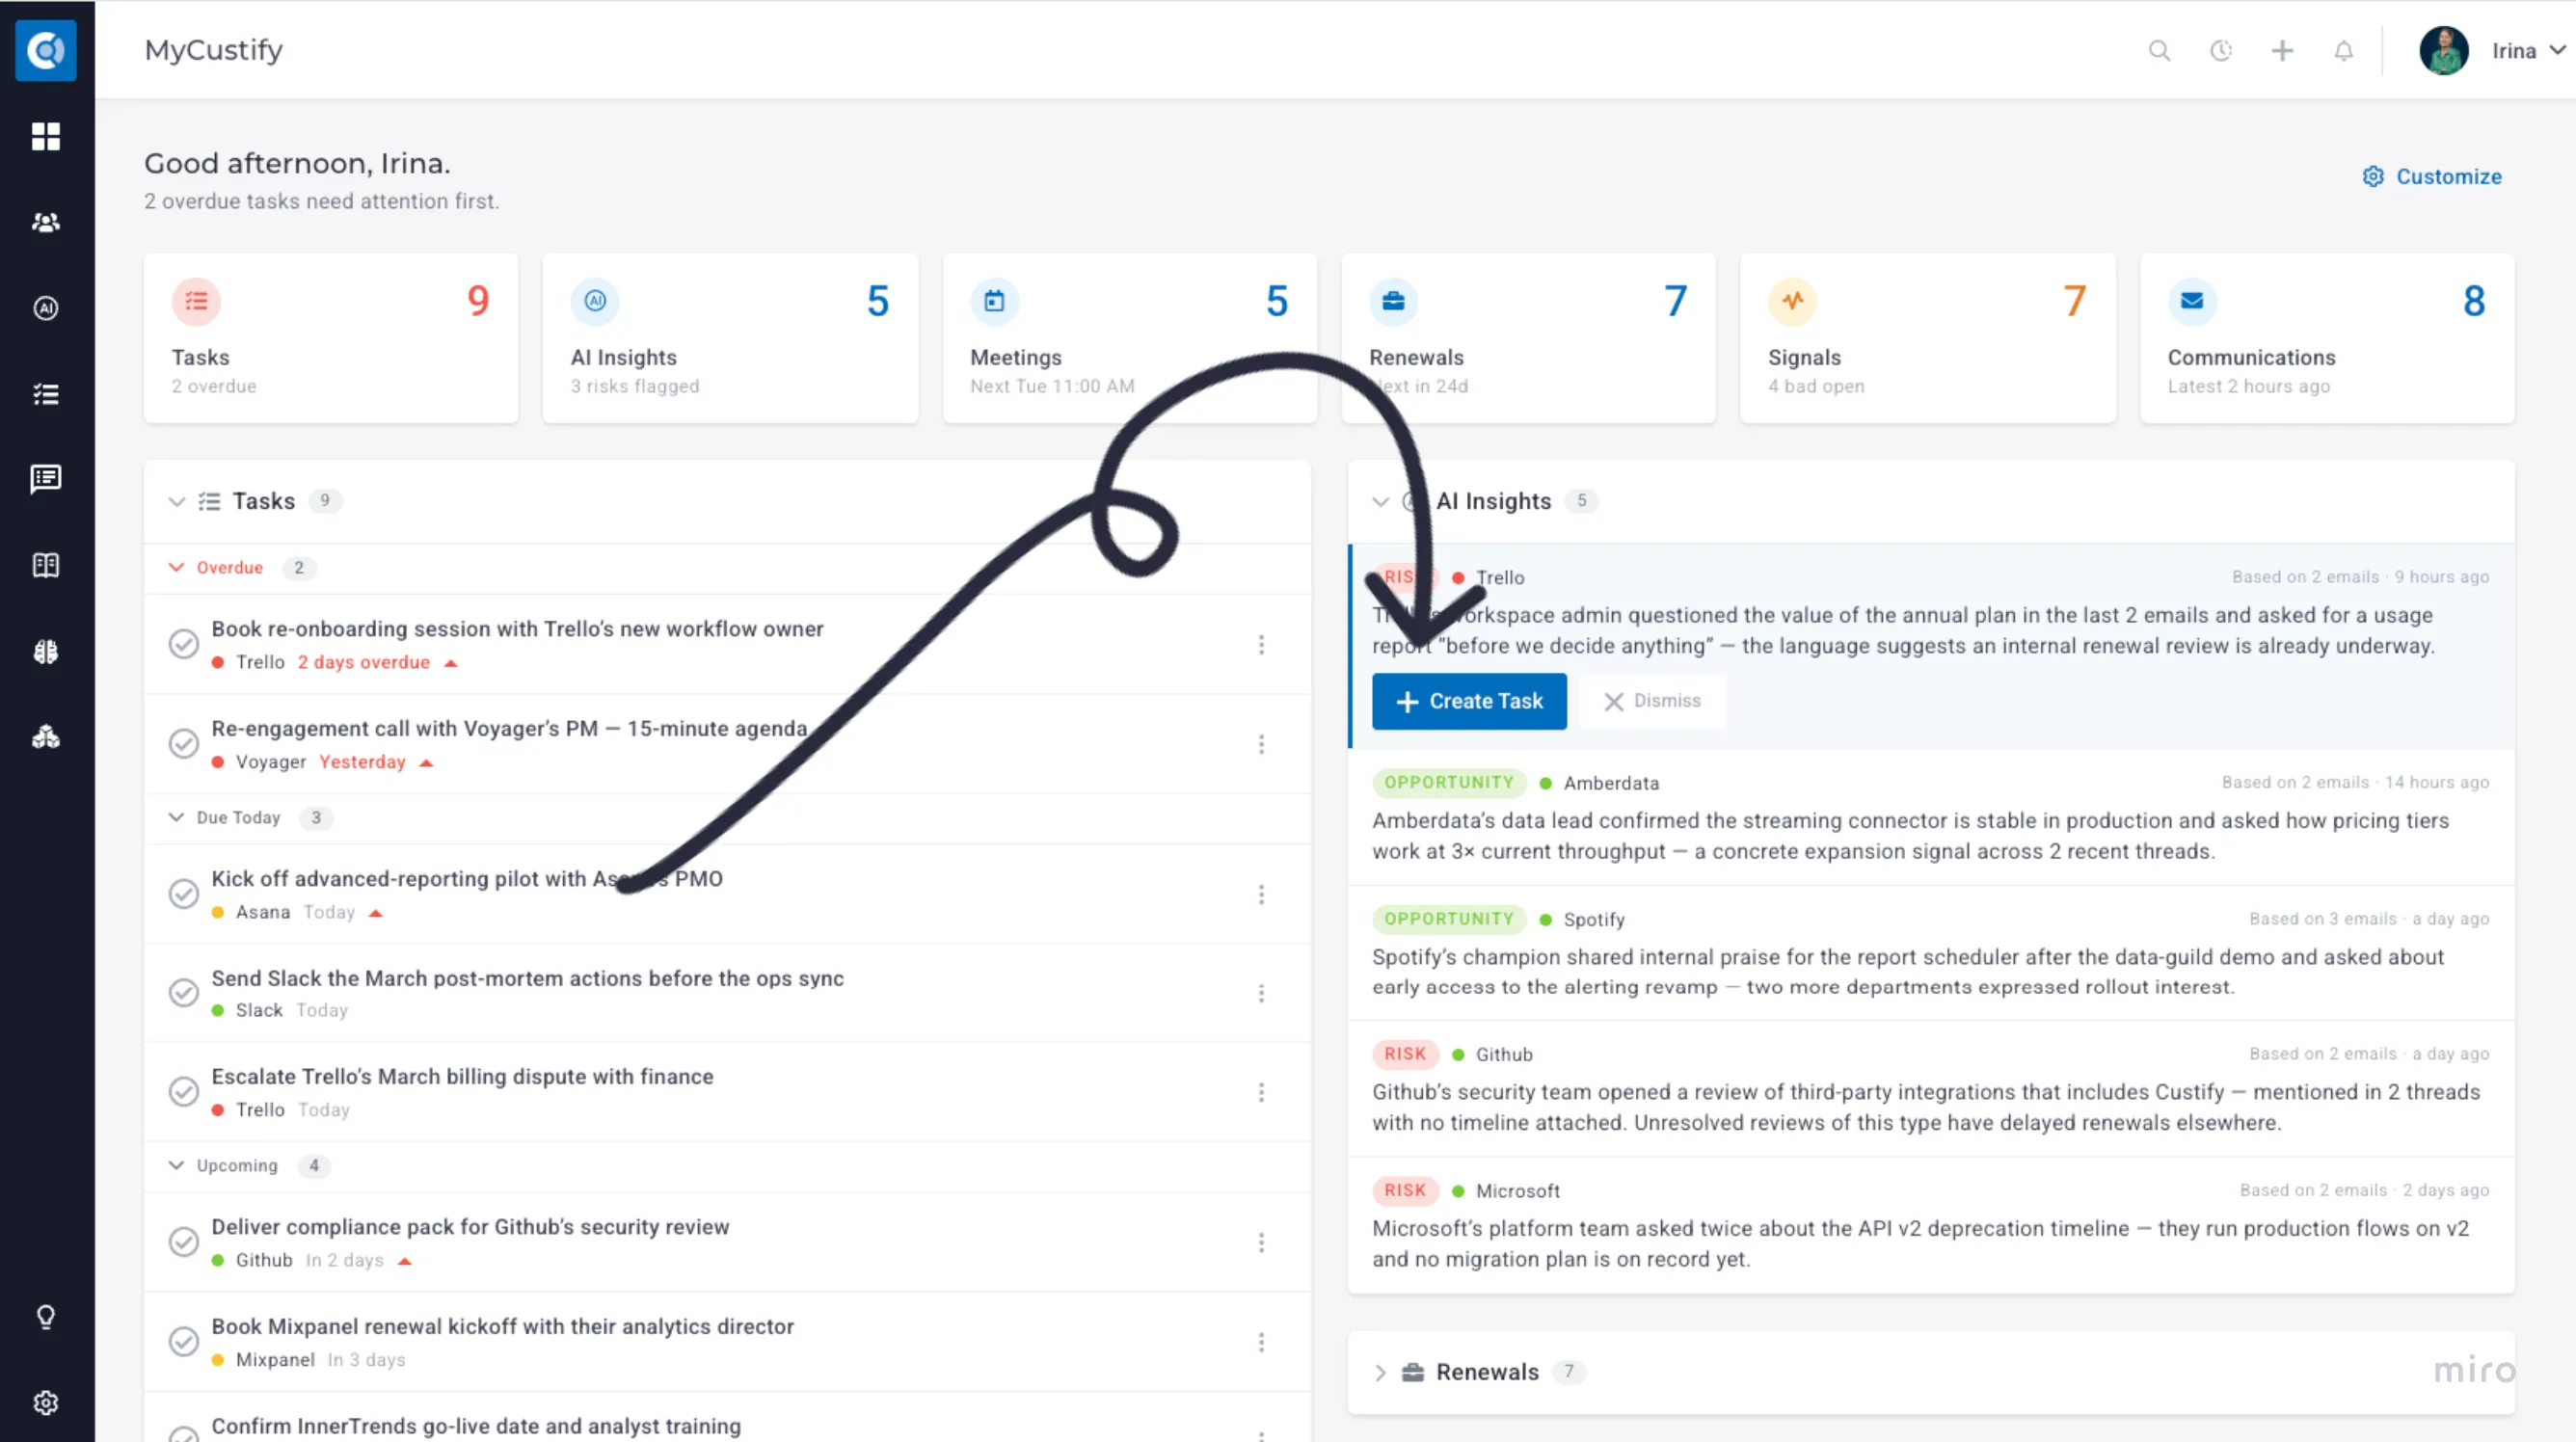
Here’s what MyCustify helps you do:
- Catch risks early: CustifyAI reads your recent customer conversations and flags risks and expansion opportunities, so warning signs don’t get buried in long email threads.
- Never miss a renewal: see every upcoming renewal with its MRR, health, and days left, so you can prioritize the accounts that need you most.
- Stay on top of your day: overdue tasks, today’s priorities, and upcoming meetings are all in one place.
- Respond faster: reply to your latest customer emails in one click.
MyCustify adapts to the way you work. Reorder the sections, hide the ones you don’t need, and make it truly yours.
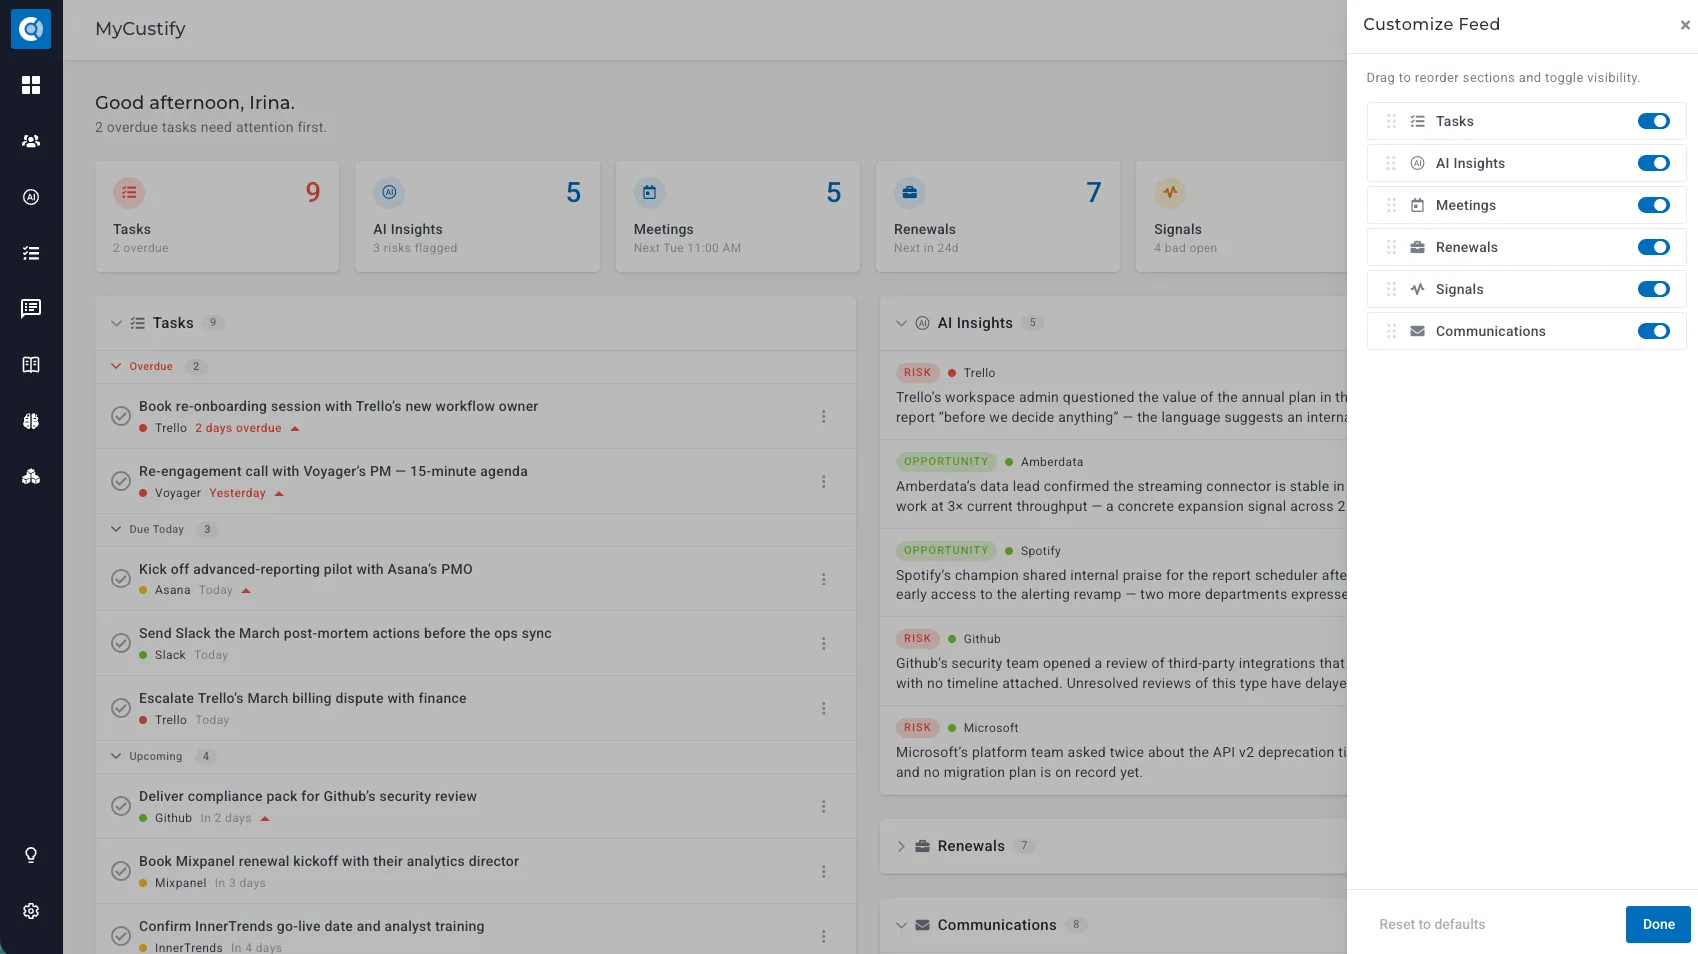
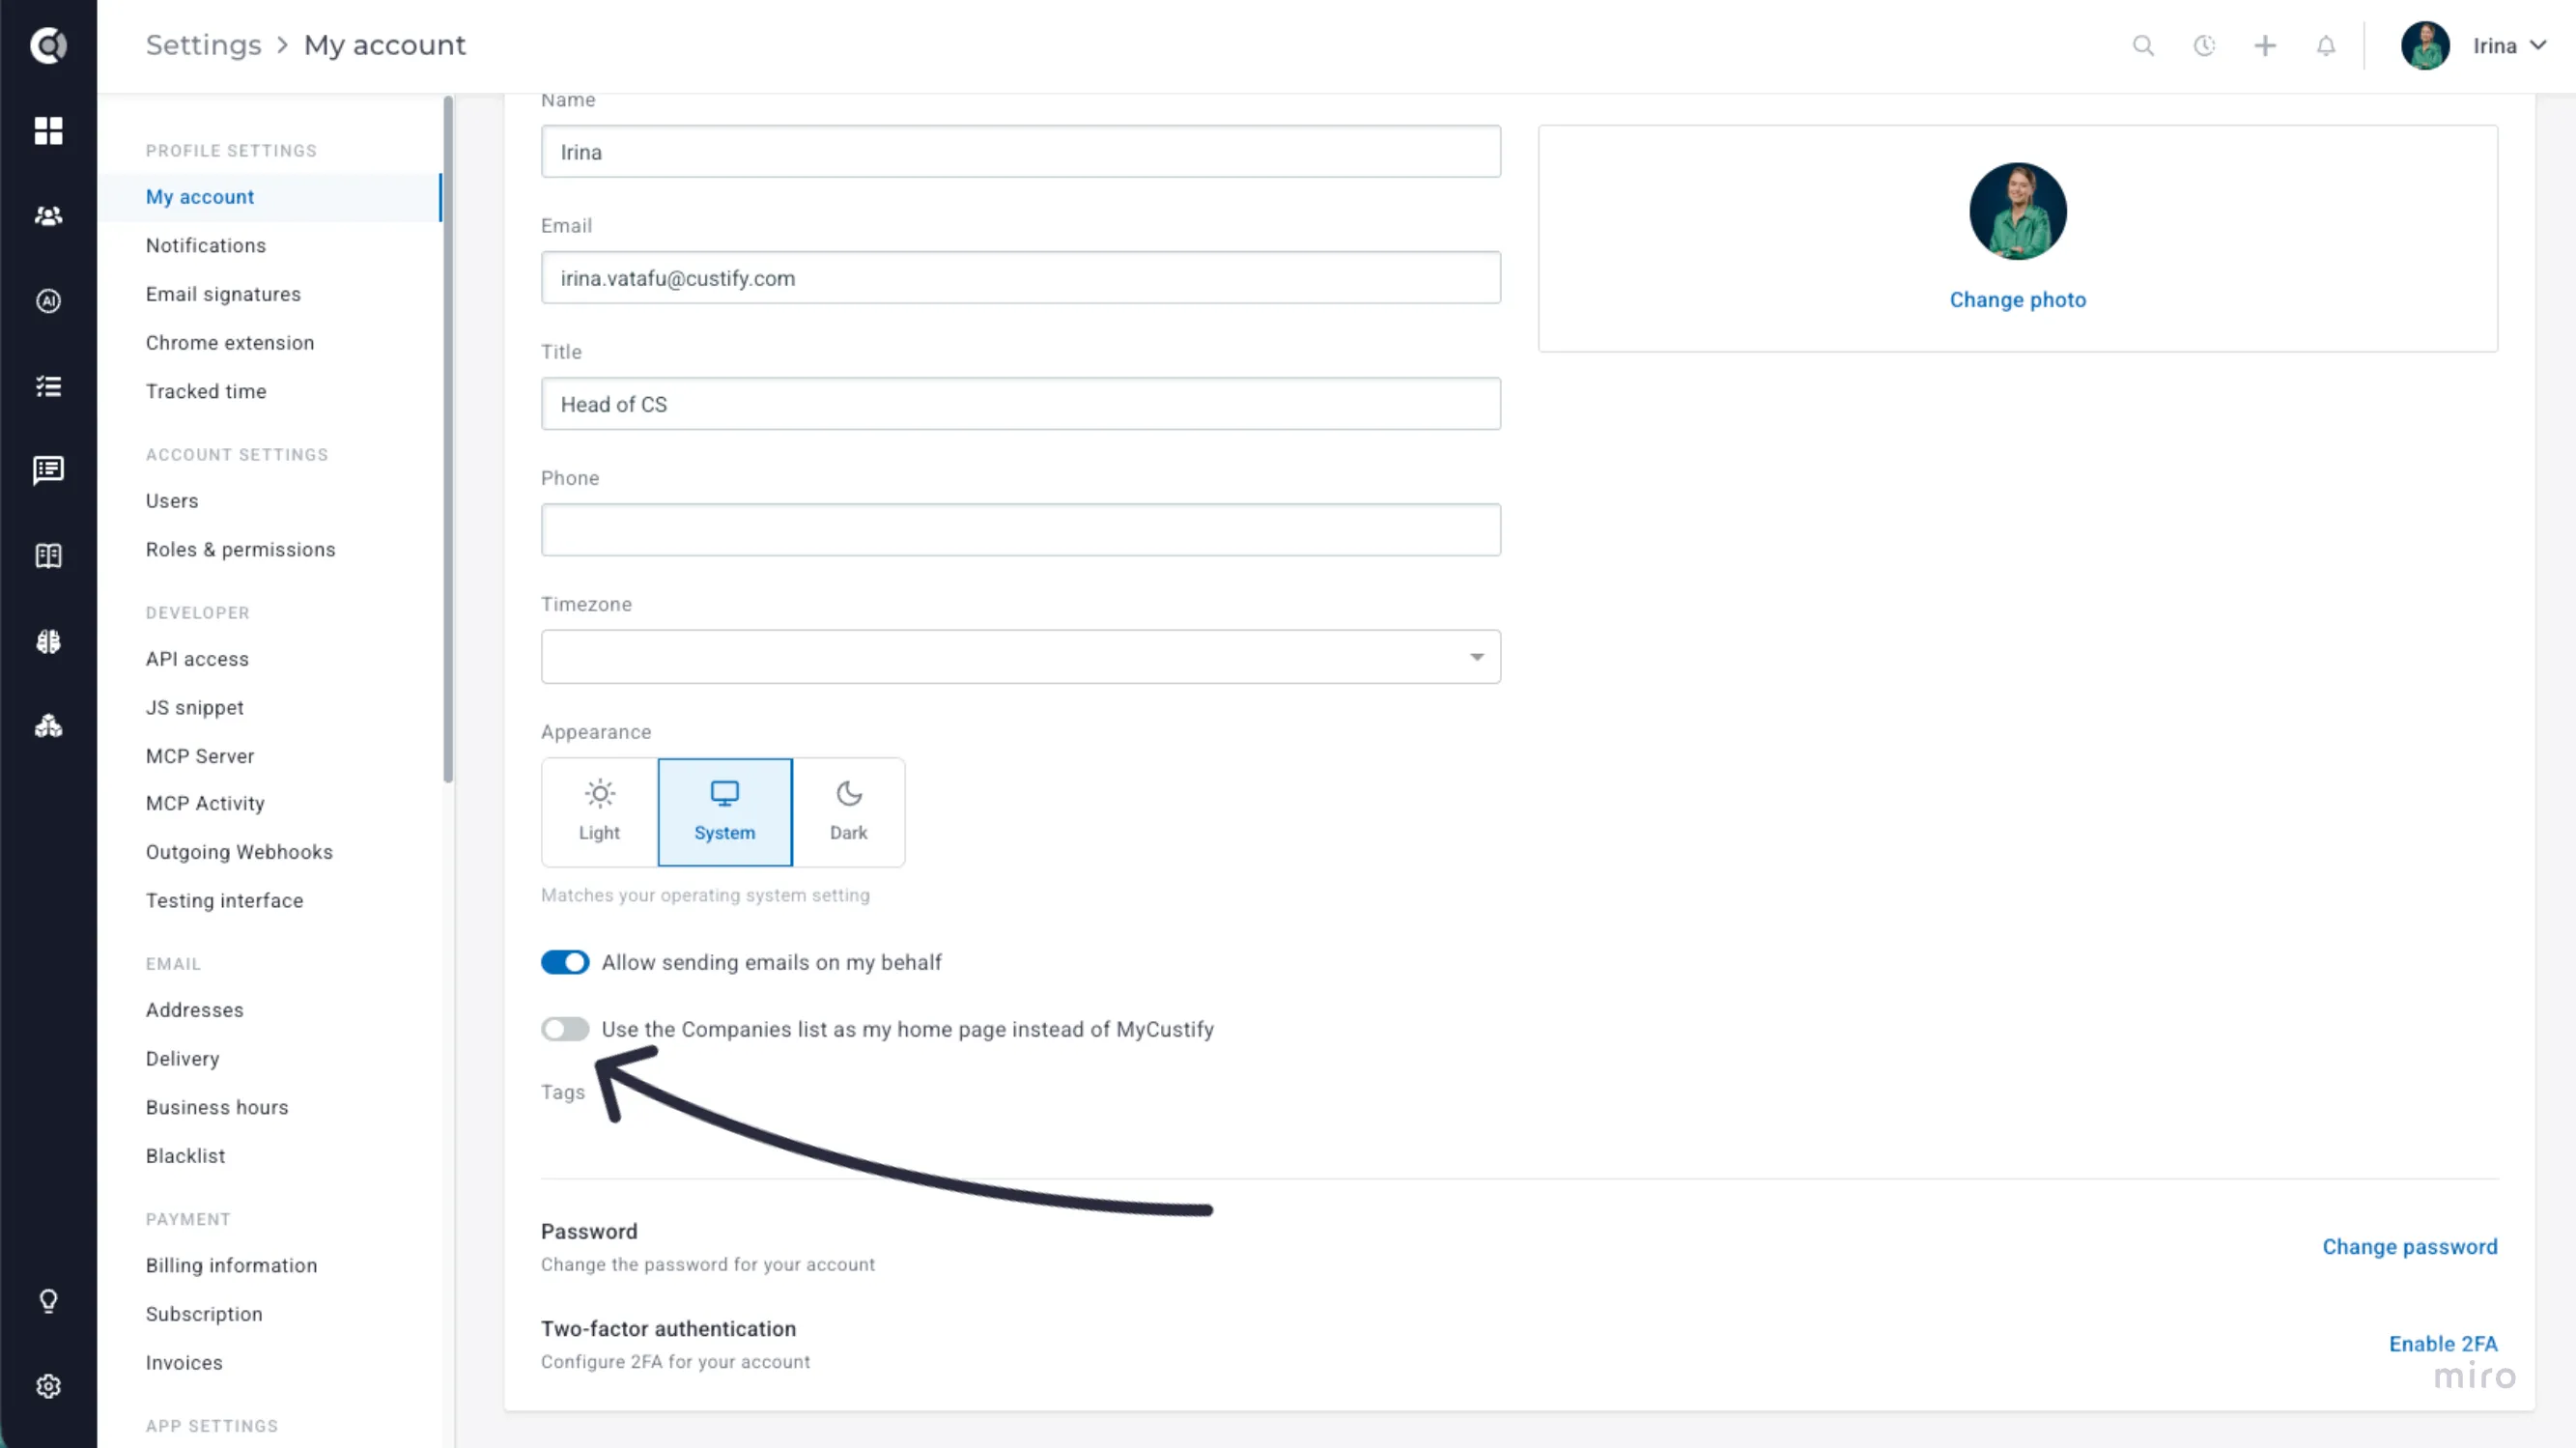
How to use it: MyCustify is your new home page after login, with no setup needed. Connect your calendar and inbox to get the full picture, and enable CustifyAI to see AI insights. Click Customize to arrange your sections. Prefer the Companies list? Go to Settings > My account and turn on Use the Companies list as my home page instead of MyCustify.
For more details, see MyCustifyMyCustify.
Playbooks for Multiple Companies and Multiple People
Until now, playbooks worked one customer at a time: a company entered the playbook through a segment or trigger, and every action ran for that single company. That’s ideal for customer journeys, but it doesn’t help with one of the most common CS needs: a single update that looks across your whole portfolio. Think of a weekly digest of at-risk accounts for your team leads, a monthly summary of new customers for leadership, or a Monday ranking of top MRR movers in Slack.
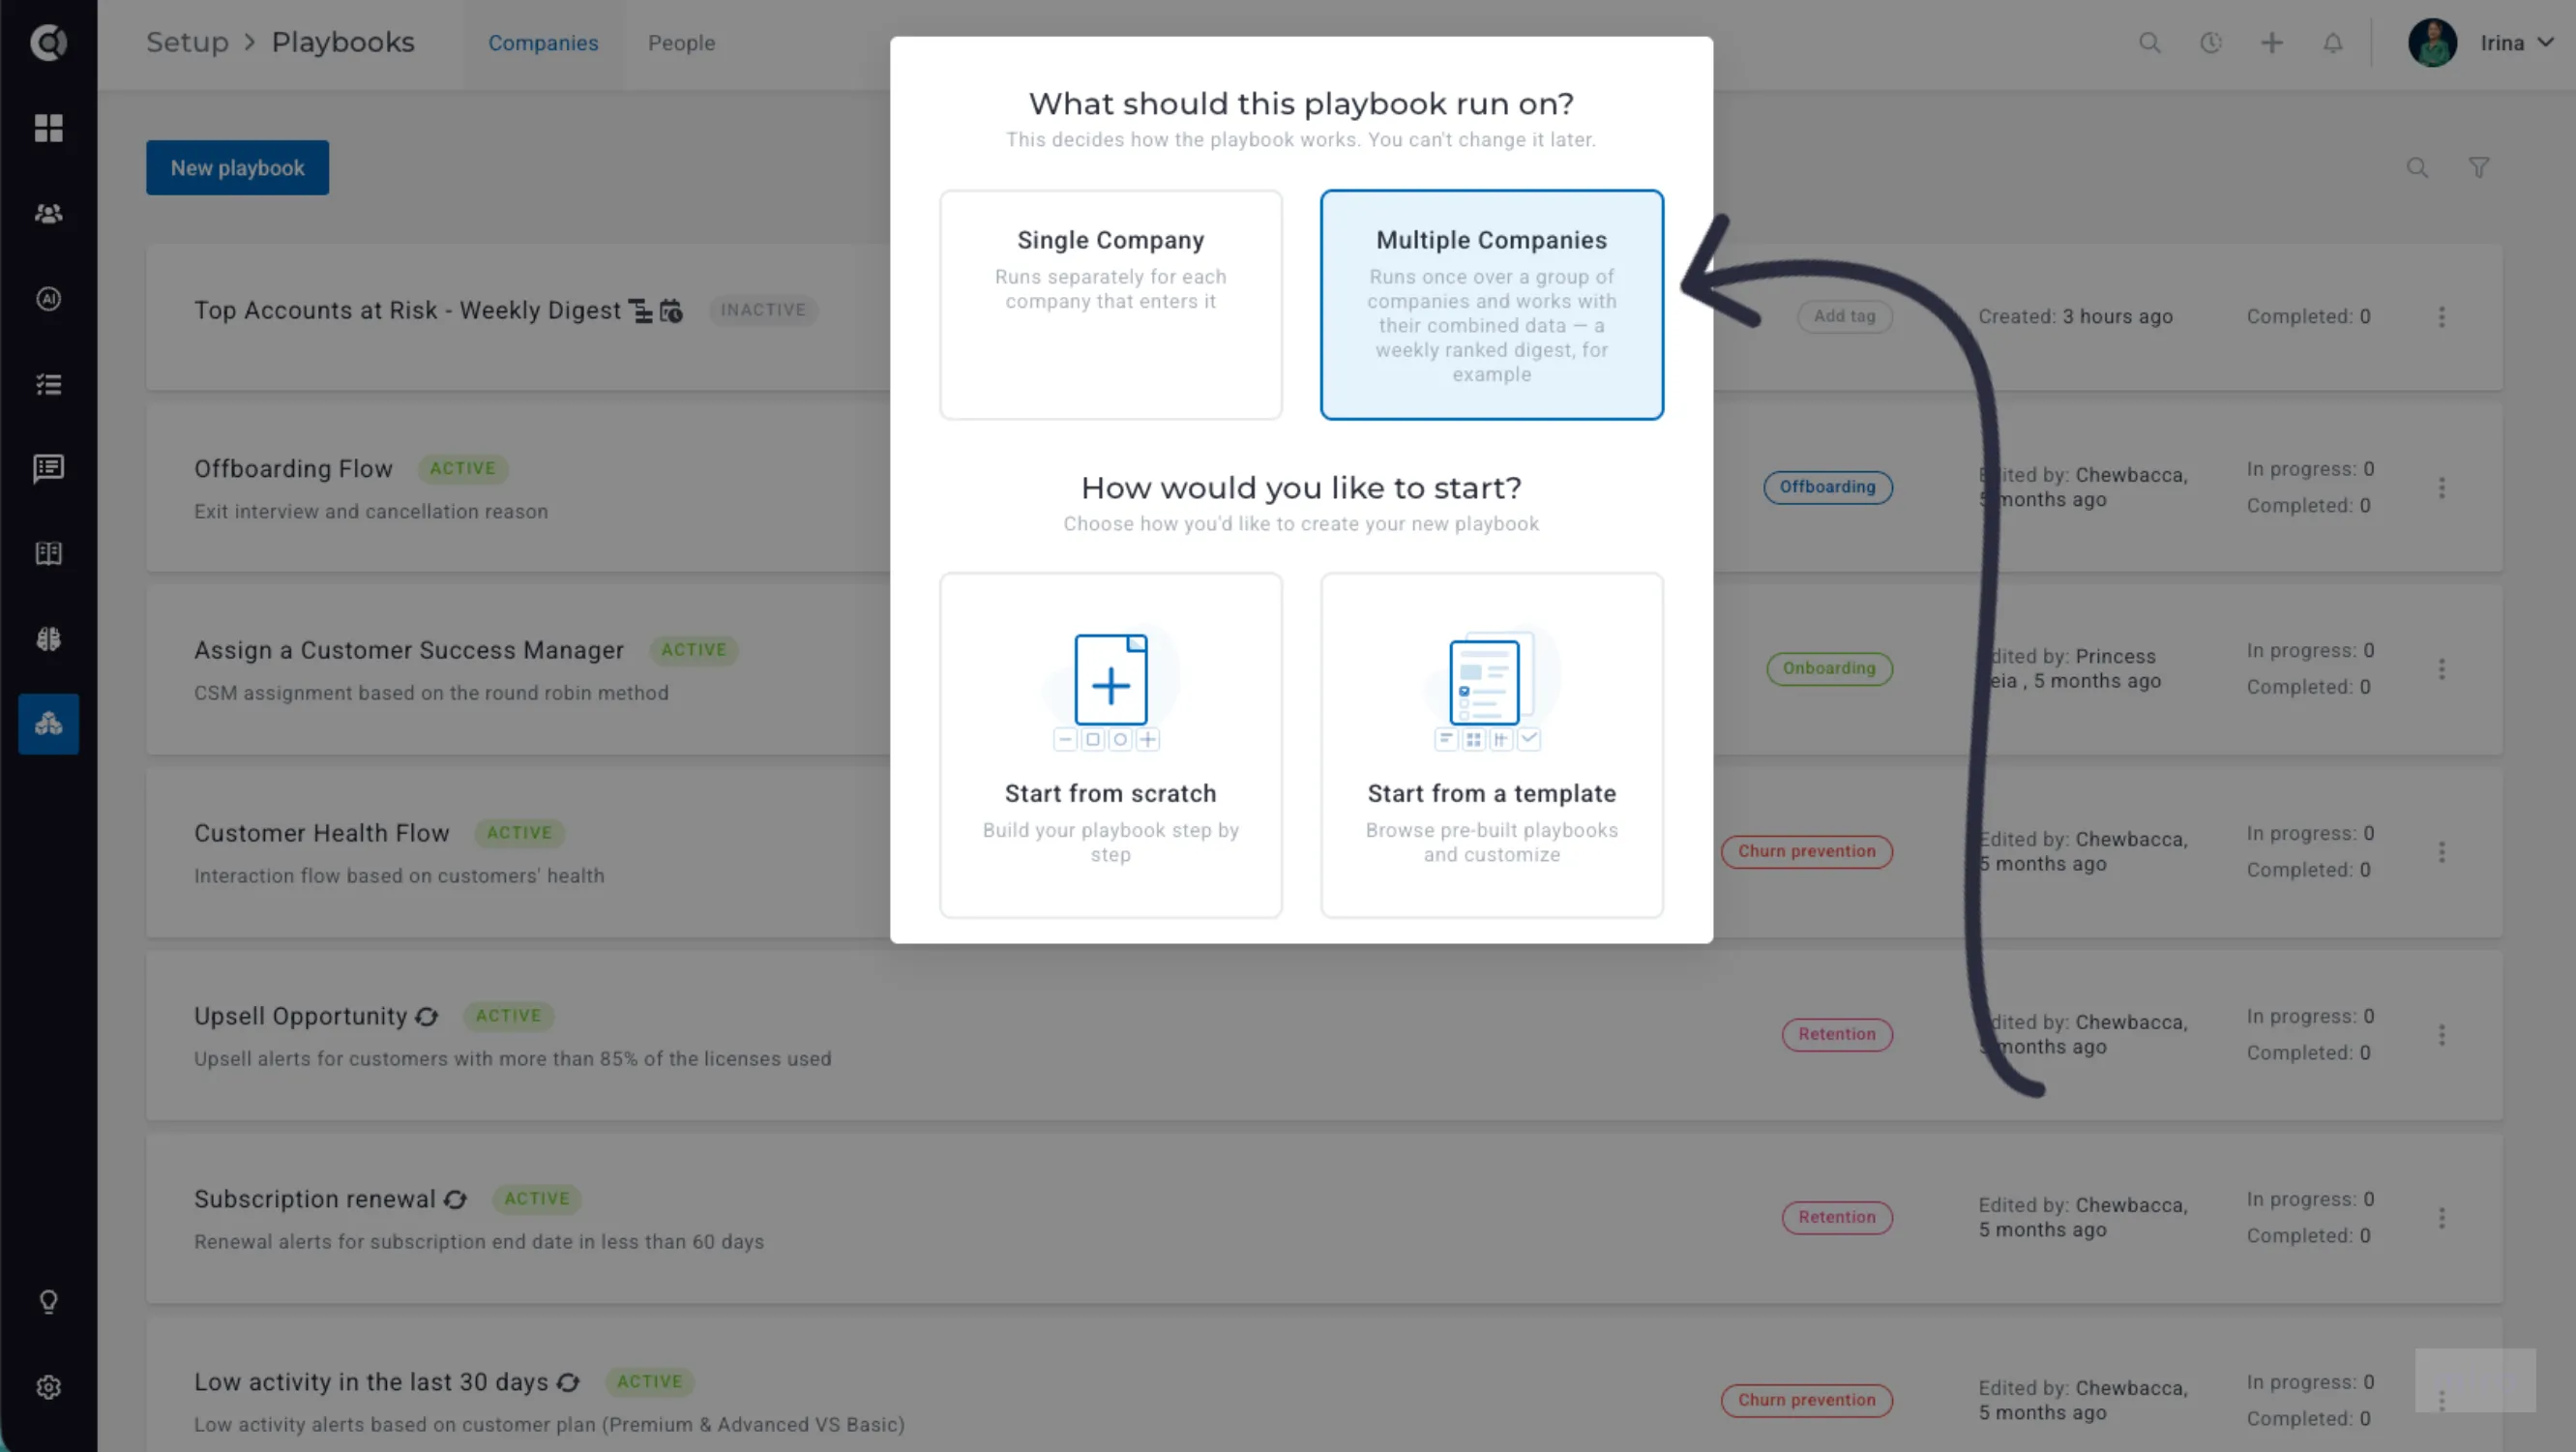
With the new Multiple Companies and Multiple People playbooks, one run works over a whole group of companies or people and uses their combined data. These playbooks don’t need a segment or a customer to enter them. They simply run manually whenever you need them, or on a schedule you set.
Each playbook starts with a data set, the group of companies or people you want to report on. You can filter it by segments or attributes, sort it, and limit it (for example, your 10 largest accounts).
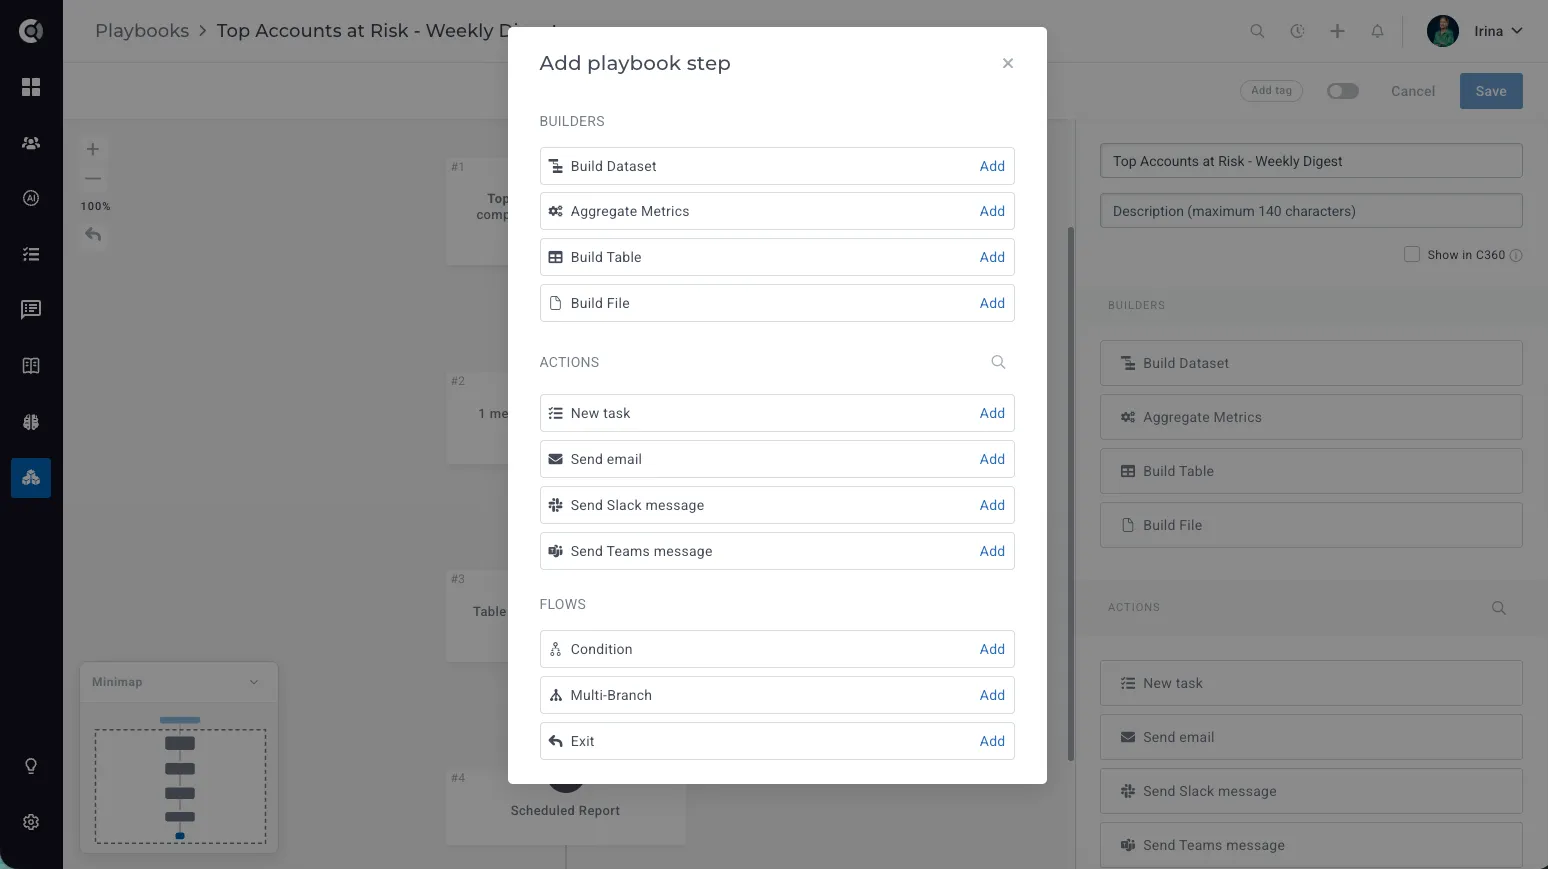
Everything else builds on that data set:
- Aggregate Metrics calculate totals, averages, minimums, maximums, or counts, such as total MRR or the number of overdue tasks.
- Build Table turns your data set into a clean table, with company names linking straight back to Custify.
- Build File creates a CSV file you can attach to an email.
Then share the results by email, Slack, or Teams, or create a task. Add conditions to adapt the message based on the numbers.
How to use it: Go to Playbooks, click New playbook and select Multiple Companies (or Multiple People in the People tab). Start from scratch, or pick a ready-made template such as Weekly Portfolio Digest or New Customers Summary. Choose a manual or scheduled trigger, add a Build Dataset step first, then add your metrics, table, and message.
For more details, see Portfolio PlaybooksPortfolio Playbooks.
Playbook Step Actions and Email Stats
You’ve built playbooks to save time and engage customers at the right moment. But how do you know they’re working? Until now, that meant opening email steps one by one or digging through tasks and notes to find out what a playbook had done. Now every playbook comes with its own performance view, organized in three tabs: Overview, Step Actions, and Email Stats.
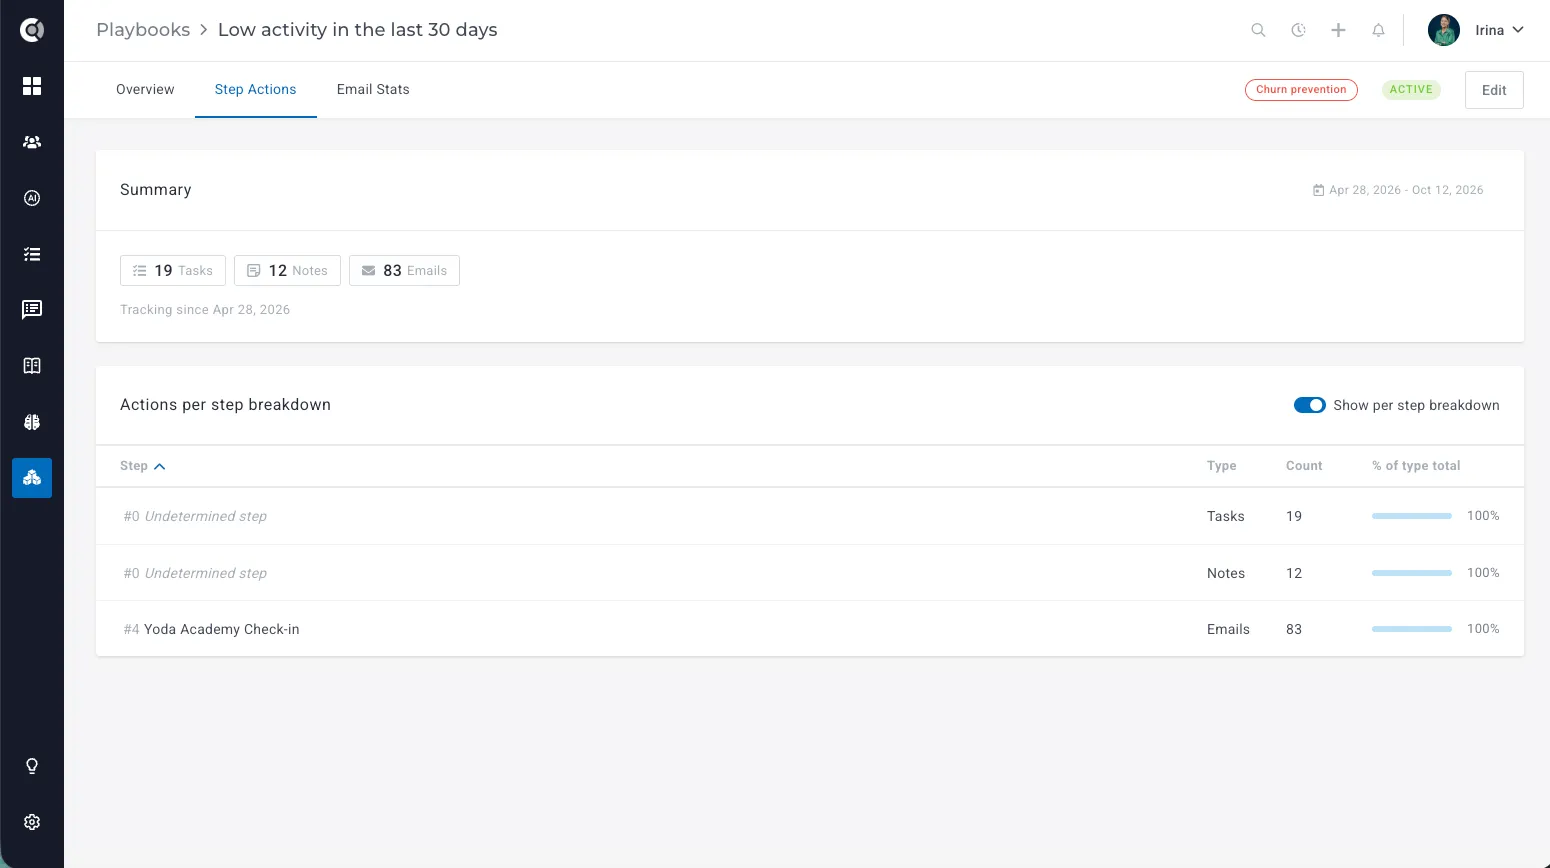
Step Actions shows everything a playbook has produced: tasks, notes, emails, notifications, Slack, Teams, and Intercom messages, surveys, webhook calls, Zapier triggers, and events. See the breakdown for each step, filter by date range, and click through to the exact tasks or notes a playbook created. It’s the easiest way to check that your automation is doing what you designed it to do.
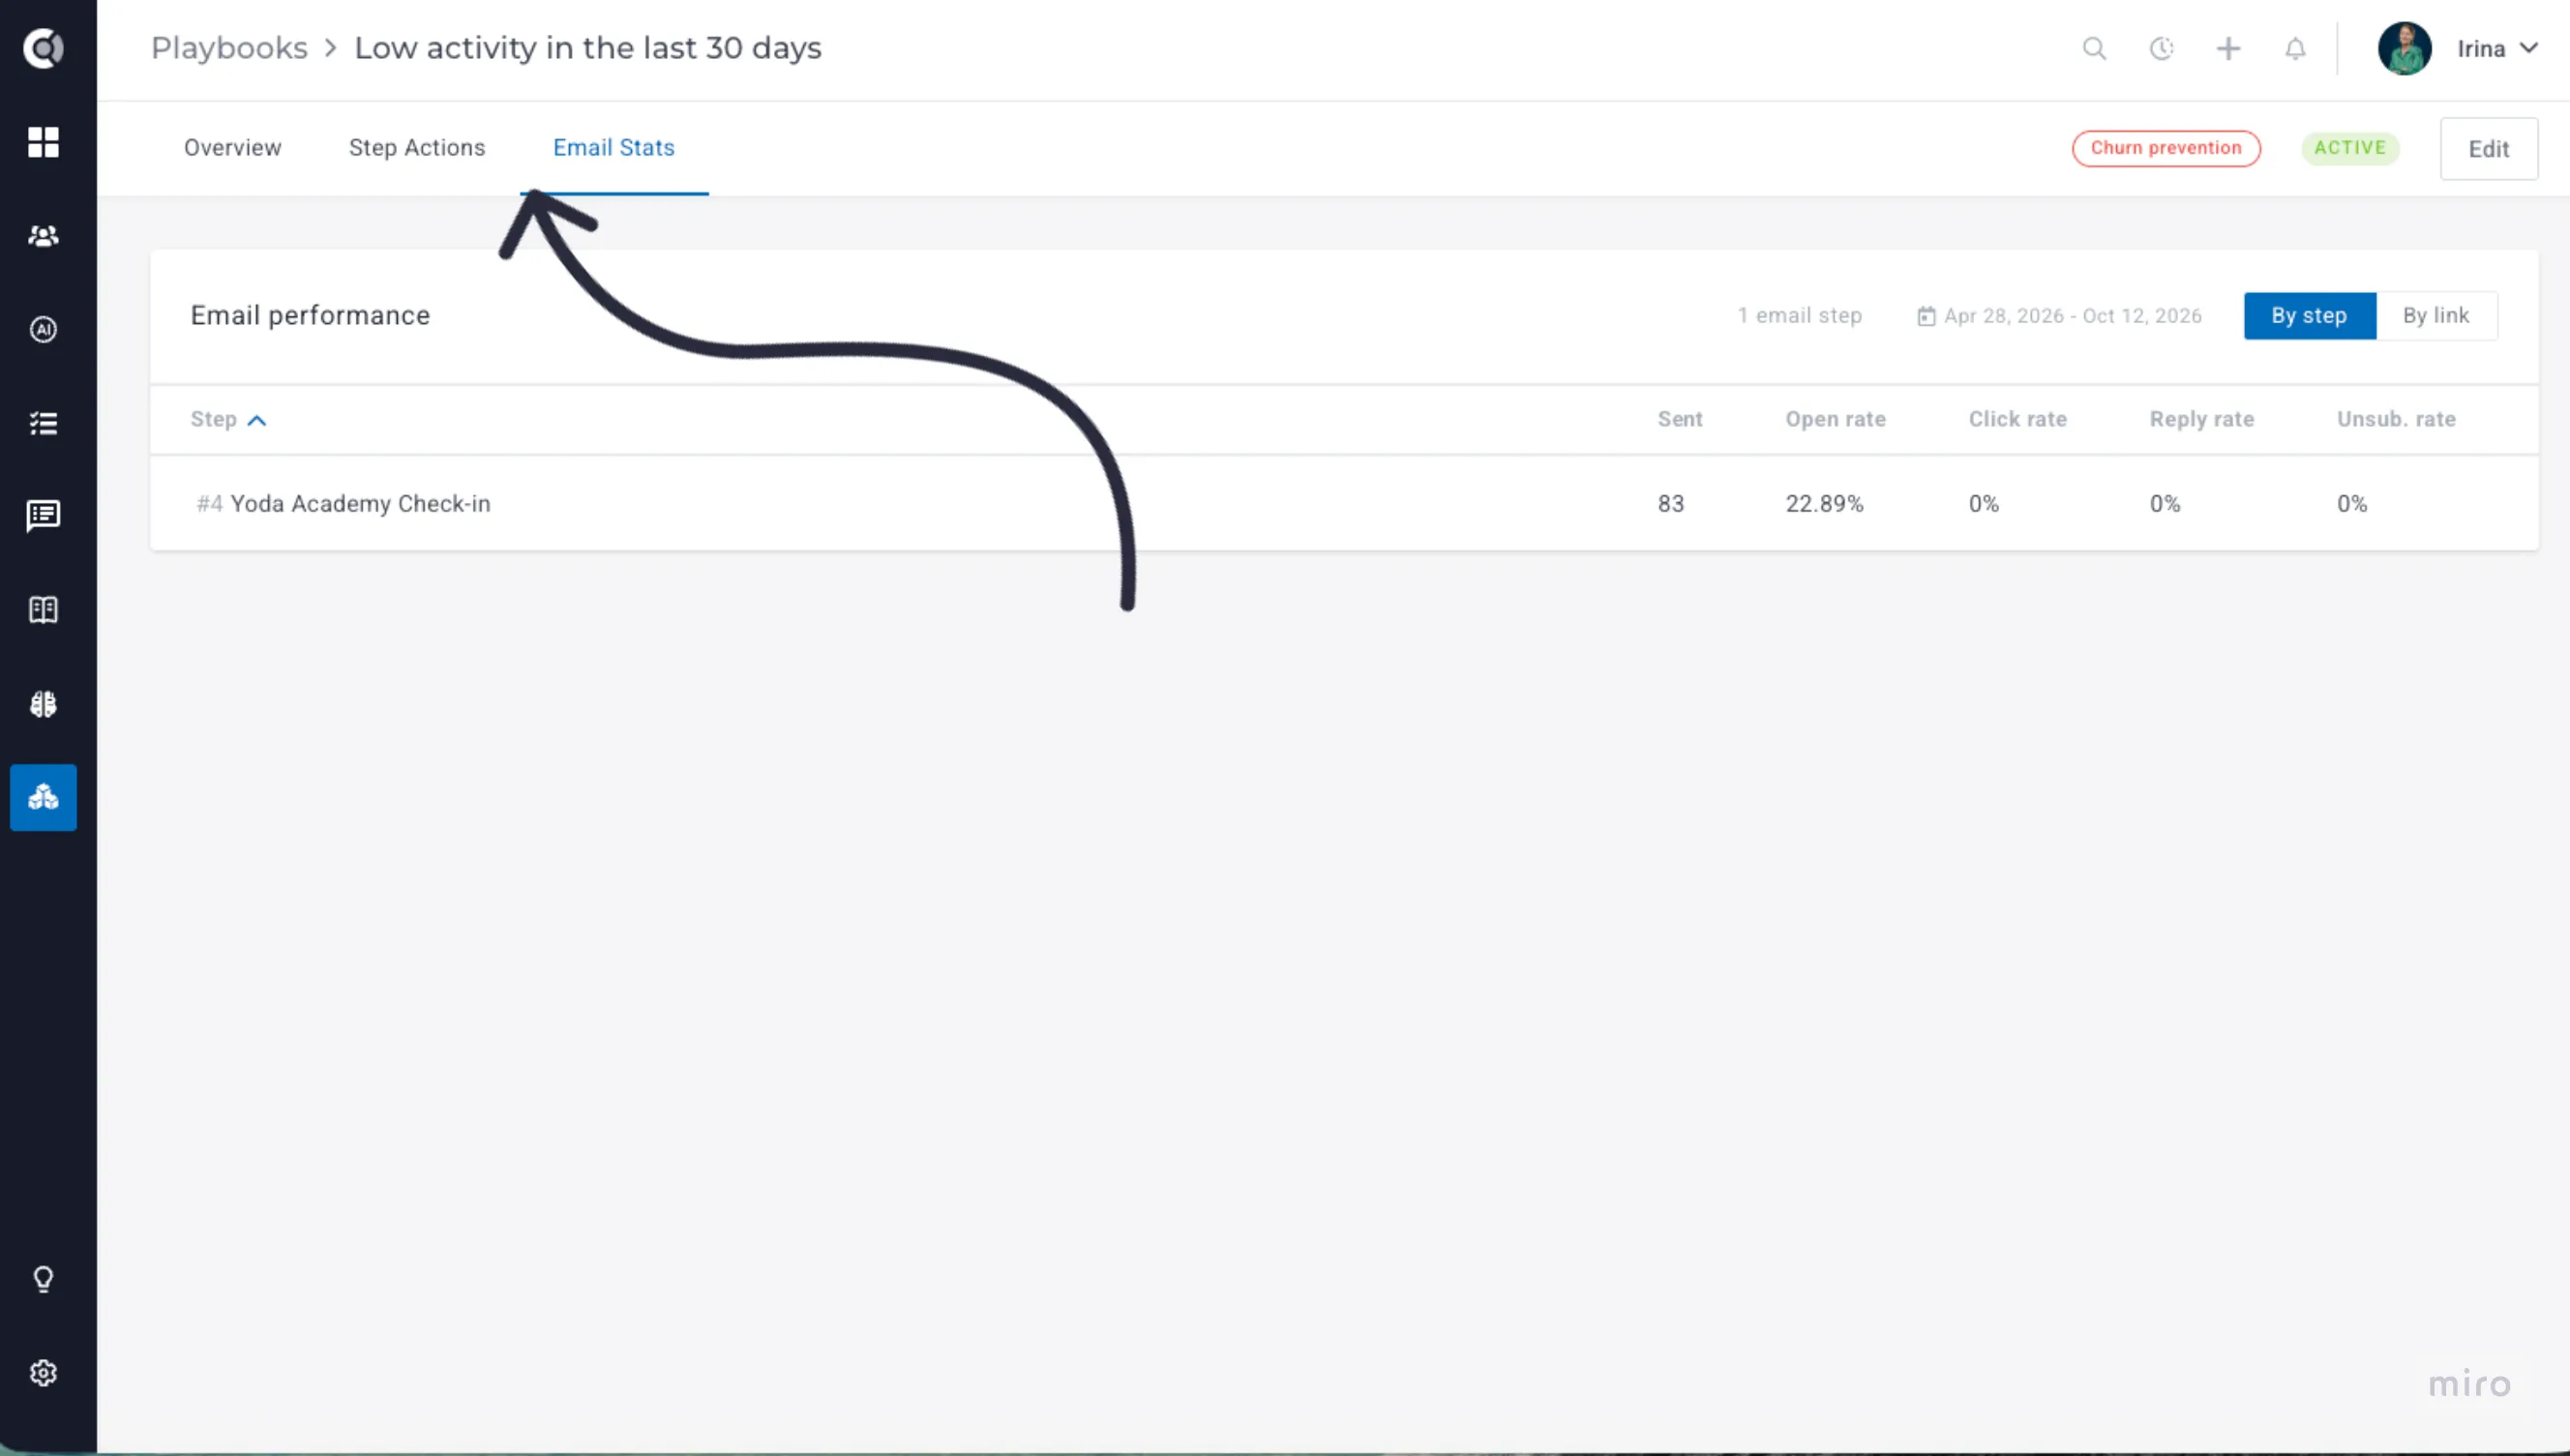
Email Stats brings the performance of every email step together in one place, which makes it easy to compare emails in a sequence or across branches:
• By step: sent, open rate, click rate, reply rate, and unsubscribe rate for every email in the playbook.
• By link: how each link included in the emails sent performs, so you know which content, resources, or calls to action your customers actually click.
Spot the email that loses your audience, find the subject lines that work, and improve your playbooks based on real results instead of guesses.
How to use it: Open any playbook and switch between the Overview, Step Actions, and Email Stats tabs at the top. The Email Stats tab appears for playbooks that contain email steps. Click a step name in either tab to jump straight to that step in the flow.
Good to know: Step Actions includes history for emails, survey emails, tasks, and notes going back to the Tracking since date shown on the page. Emails and survey emails are linked to the step that sent them, while older tasks and notes appear under Undetermined step, since they can’t be linked to a specific step. Other actions, such as notifications, messages, and webhook calls, are counted from this release on.
Customer Portal
Branding and Custom Domains
Your Customer Portal is where customers follow their success plan, objectives, and shared tasks. Now it can look and feel like a natural part of your own product, giving your customers a consistent, trustworthy brand experience.
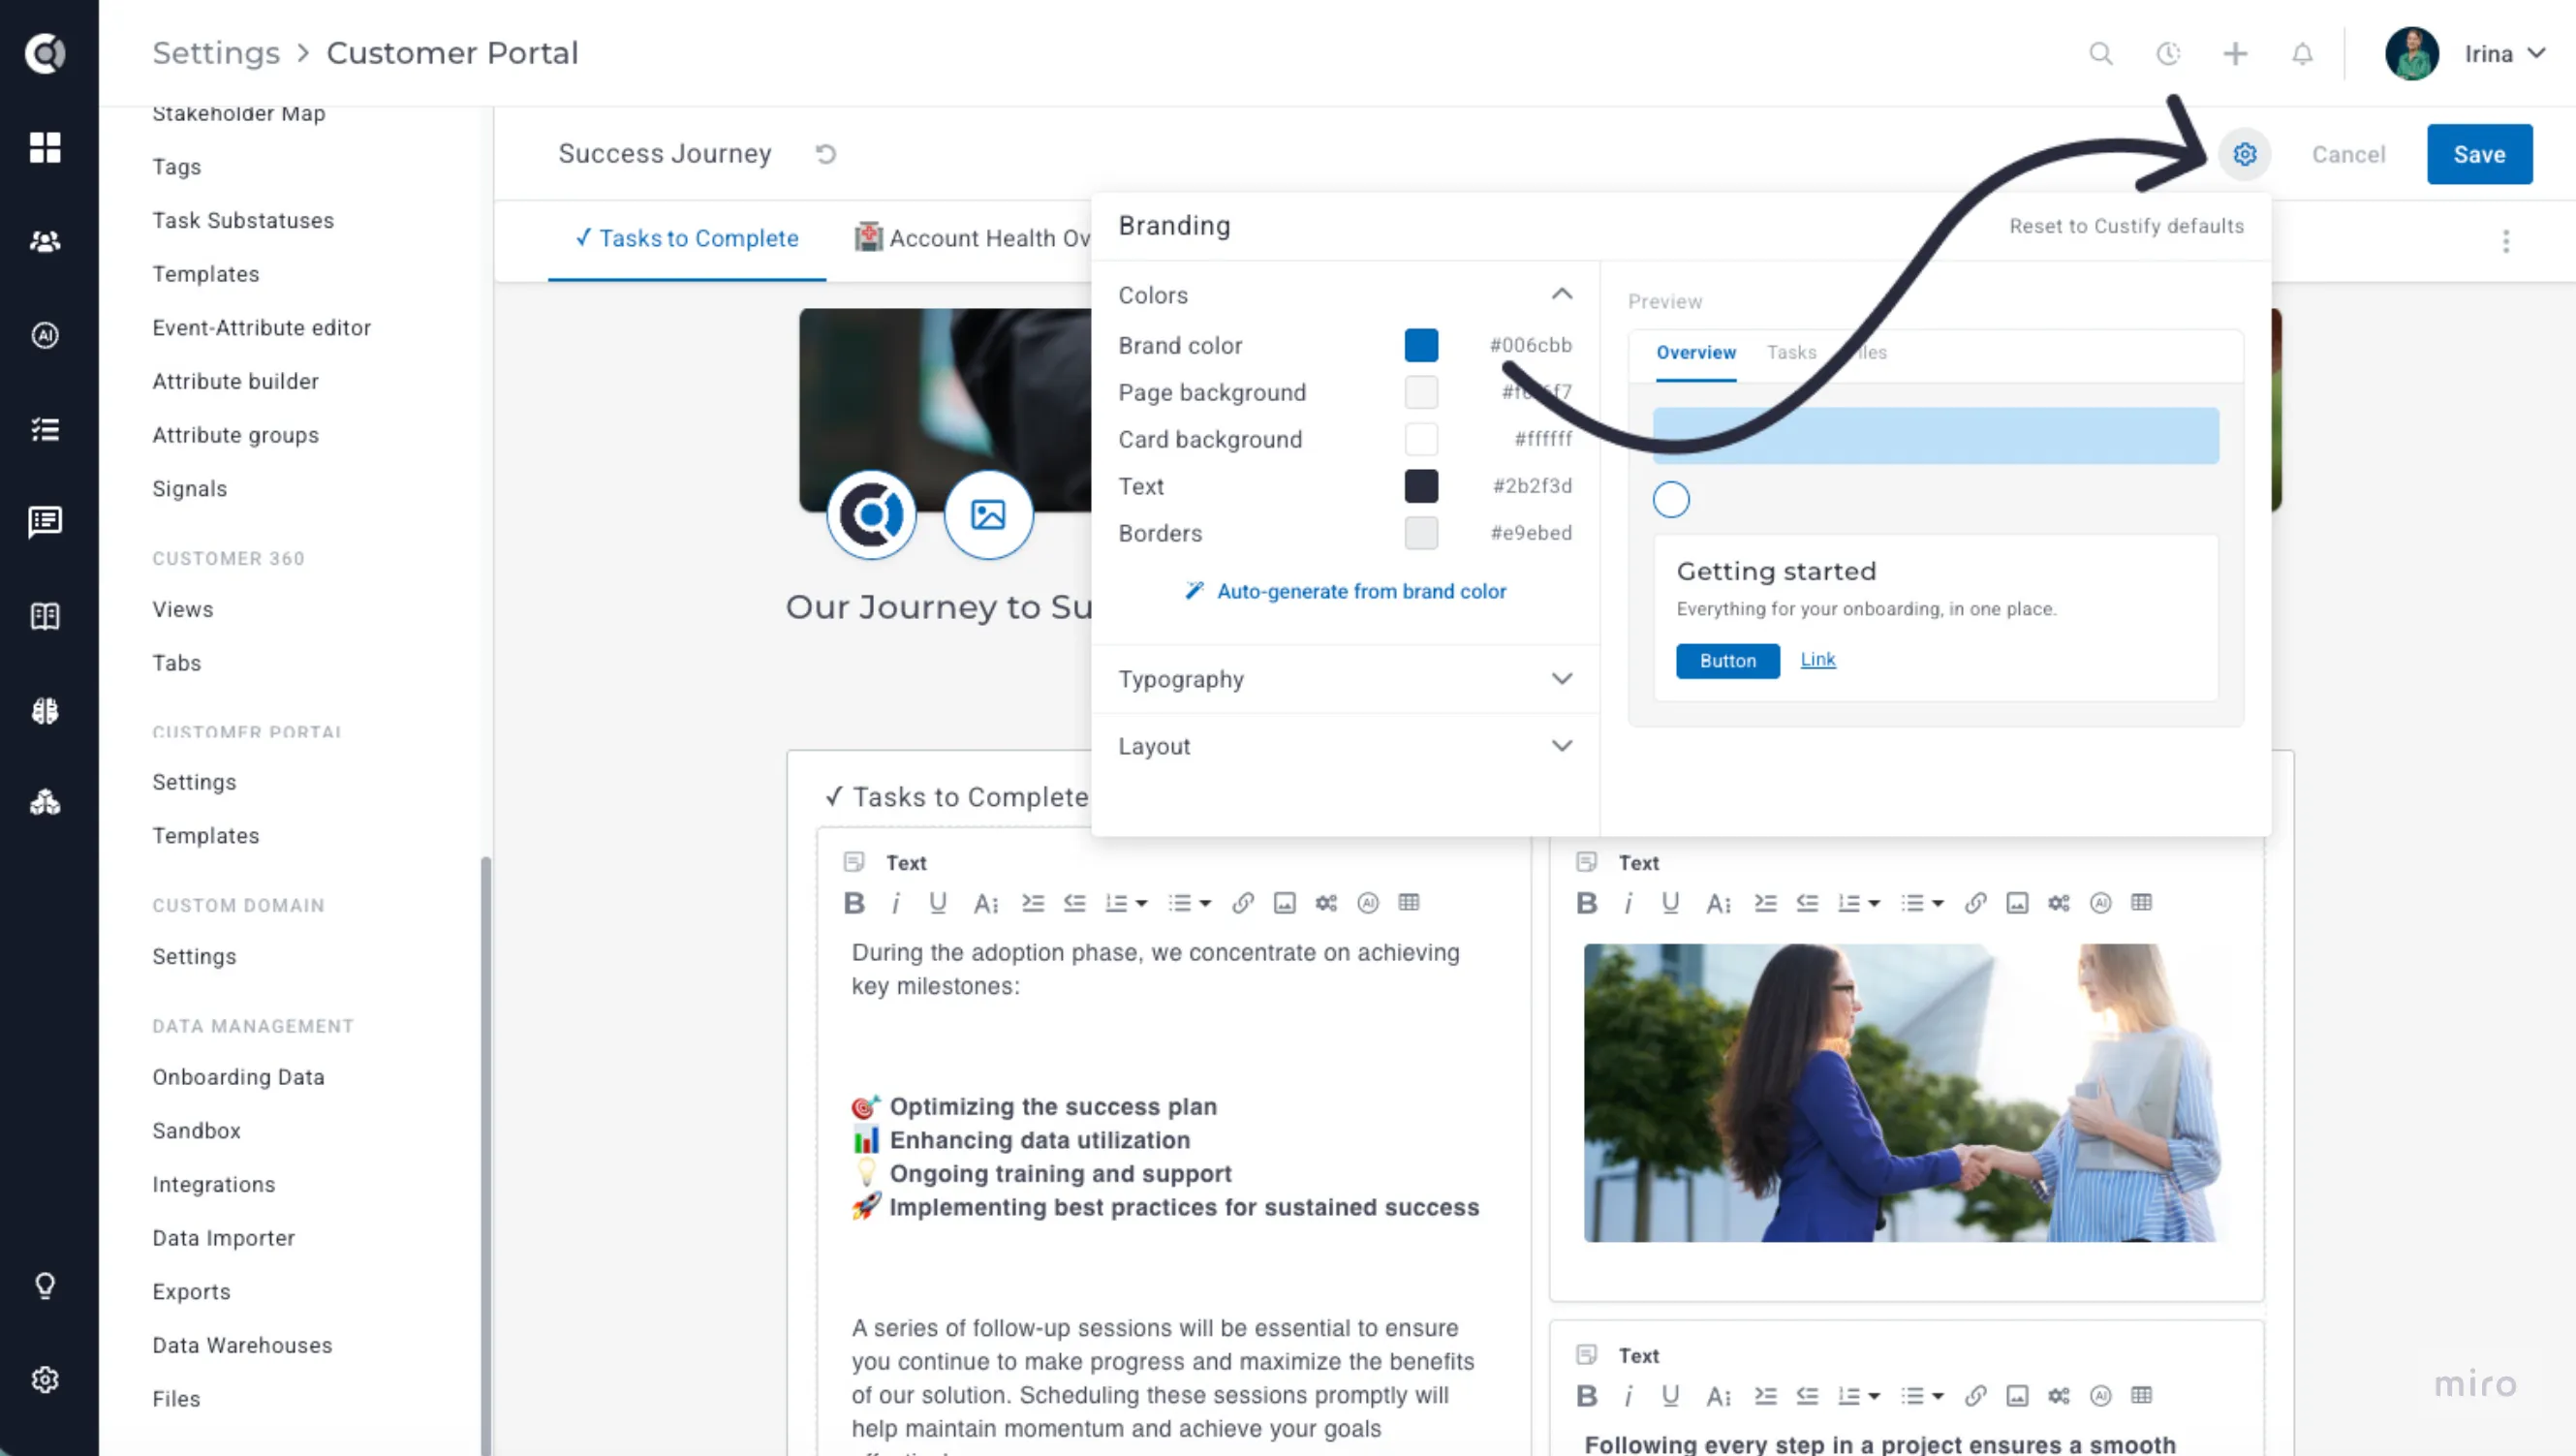
New branding controls let you match the portal to your brand:
• Colors: set the brand color, page background, card background, text, and borders, or generate all five automatically from your brand color and fine tune them from there.
• Fonts: choose separate fonts for headings and body text, from 13 options including Inter, Open Sans, Lato, Poppins, Merriweather, and Playfair Display.
• Content width: Narrow, Default, Wide, or Full.
A live preview shows your changes as you make them. Set your branding once on a portal template, and adjust it for individual customers when needed.
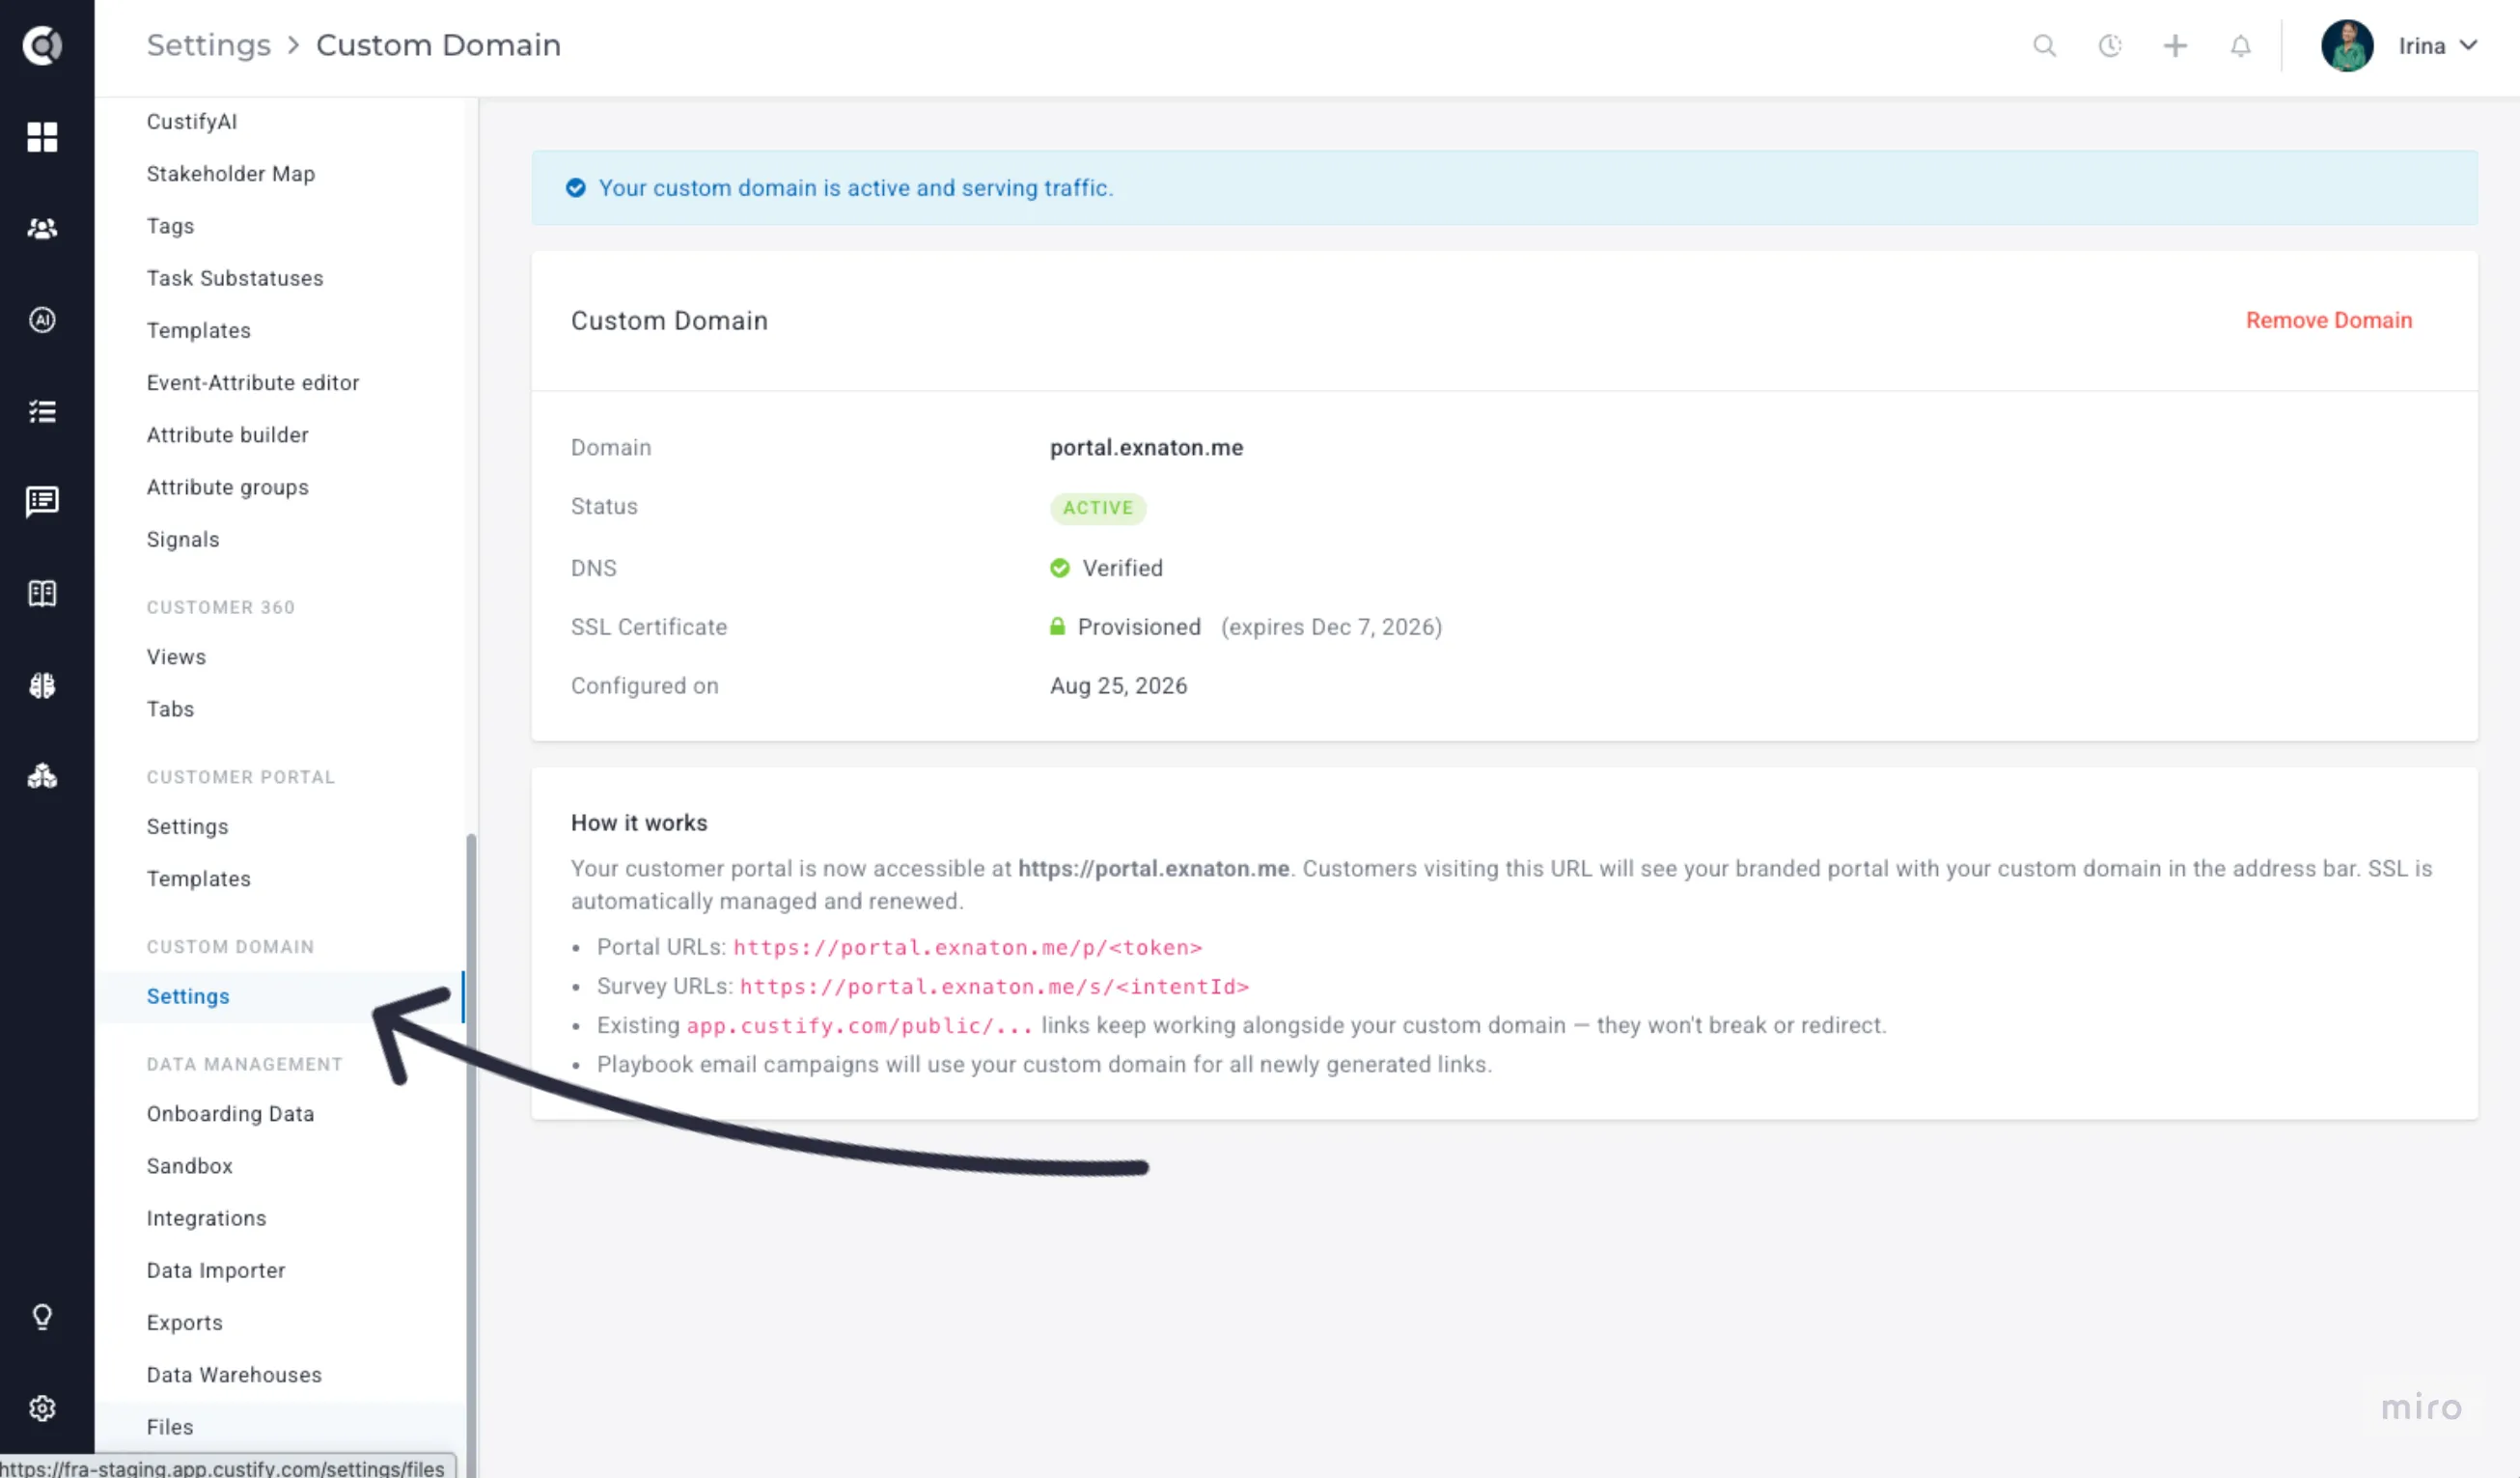
To complete the experience, you can also serve your Customer Portal and survey pages on your own branded domain, such as portal.yourcompany.com, instead of a Custify link. Customers see an address they recognize and trust. SSL certificates are handled automatically, and the original links keep working, so nothing you’ve already shared breaks. Custom Domains is available as a paid add-on.
How to use it: To customize branding, click the gear icon in the portal editor toolbar, either on a template (Settings > Customer Portal) or on a company’s portal in the Customer 360. For custom domains, go to Settings > Custom Domain > Settings and point your domain to Custify with a CNAME record. Your branded pages go live automatically, with a secure certificate, as soon as the record is verified.
Embed the Customer Portal in your product
Make the portal part of your customers’ everyday workflow. With the Custify JavaScript snippet, you can give customers access to their portal directly from inside your own product, right where they already work. More visibility means more engagement with their success plan. The setup steps are available in our public API documentation.
Dynamic Customer 360
Activity Snapshot
The new Activity Snapshot block shows an account’s upcoming and recent activity in one place on the Customer 360. You can see the next planned steps and the latest interactions without opening the Tasks, Meetings, or Activity tabs.
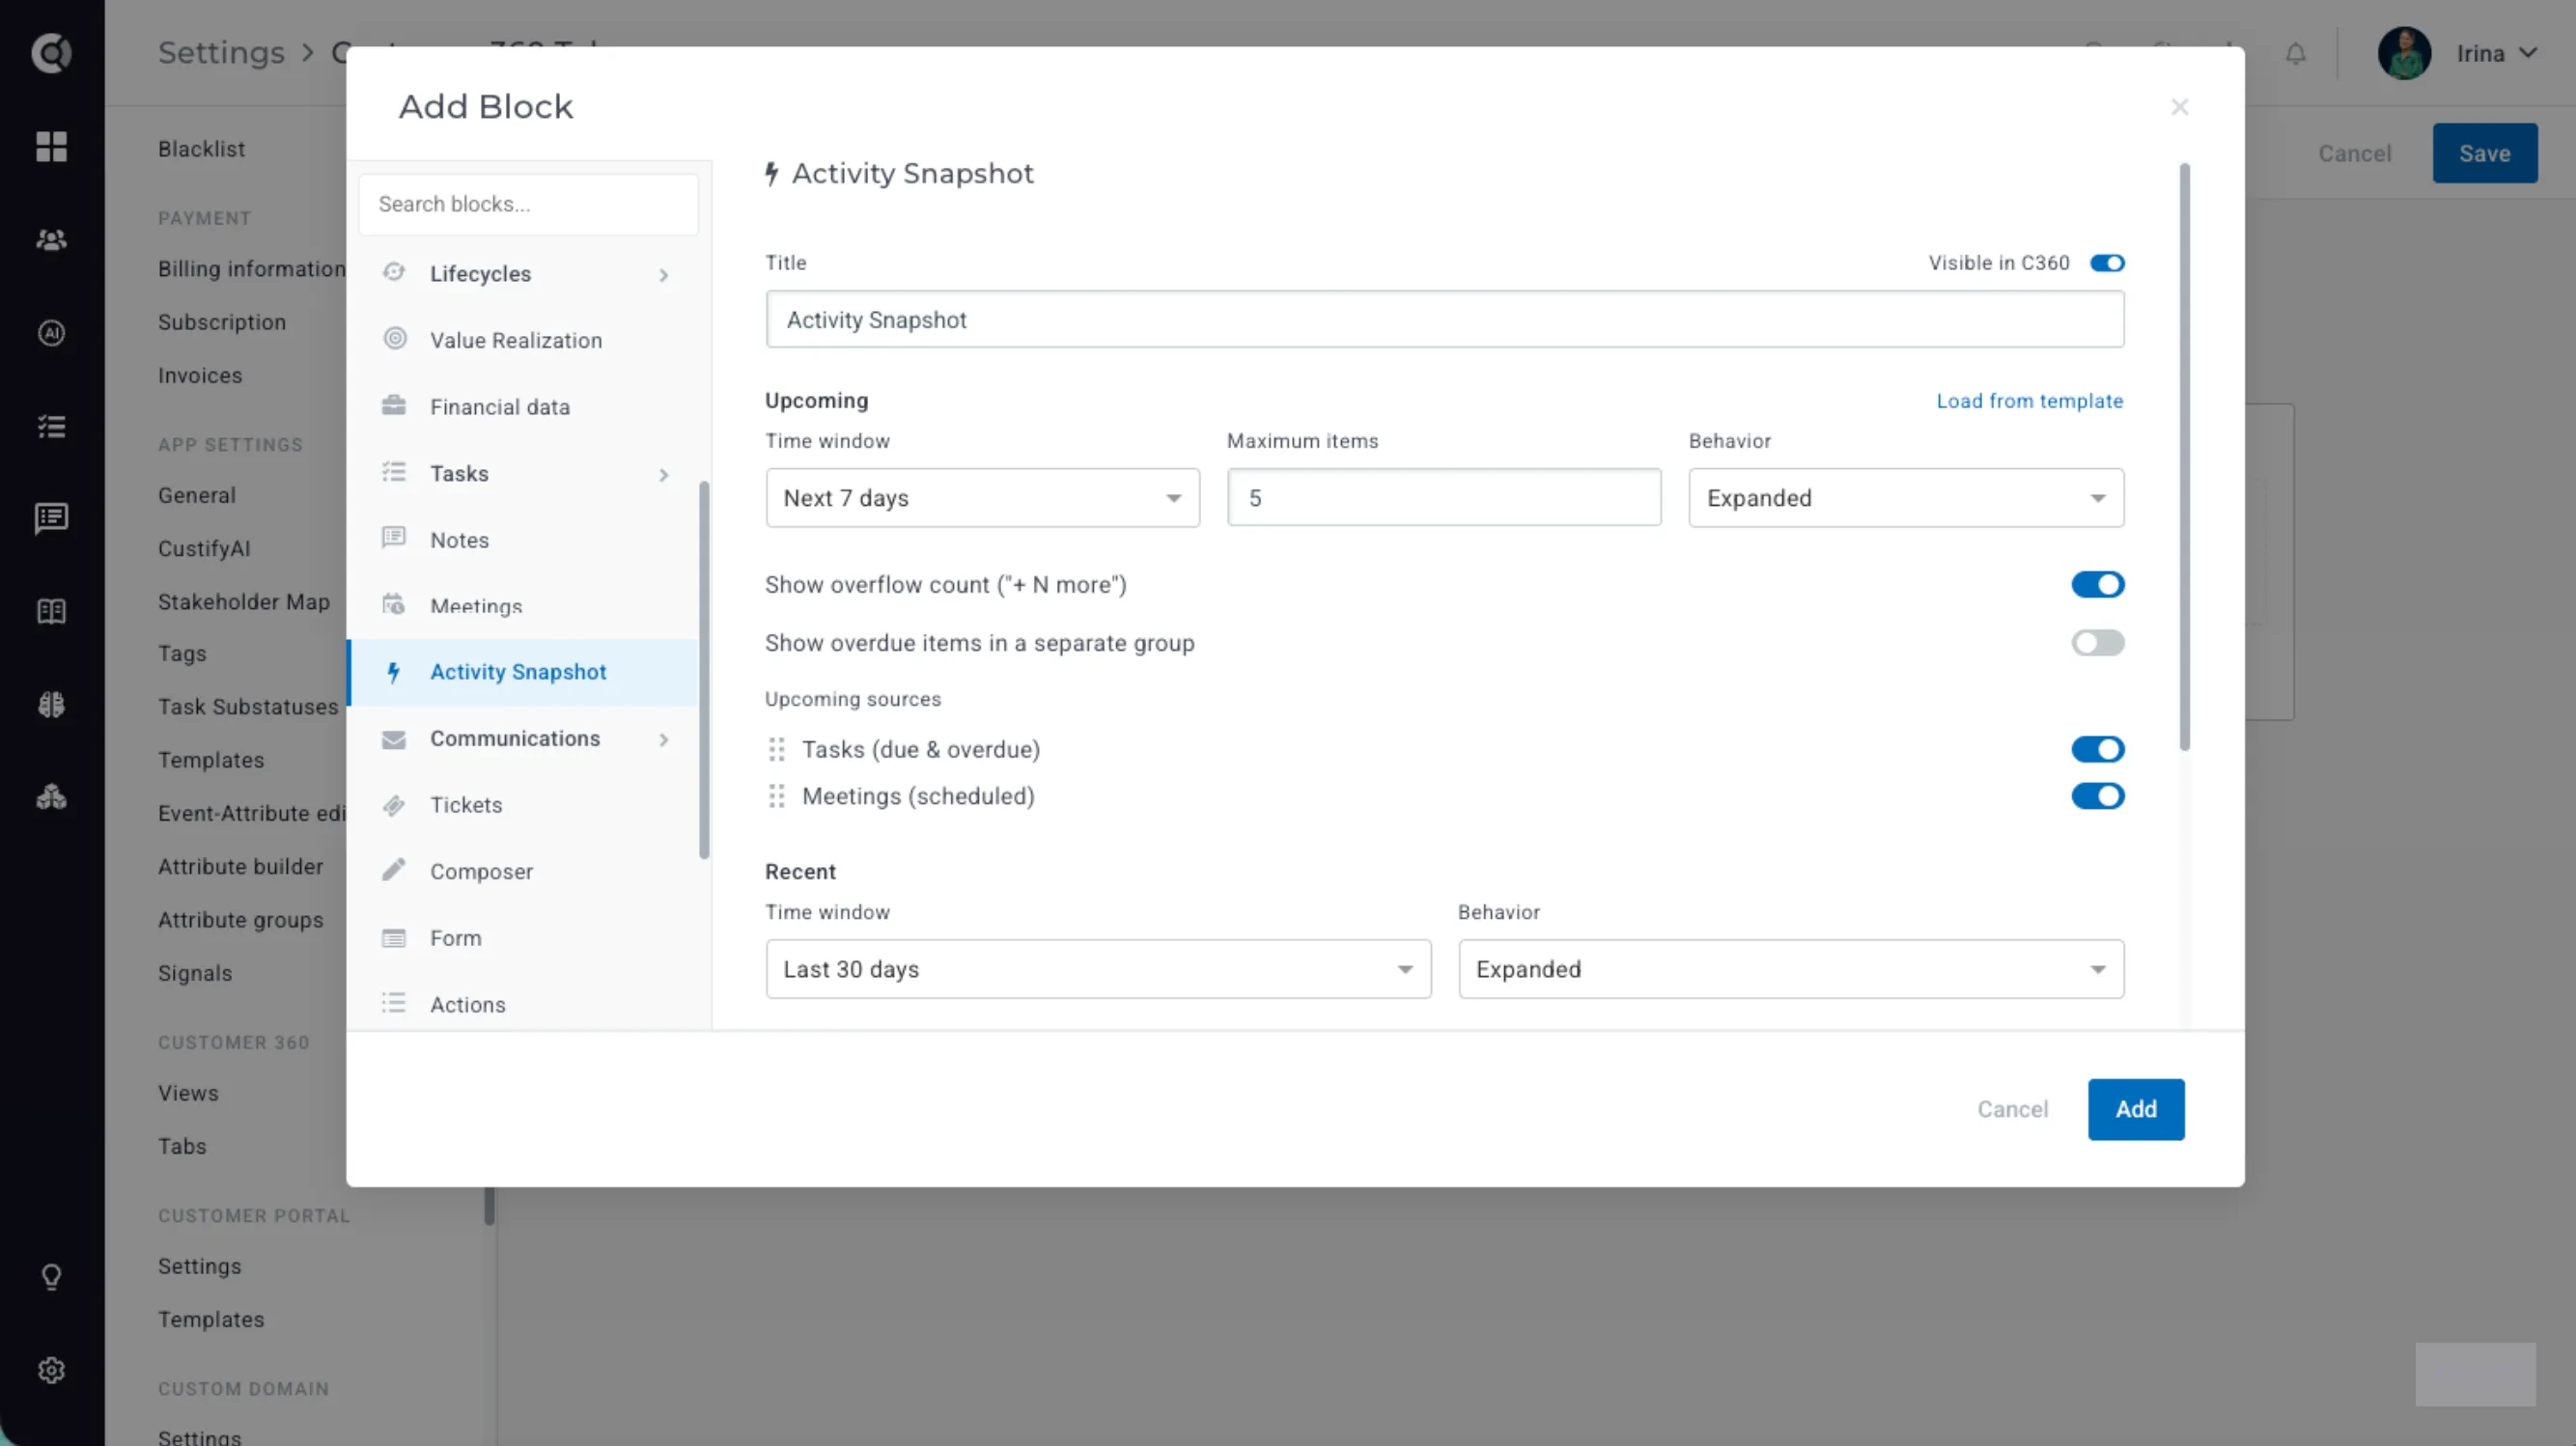
The block has two sections:
- Upcoming: tasks that are due or overdue, and scheduled meetings.
- Recent: the most recent note, email (sent or received), meeting, product activity, and touchpoint for the account.
You can configure:
- Time window: how far ahead Upcoming looks (for example, the next 7 days) and how far back Recent looks (for example, the last 30 days).
- Sources: which items appear in each section, and in what order. Drag them to change the order.
- Maximum items: how many upcoming items are shown. Turn on Show overflow count to display “+ N more” for the rest.
- Overdue items: turn on Show overdue items in a separate group to list them separately from upcoming ones.
- Behavior: whether each section opens expanded or collapsed.
- Highlight stale engagement: highlights recent items older than the number of days you set (14 by default), so you can quickly see when an account hasn’t had any activity in a while.
How to use it: Go to Settings > Customer 360, open the view or tab you want to edit, and click Add Block. Select Activity Snapshot, choose your settings for the Upcoming and Recent sections, then click Add and save your changes.
Child Entities Details
Many customers aren’t a single account: they run several products, workspaces, or subsidiaries. The new Child Entities Details block brings all of them together on the parent’s Customer 360, each in its own tab. Choose what to show for every child (for example, its Activity Snapshot), and review the activity of an entire customer organization without leaving the parent account.
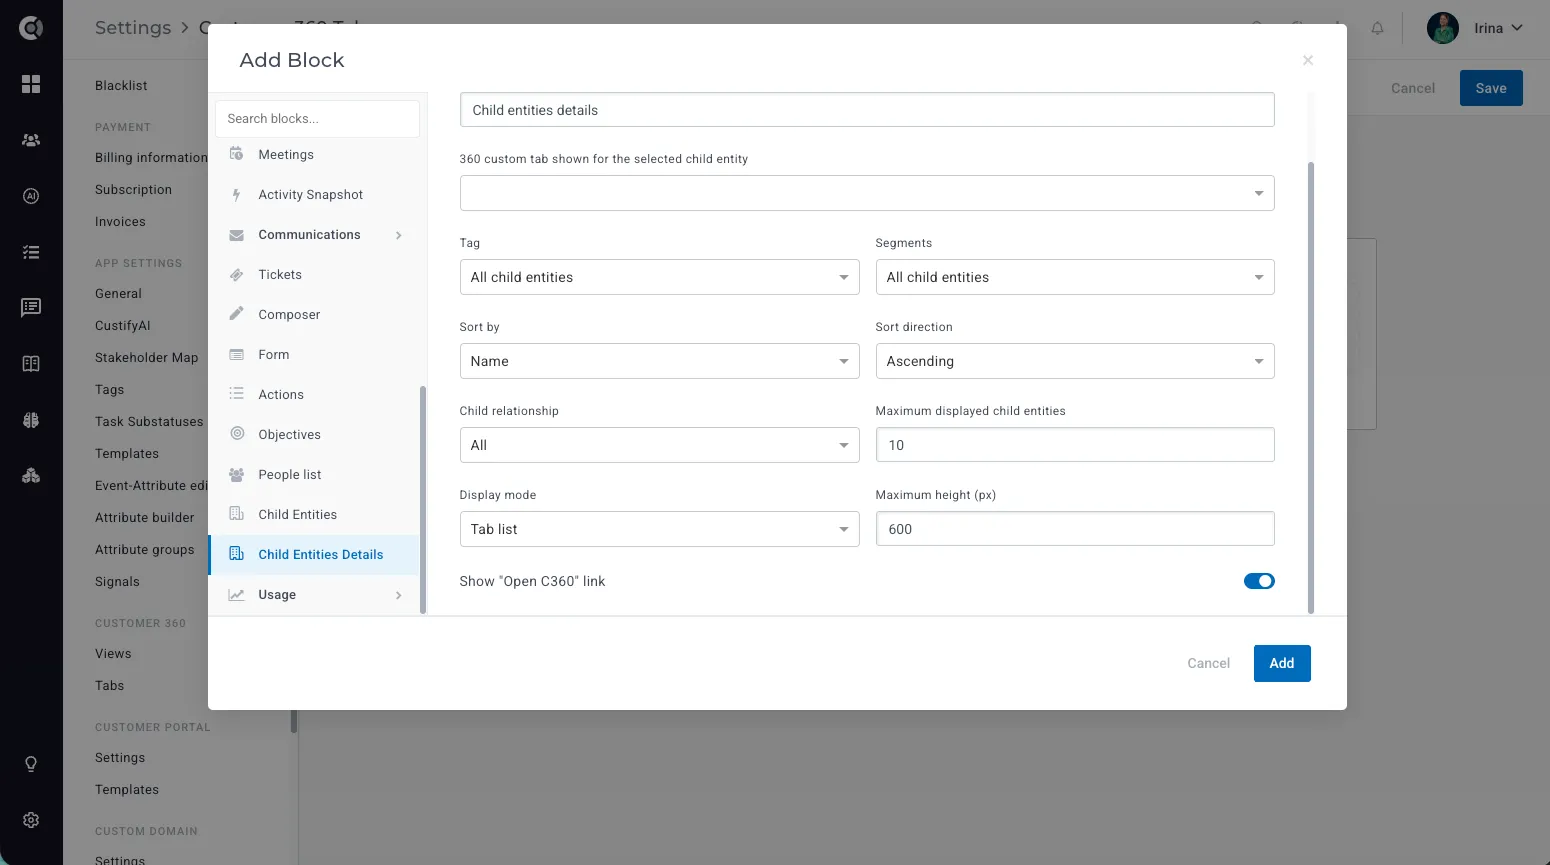
Show direct or all children, filter by tags or segments to keep only the relevant ones, and control the sort order and how many are displayed.
How to use it: Make sure the parent and child relationships are defined for your companies. Then add the Child Entities Details block to a Customer 360 view, select the tab that should be shown for each child entity, and set your filters.
New File table block
Contracts, QBR decks, and onboarding documents are easier to work with when they’re right where you need them. The new File table block brings a fully configurable version of the Files tab into any custom Customer 360 tab, for both companies and people. The existing Files block is now called File list.
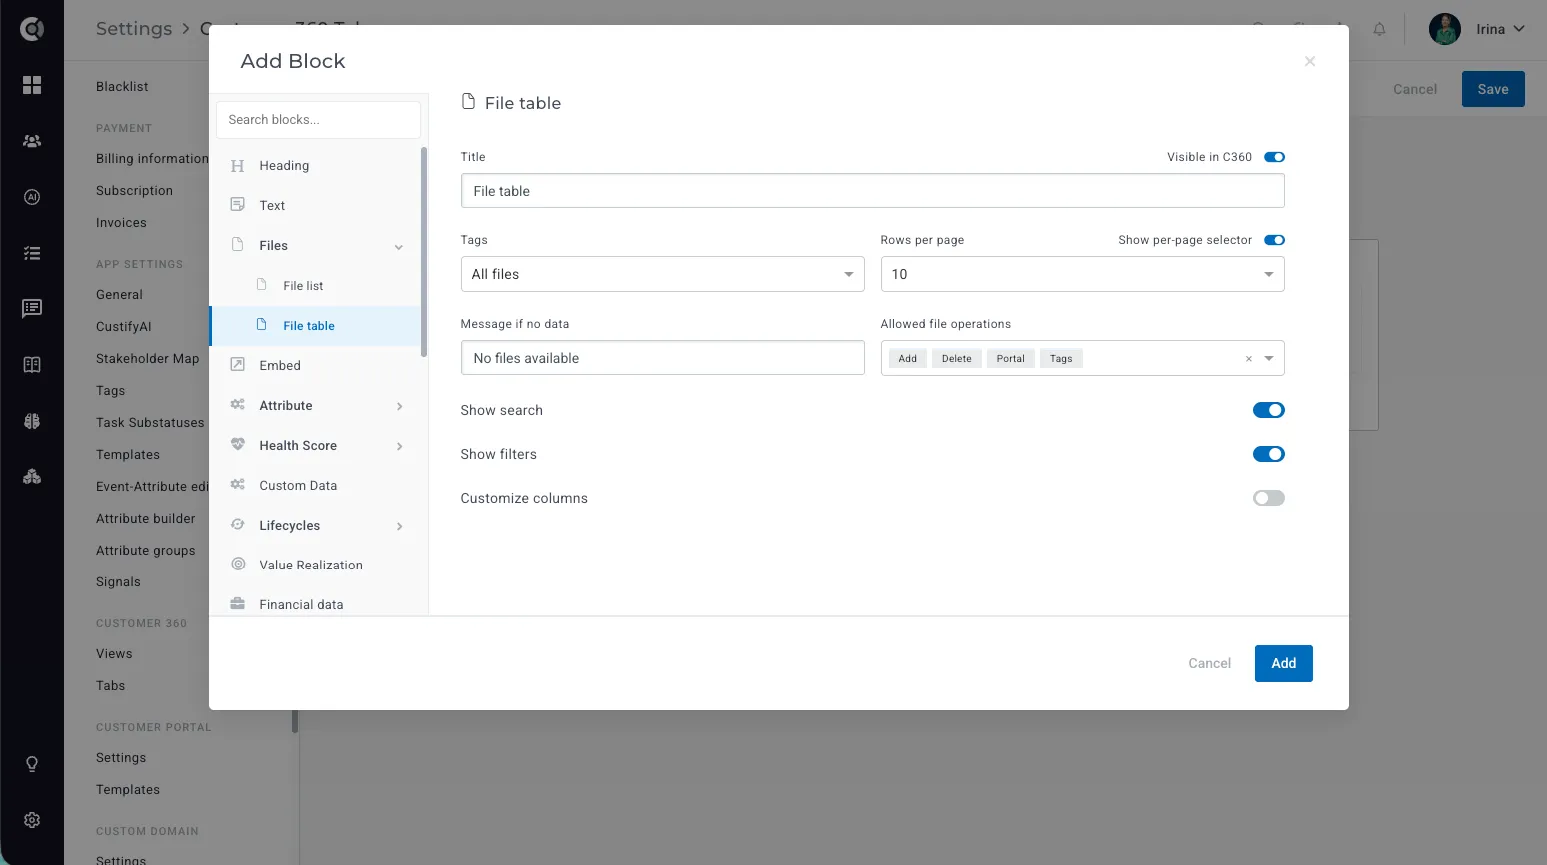
Tailor each block to its purpose:
- Show only the files that matter for that tab, using tags (for example, only contracts on a Renewal tab).
- Choose how many rows appear per page, and whether viewers can change it.
- Decide which actions are allowed (add, delete, share to the portal, tag), or make the block read-only.
- Show or hide search and filters.
- Pick the columns you need and their order.
The block always respects user permissions: people only see the file actions their role already allows.
Upload files from the File list block
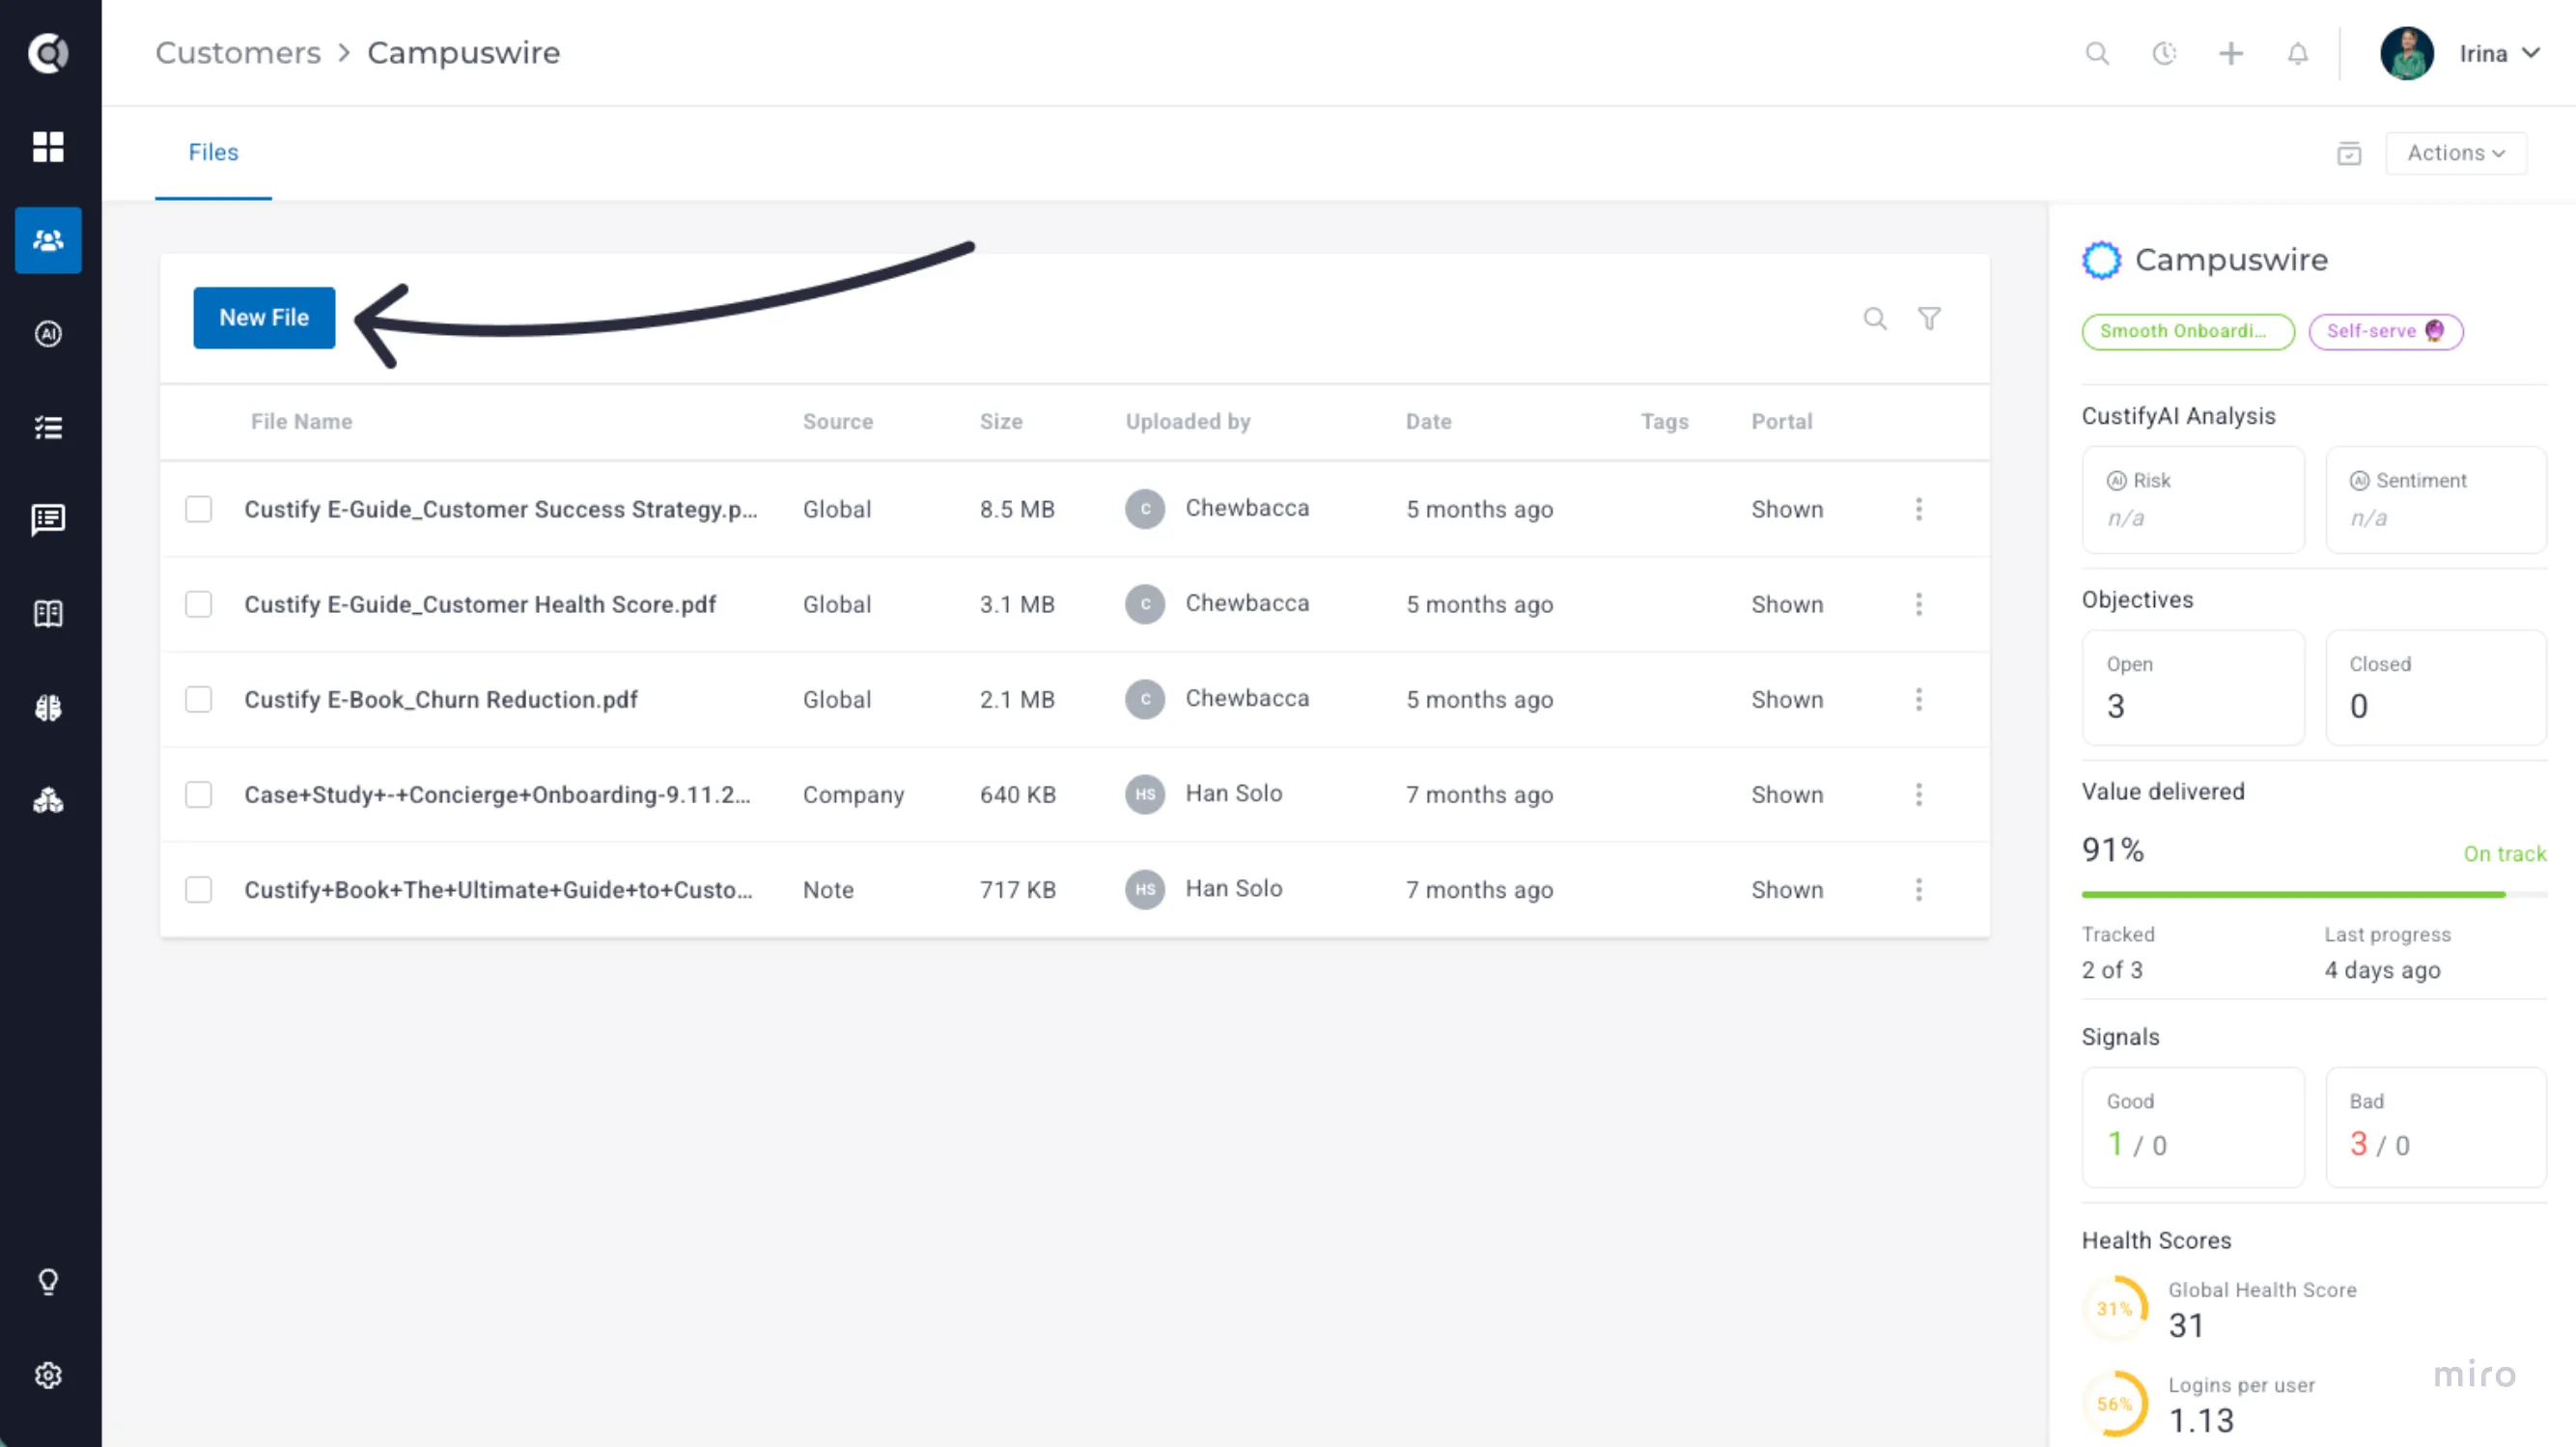
Adding a file no longer means leaving the view you’re working in. The File list block now lets you upload files directly from the Customer 360. Turn on Allow file uploads in the block settings to enable it.
Notifications
View all notifications
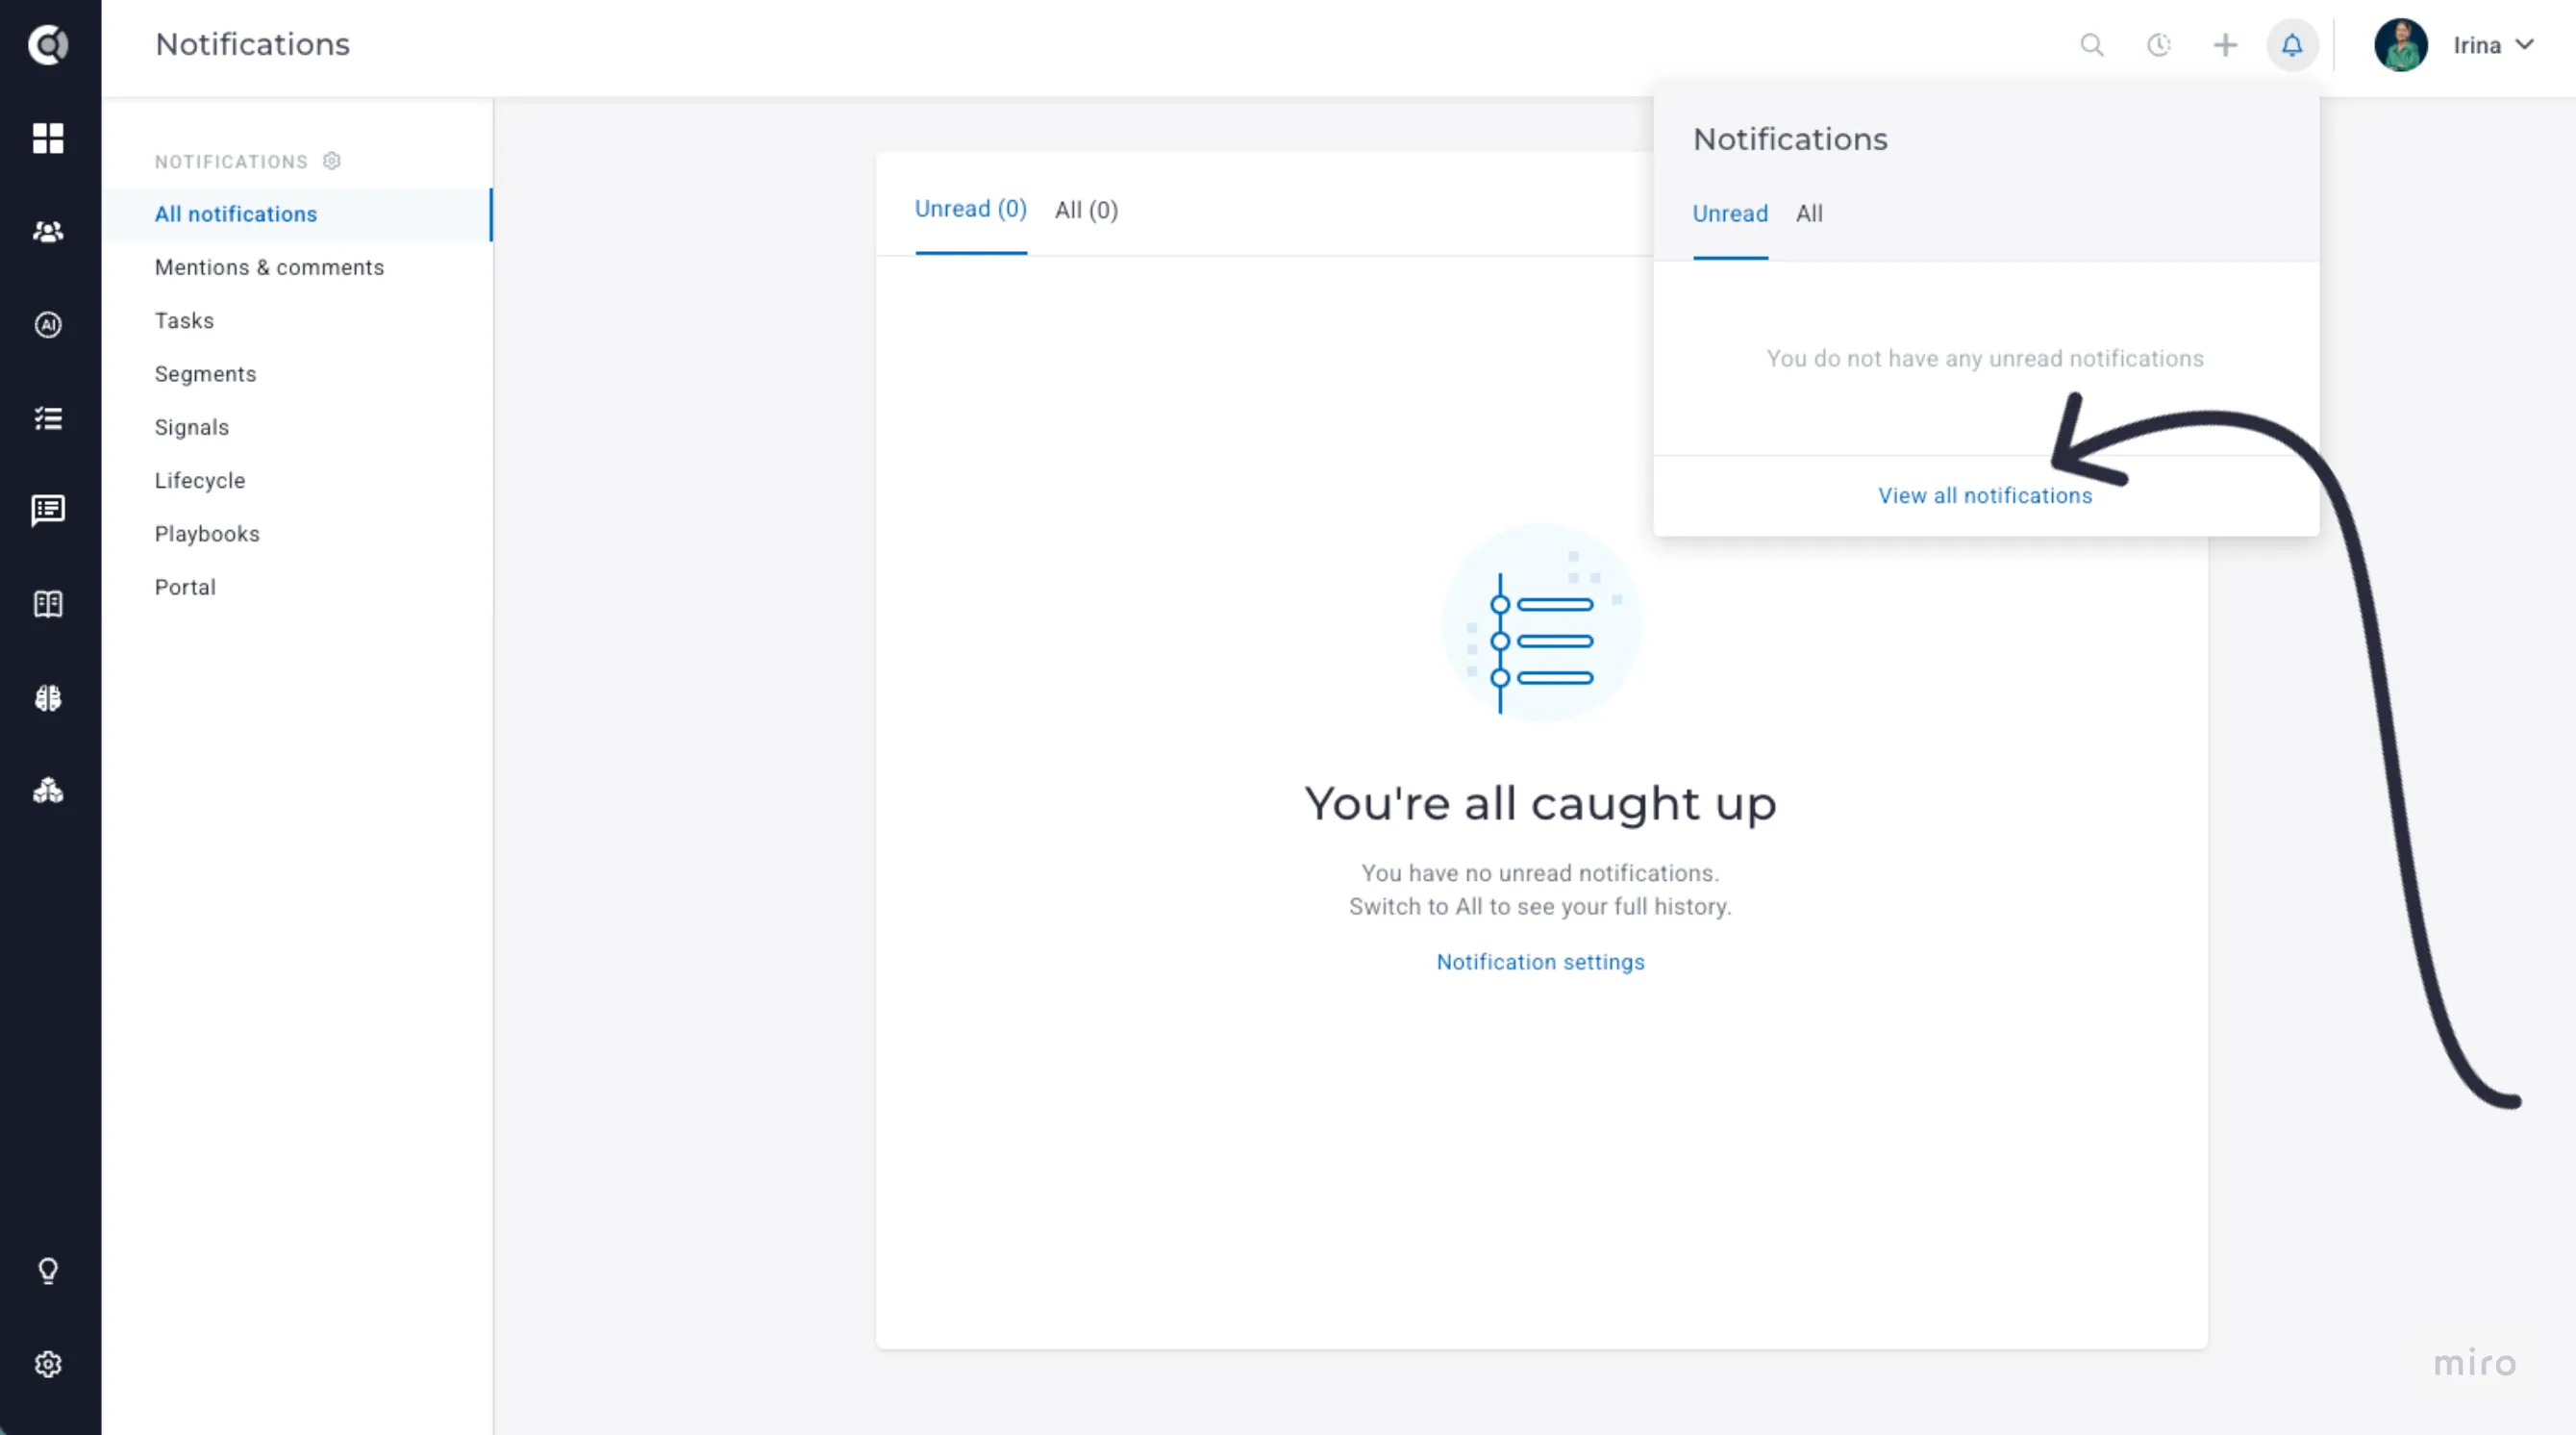
Never lose track of a mention or an overdue task again. A new notifications page brings all your notifications together in one place, grouped into sections such as Mentions & comments, Tasks, Segments, Lifecycle, Playbooks, and Portal, so you can catch up quickly and focus on what needs a response. Click the notifications bell and choose View all notifications to open it.
Refreshed design for Custify system emails
Every email Custify sends automatically, from notifications and invitations to password resets, alerts, and surveys, now has a fresh, modern design. They look great on any device, support dark mode, and follow a consistent Custify style.
Dark Mode (Early Access)
Custify now comes with a native dark mode, designed to reduce eye strain and make long working sessions more comfortable. Choose between Light, Dark, or System, which follows your operating system setting and switches automatically when it changes. Each user picks their own theme, and the change applies instantly.
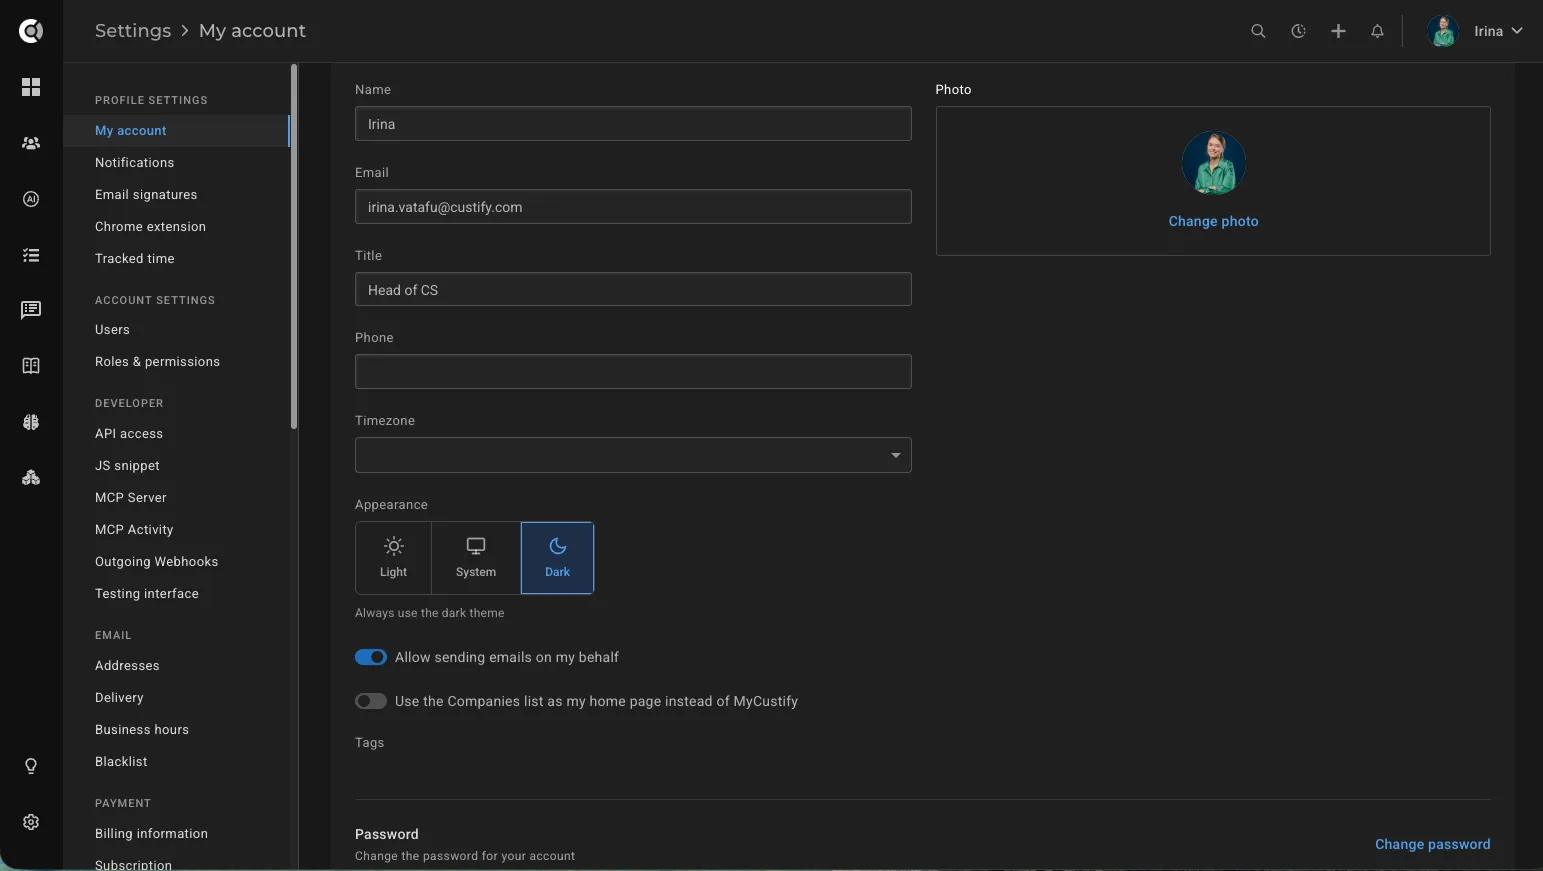
The dark theme covers the whole app, from your customer lists and Customer 360 profiles to dashboards, playbooks, and settings. Health score colors stay easy to tell apart, and the email composer keeps a white content area, so you always see exactly what your customers will receive.
We’re rolling out dark mode gradually, starting with a group of early access accounts. If you’re interested in using it, reach out to your CSM or to [email protected]. Once it’s enabled, switch themes from your profile picture in the top bar or from Settings > My Account > Appearance.
Other Useful Enhancements
Customer List and Search
Global search results grouped by entity type
Find the right record faster. If you work with different entity types, such as Projects or Subsidiaries, global search now groups results by entity type instead of listing everything under Companies. Click Show all results to open the full list, already filtered by that entity type. Companies with the type Company, or without an entity type, still appear under Companies.
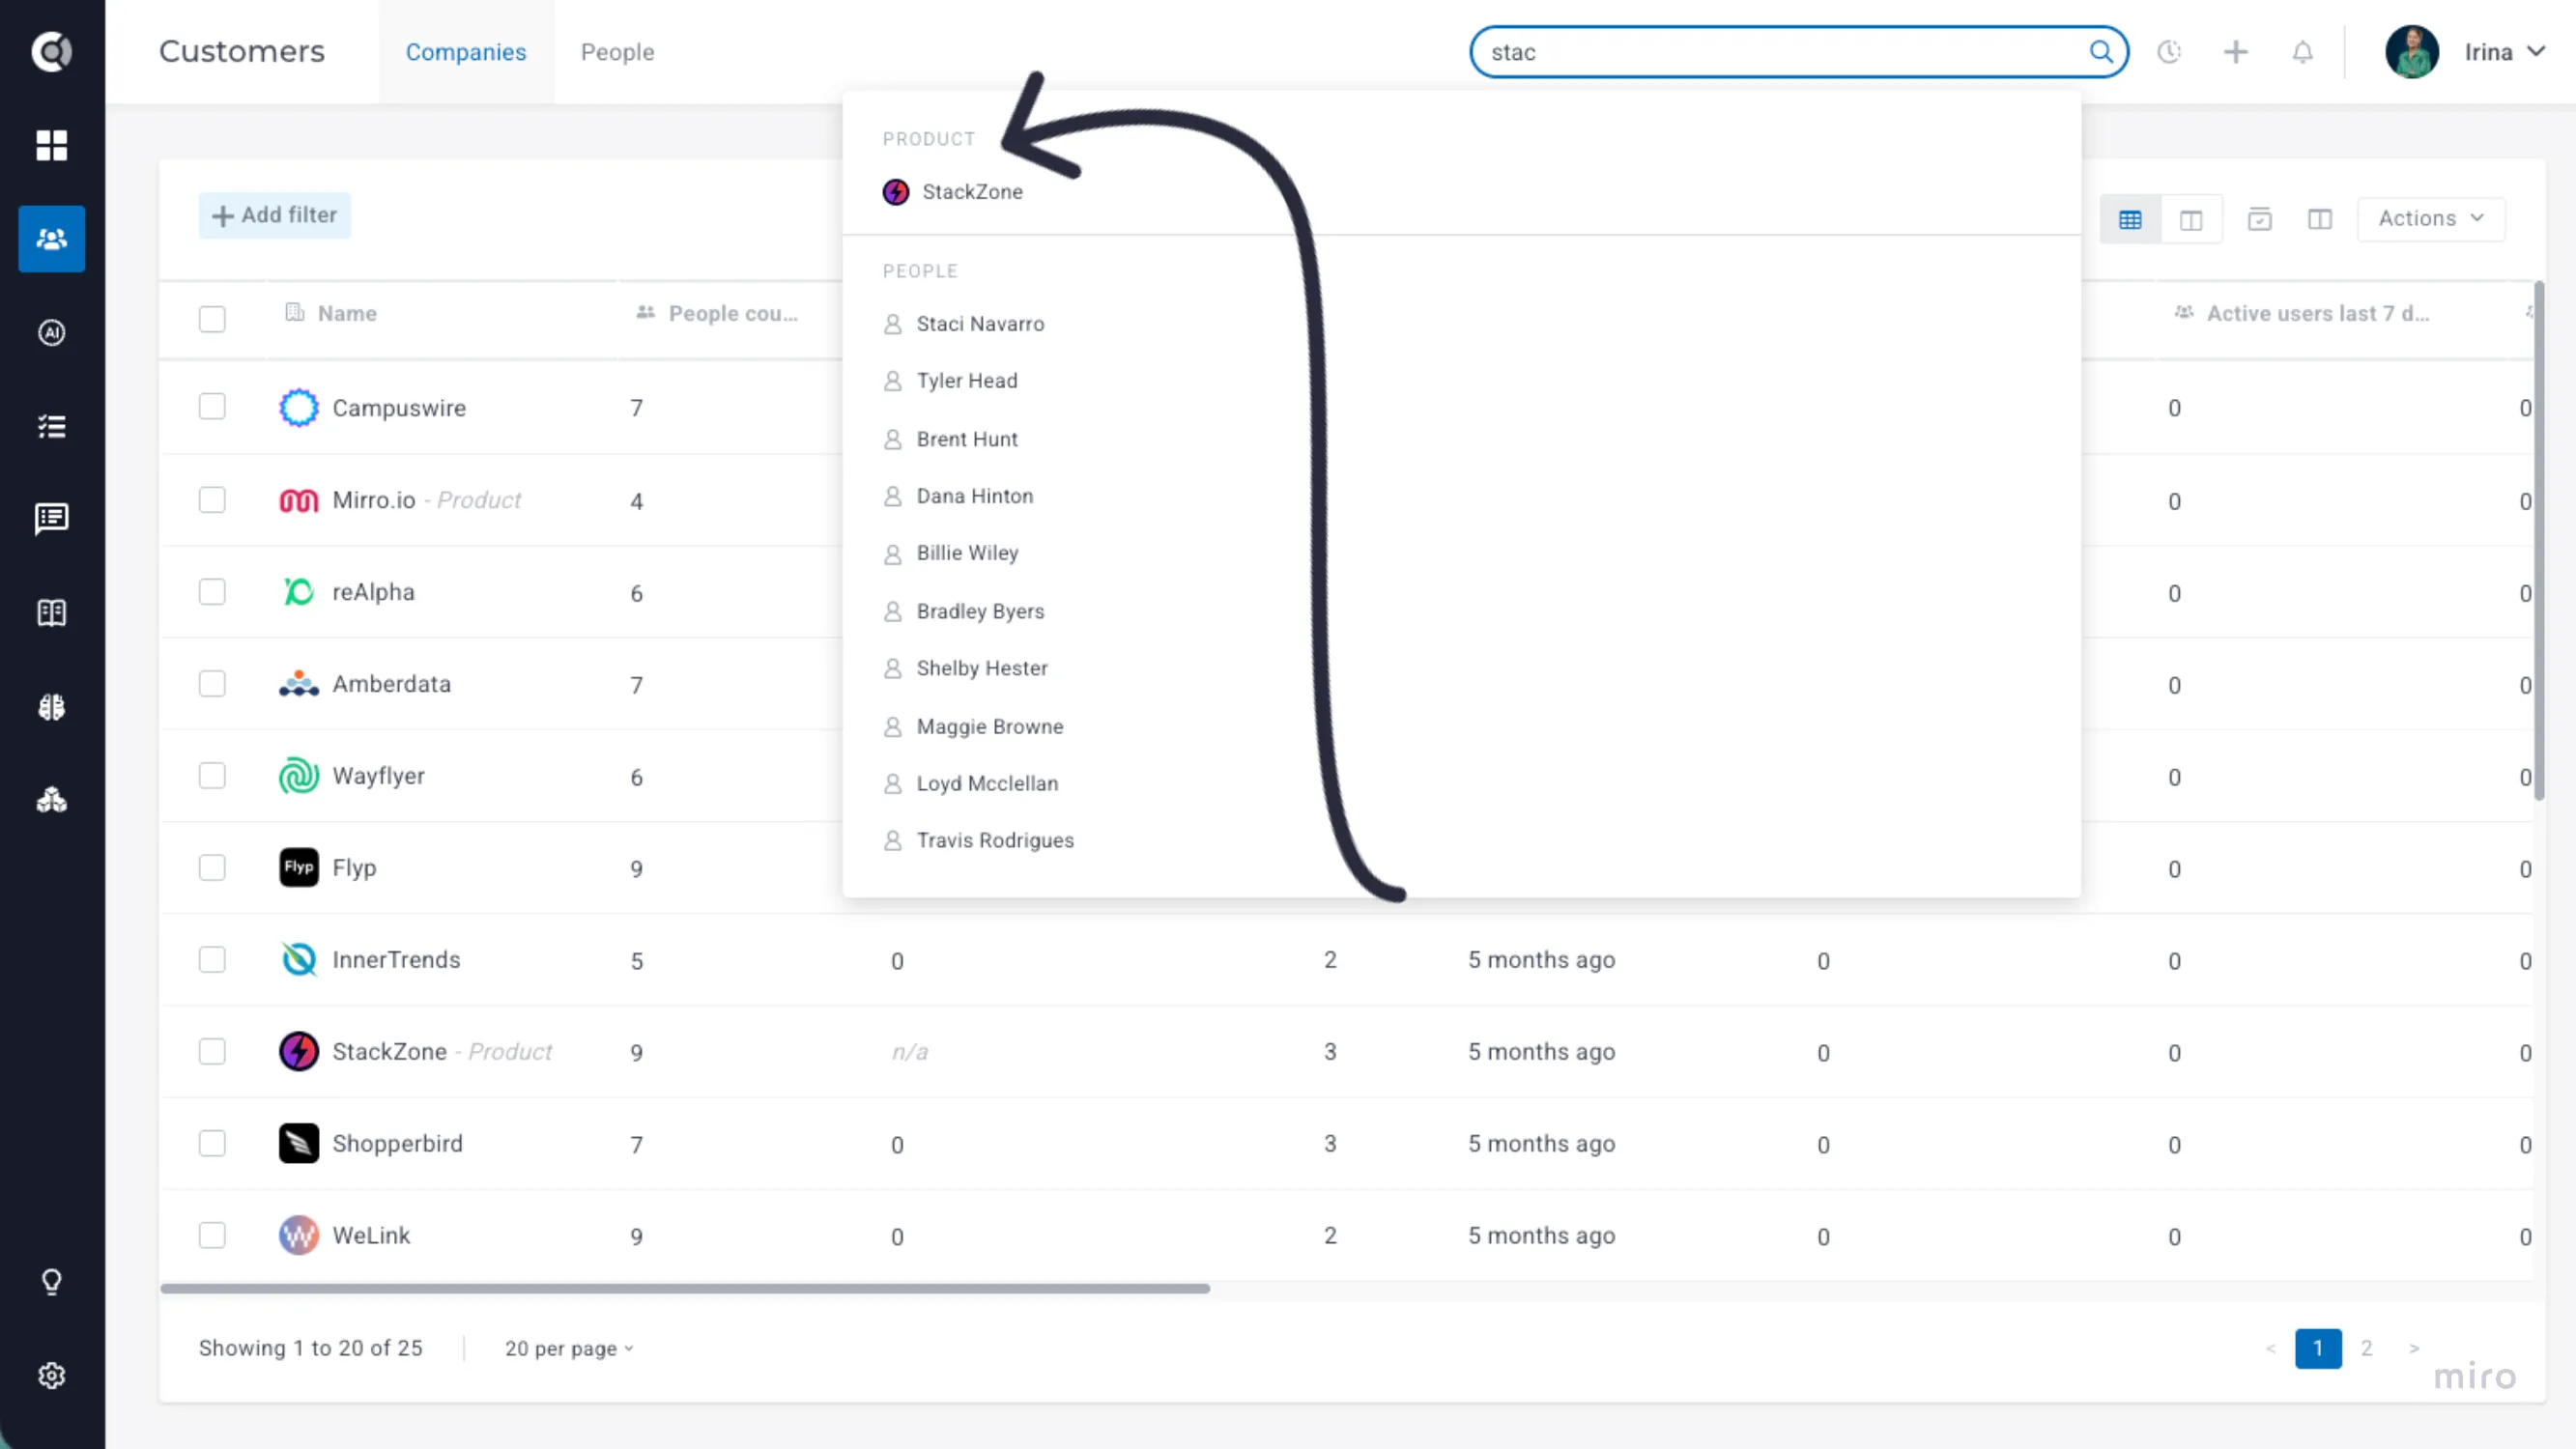
Show tags in global search results
Tell similar records apart at a glance. You can now choose which company and people tags appear in global search results, for example, a tier or region tag, so you open the right account the first time. In Settings > Tags, open a tag’s menu and choose Show in search results. If a record has several tags shown in search, the first one is displayed.
Entity types based on tags
Your customer structure doesn’t always follow company levels alone. You can now refine entity types with tags, for example splitting level 1 companies into Projects and Subsidiaries depending on how they’re tagged, so every record is labeled the way your team thinks about it.
In Settings > General > Entity types, click Add level condition, select a tag, and enter the entity type name. When several conditions match, the first one in the list applies, and you can drag conditions to change their order. Companies that match no condition keep the default type for their level, and the entity type updates automatically when tags change.
Lifecycles
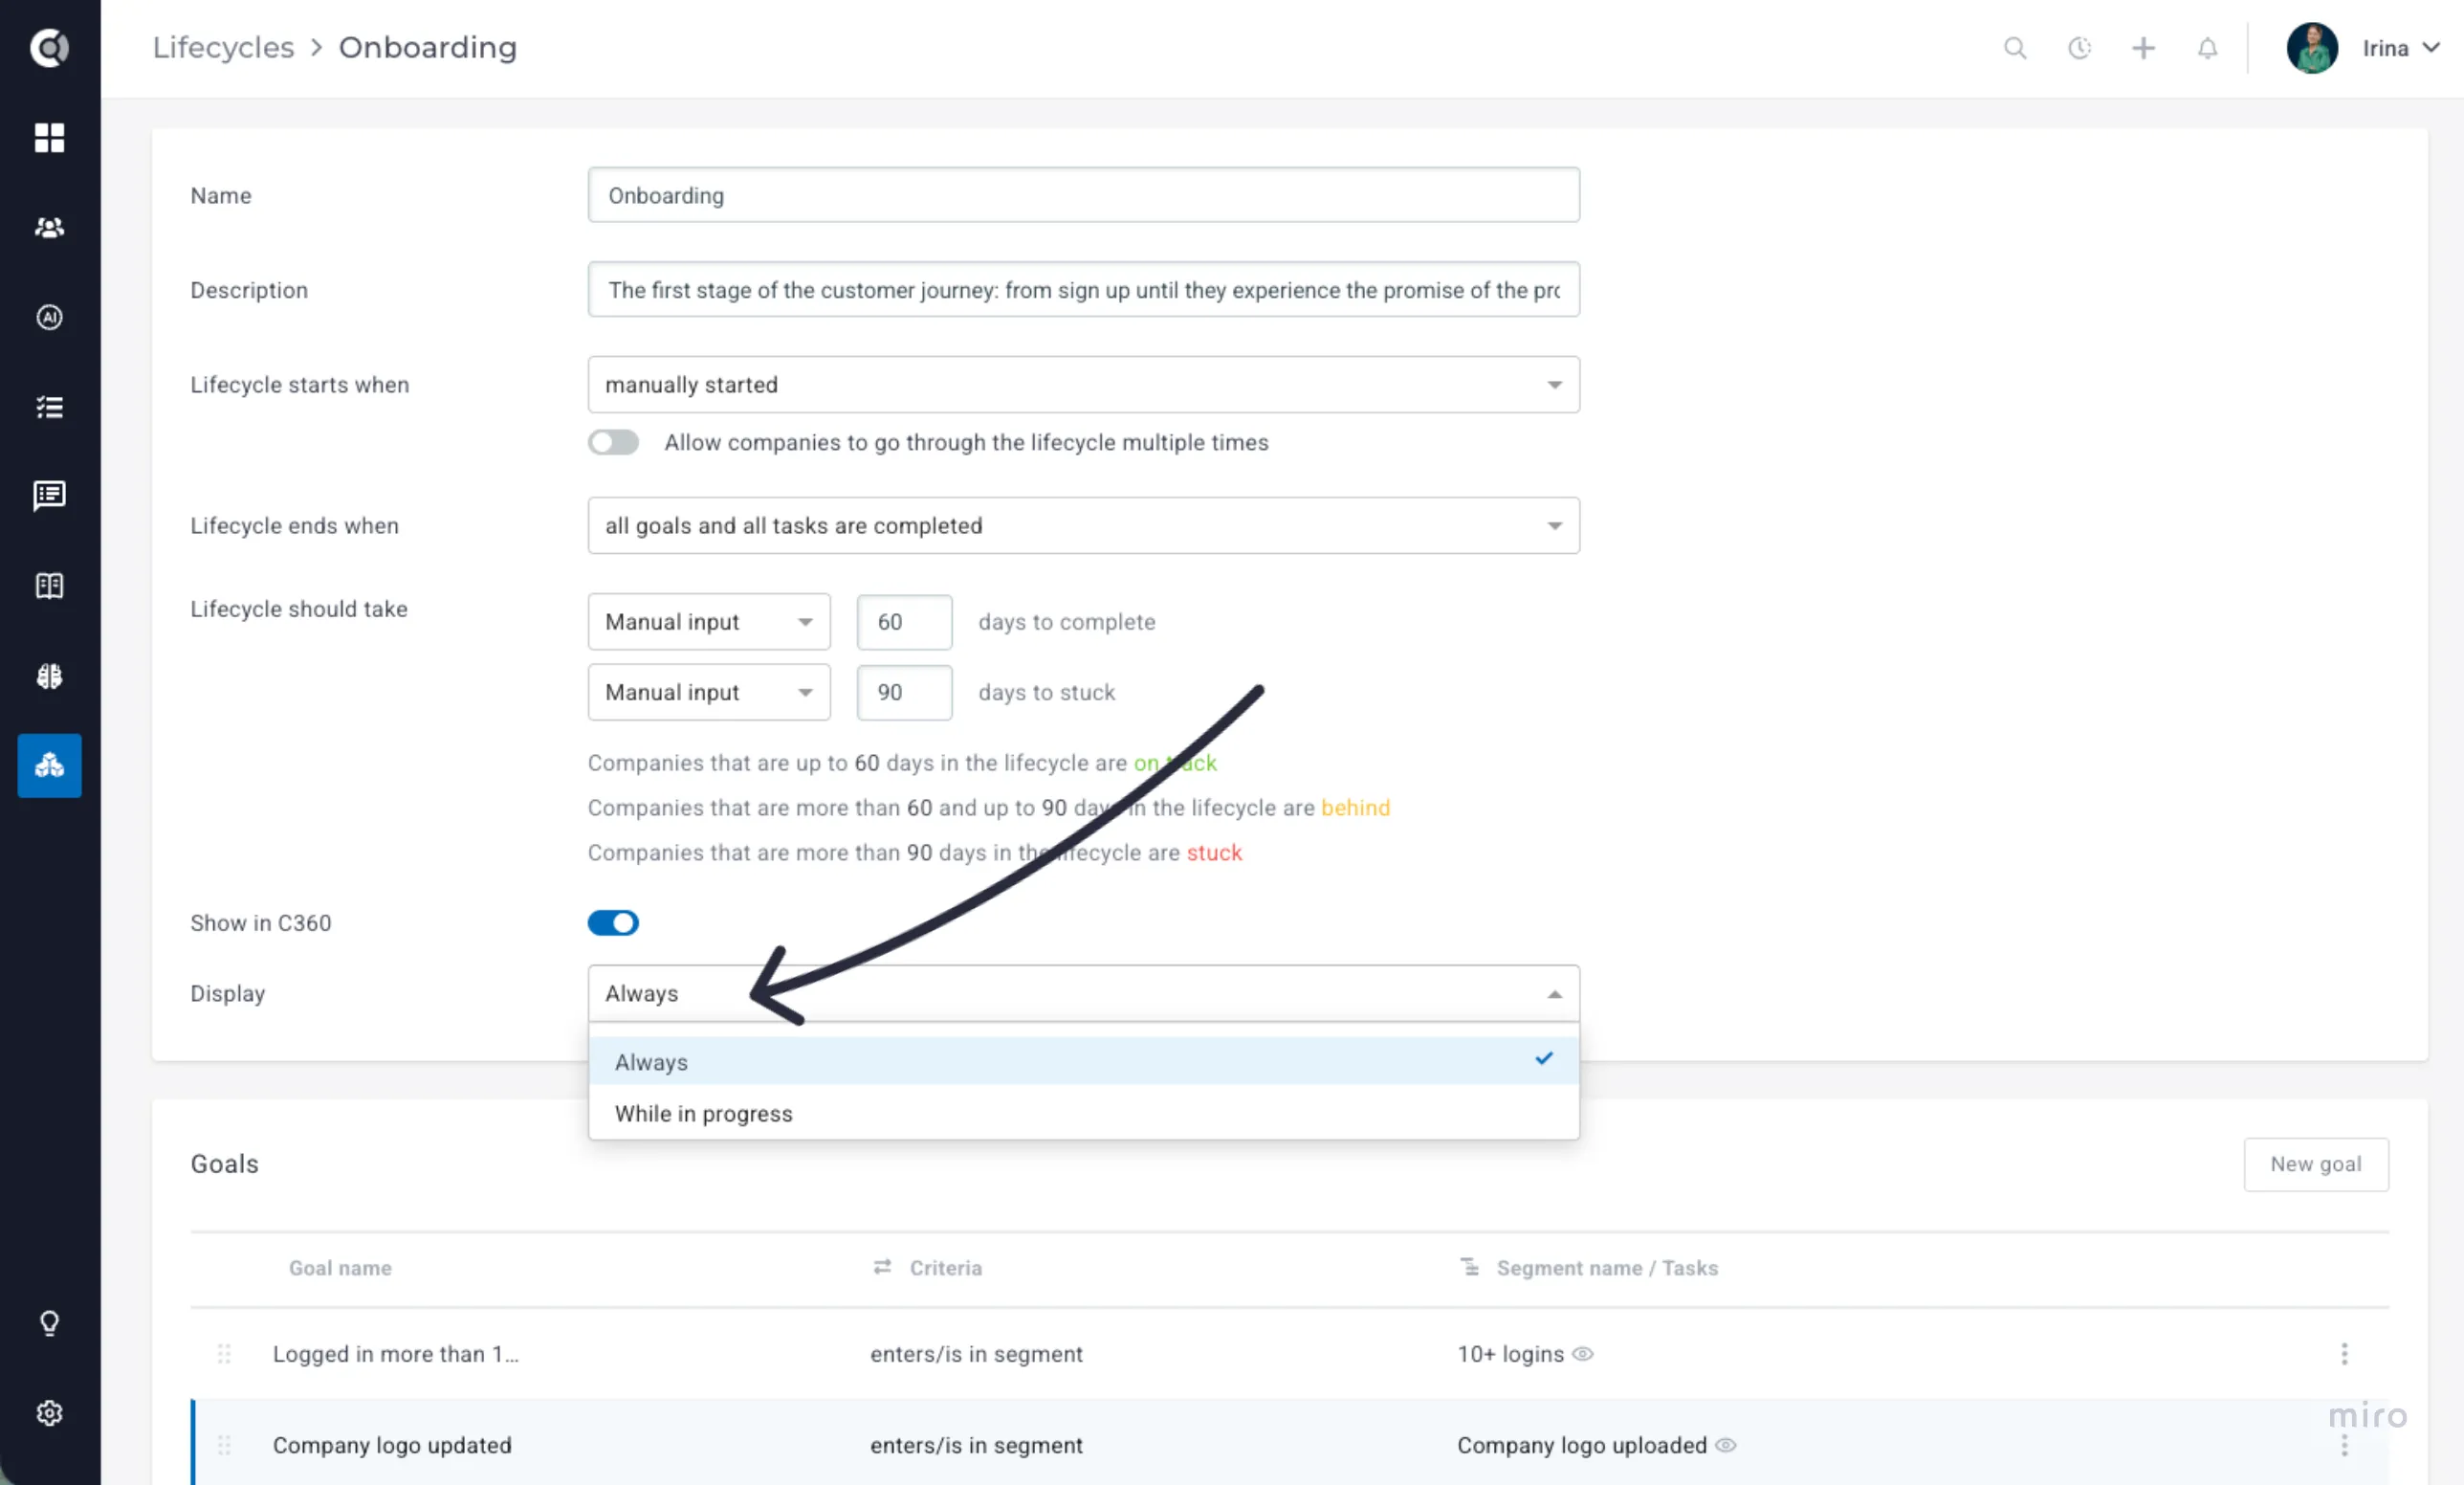
Show only lifecycles in progress on the Customer 360
Keep the Customer 360 focused on what’s happening now. Each lifecycle has a new display option: Always (the existing behavior and the default for all current lifecycles) or While in progress, which hides the lifecycle from the Customer 360 sidebar once the customer has completed it. Your team sees only the journeys that are still active, without the clutter of finished ones.
Dynamic lifecycle duration
Not every customer moves at the same pace, and your lifecycle deadlines don’t have to either. Days to complete and Days to stuck can now be based on a numeric company attribute or a calculated metric, so each company gets a deadline that fits its situation.
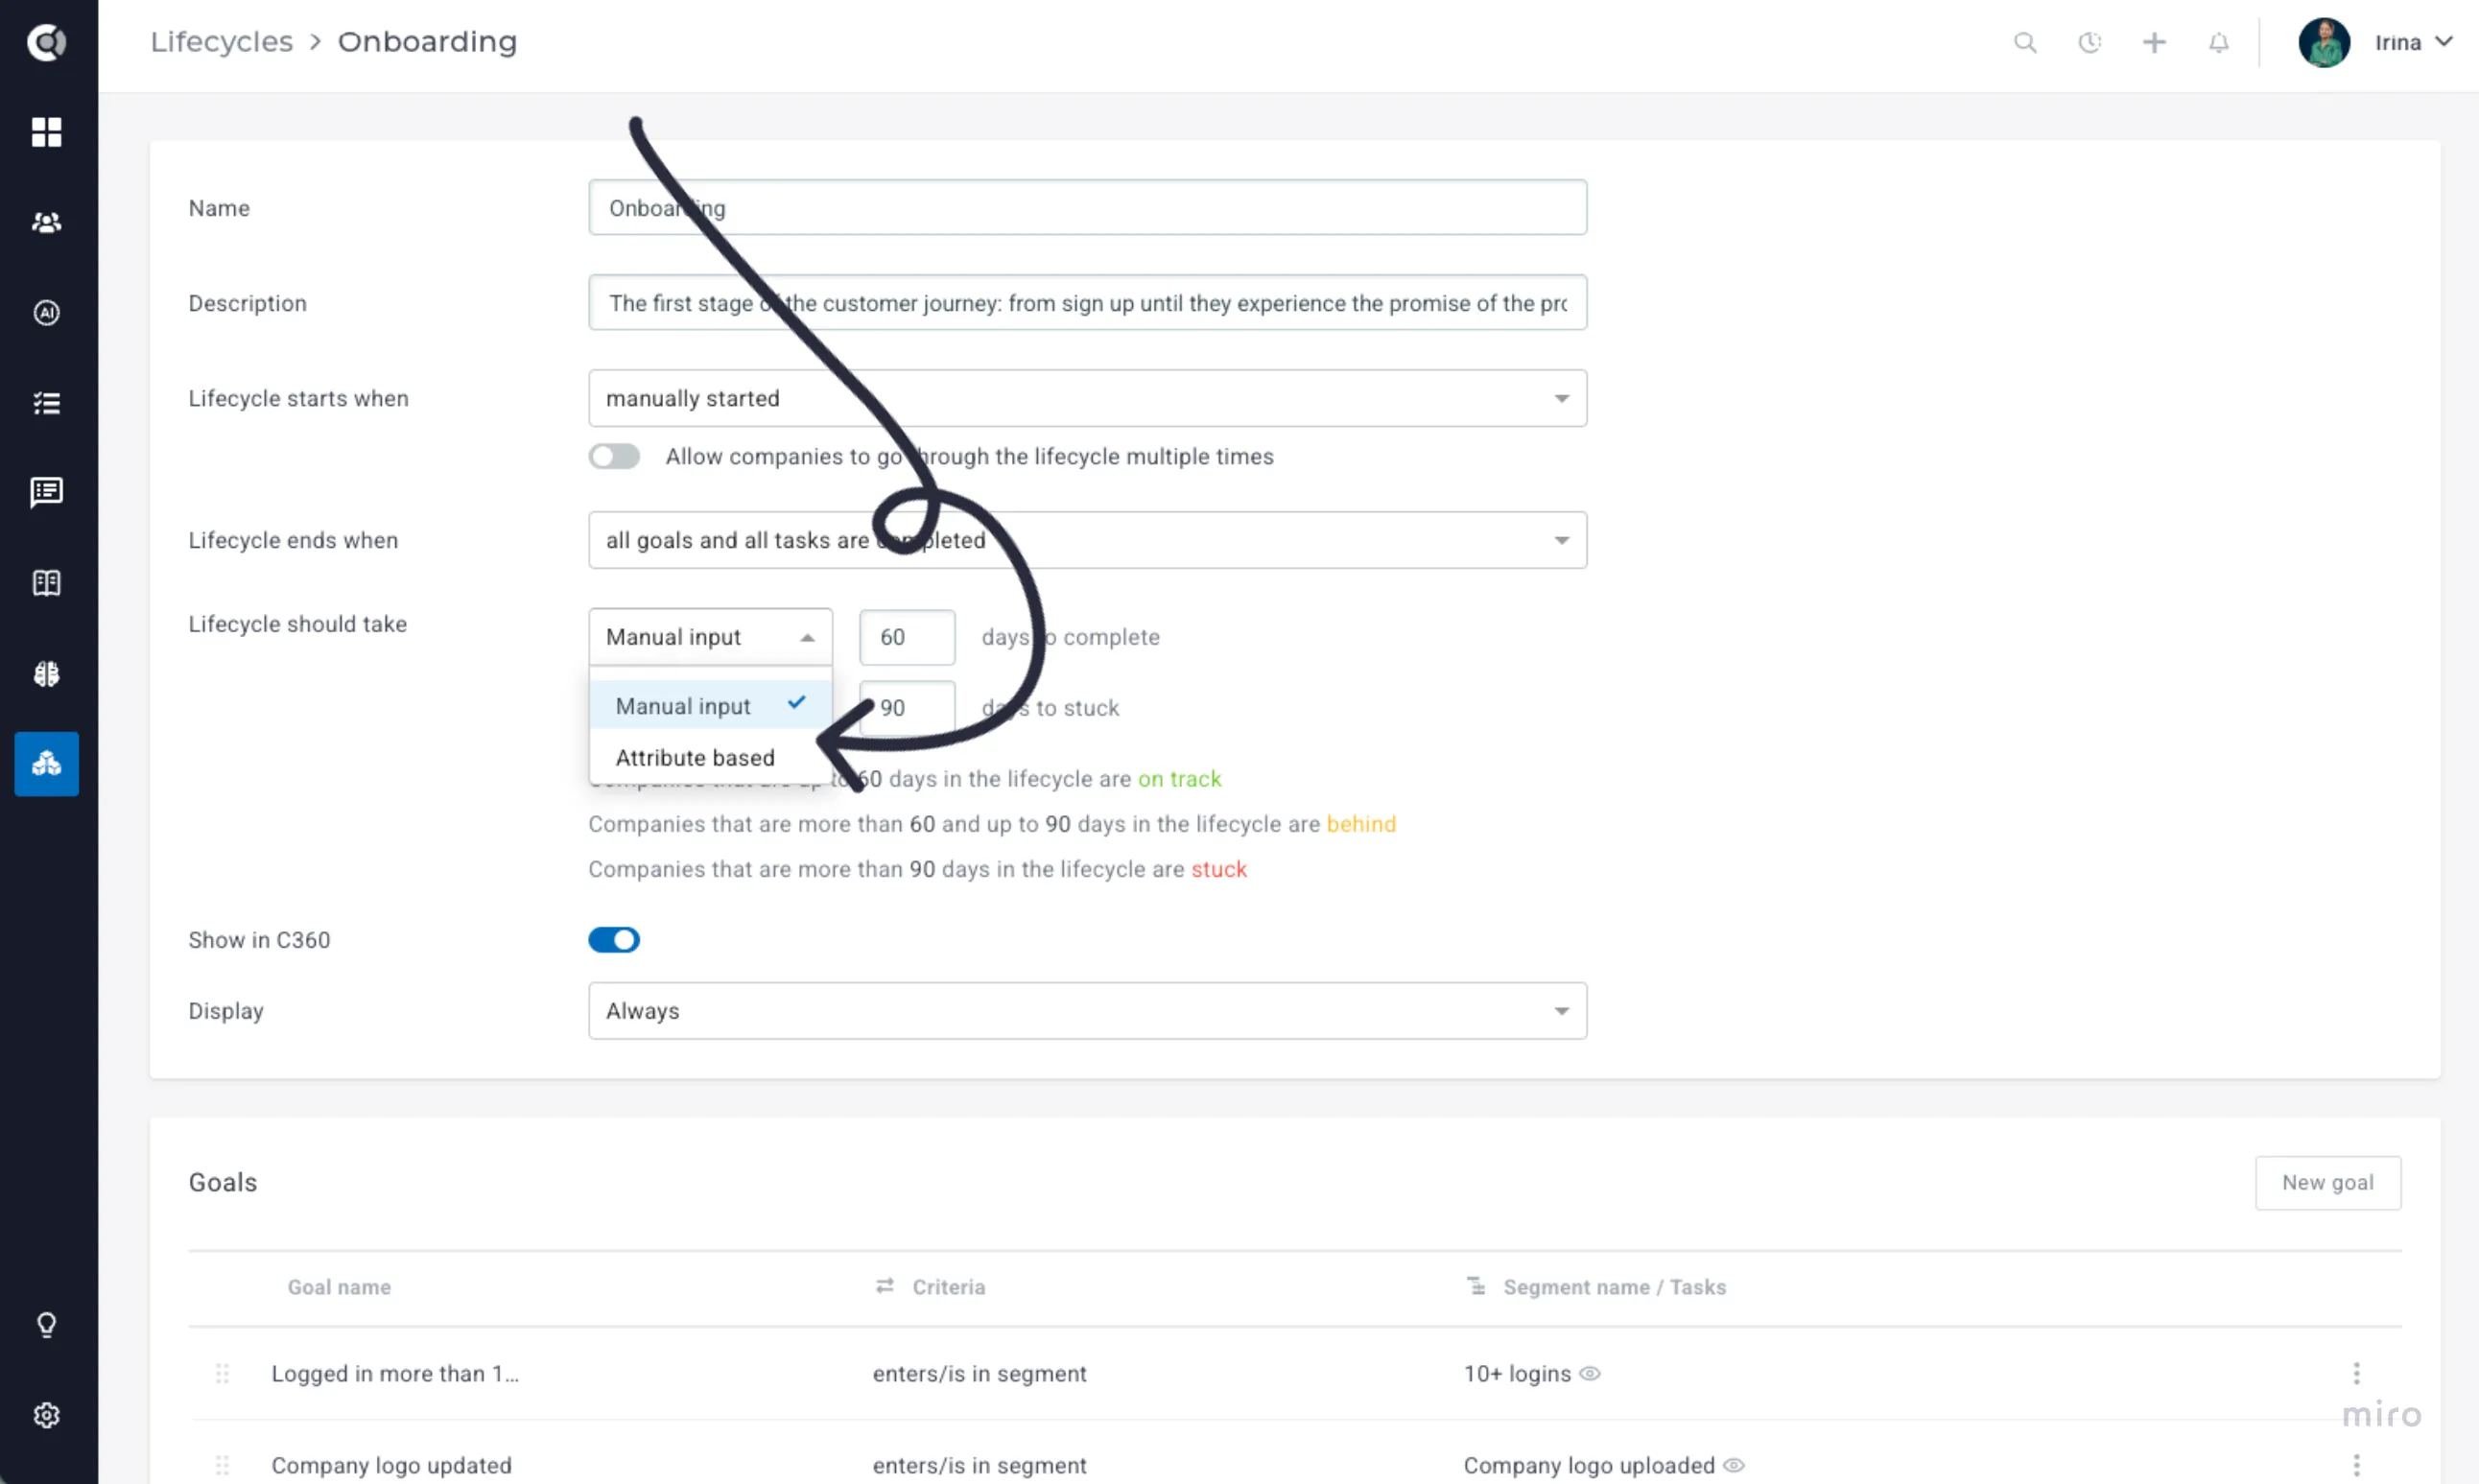
Example scenario: your onboarding has two phases that should take about 45 days in total. If a customer finishes phase 1 in 5 days, they have more time for phase 2 than a customer who needed 30 days. With a calculated metric such as “45 minus the days spent in phase 1,” each customer is flagged as stuck at the right moment, without false alarms.
Existing lifecycles keep working exactly as before, and the fixed number of days is still used as a fallback for companies that don’t have a value for the selected attribute.
Calculated Metrics
Days since last email with a specific tag
Make sure key outreach never falls through the cracks. A new Calculated Metrics function under Communication > Conversations counts how many days have passed since an email with a specific tag was sent, so you can build health score rules and automations around the communication that matters most.
Example scenario: Tag every renewal reminder email your CSMs send (for example, renewal reminder) and build a health score rule or automation on “days since last email tagged renewal reminder.” If an account is within 45 days of its renewal date and this value is empty or above 30, it’s a signal that nobody has reached out yet, and the account can be flagged before renewal turns into a last minute scramble.
Tasks
Keyword search in the list view
Find any task in seconds, in the view you prefer. Keyword search across task titles and descriptions, previously available only in the table view, now works in the list view too.
Bulk add or remove tags
Organize your tasks faster: add or remove a tag on multiple tasks at once, from both the list and table views, just like you already can for companies and people.
Notes
Link notes to meetings
Never lose the context of a conversation. Notes taken on a meeting now show which meeting they belong to. And when a meeting includes several companies, its notes appear in the Notes tab of every company that took part, so everyone working on those accounts sees the full story.
“See more” indicator for collapsed notes
Skim your notes faster. Collapsed notes that contain more than the preview shows now display a clear see more cue, so you know at a glance whether a note is worth expanding.
Surveys
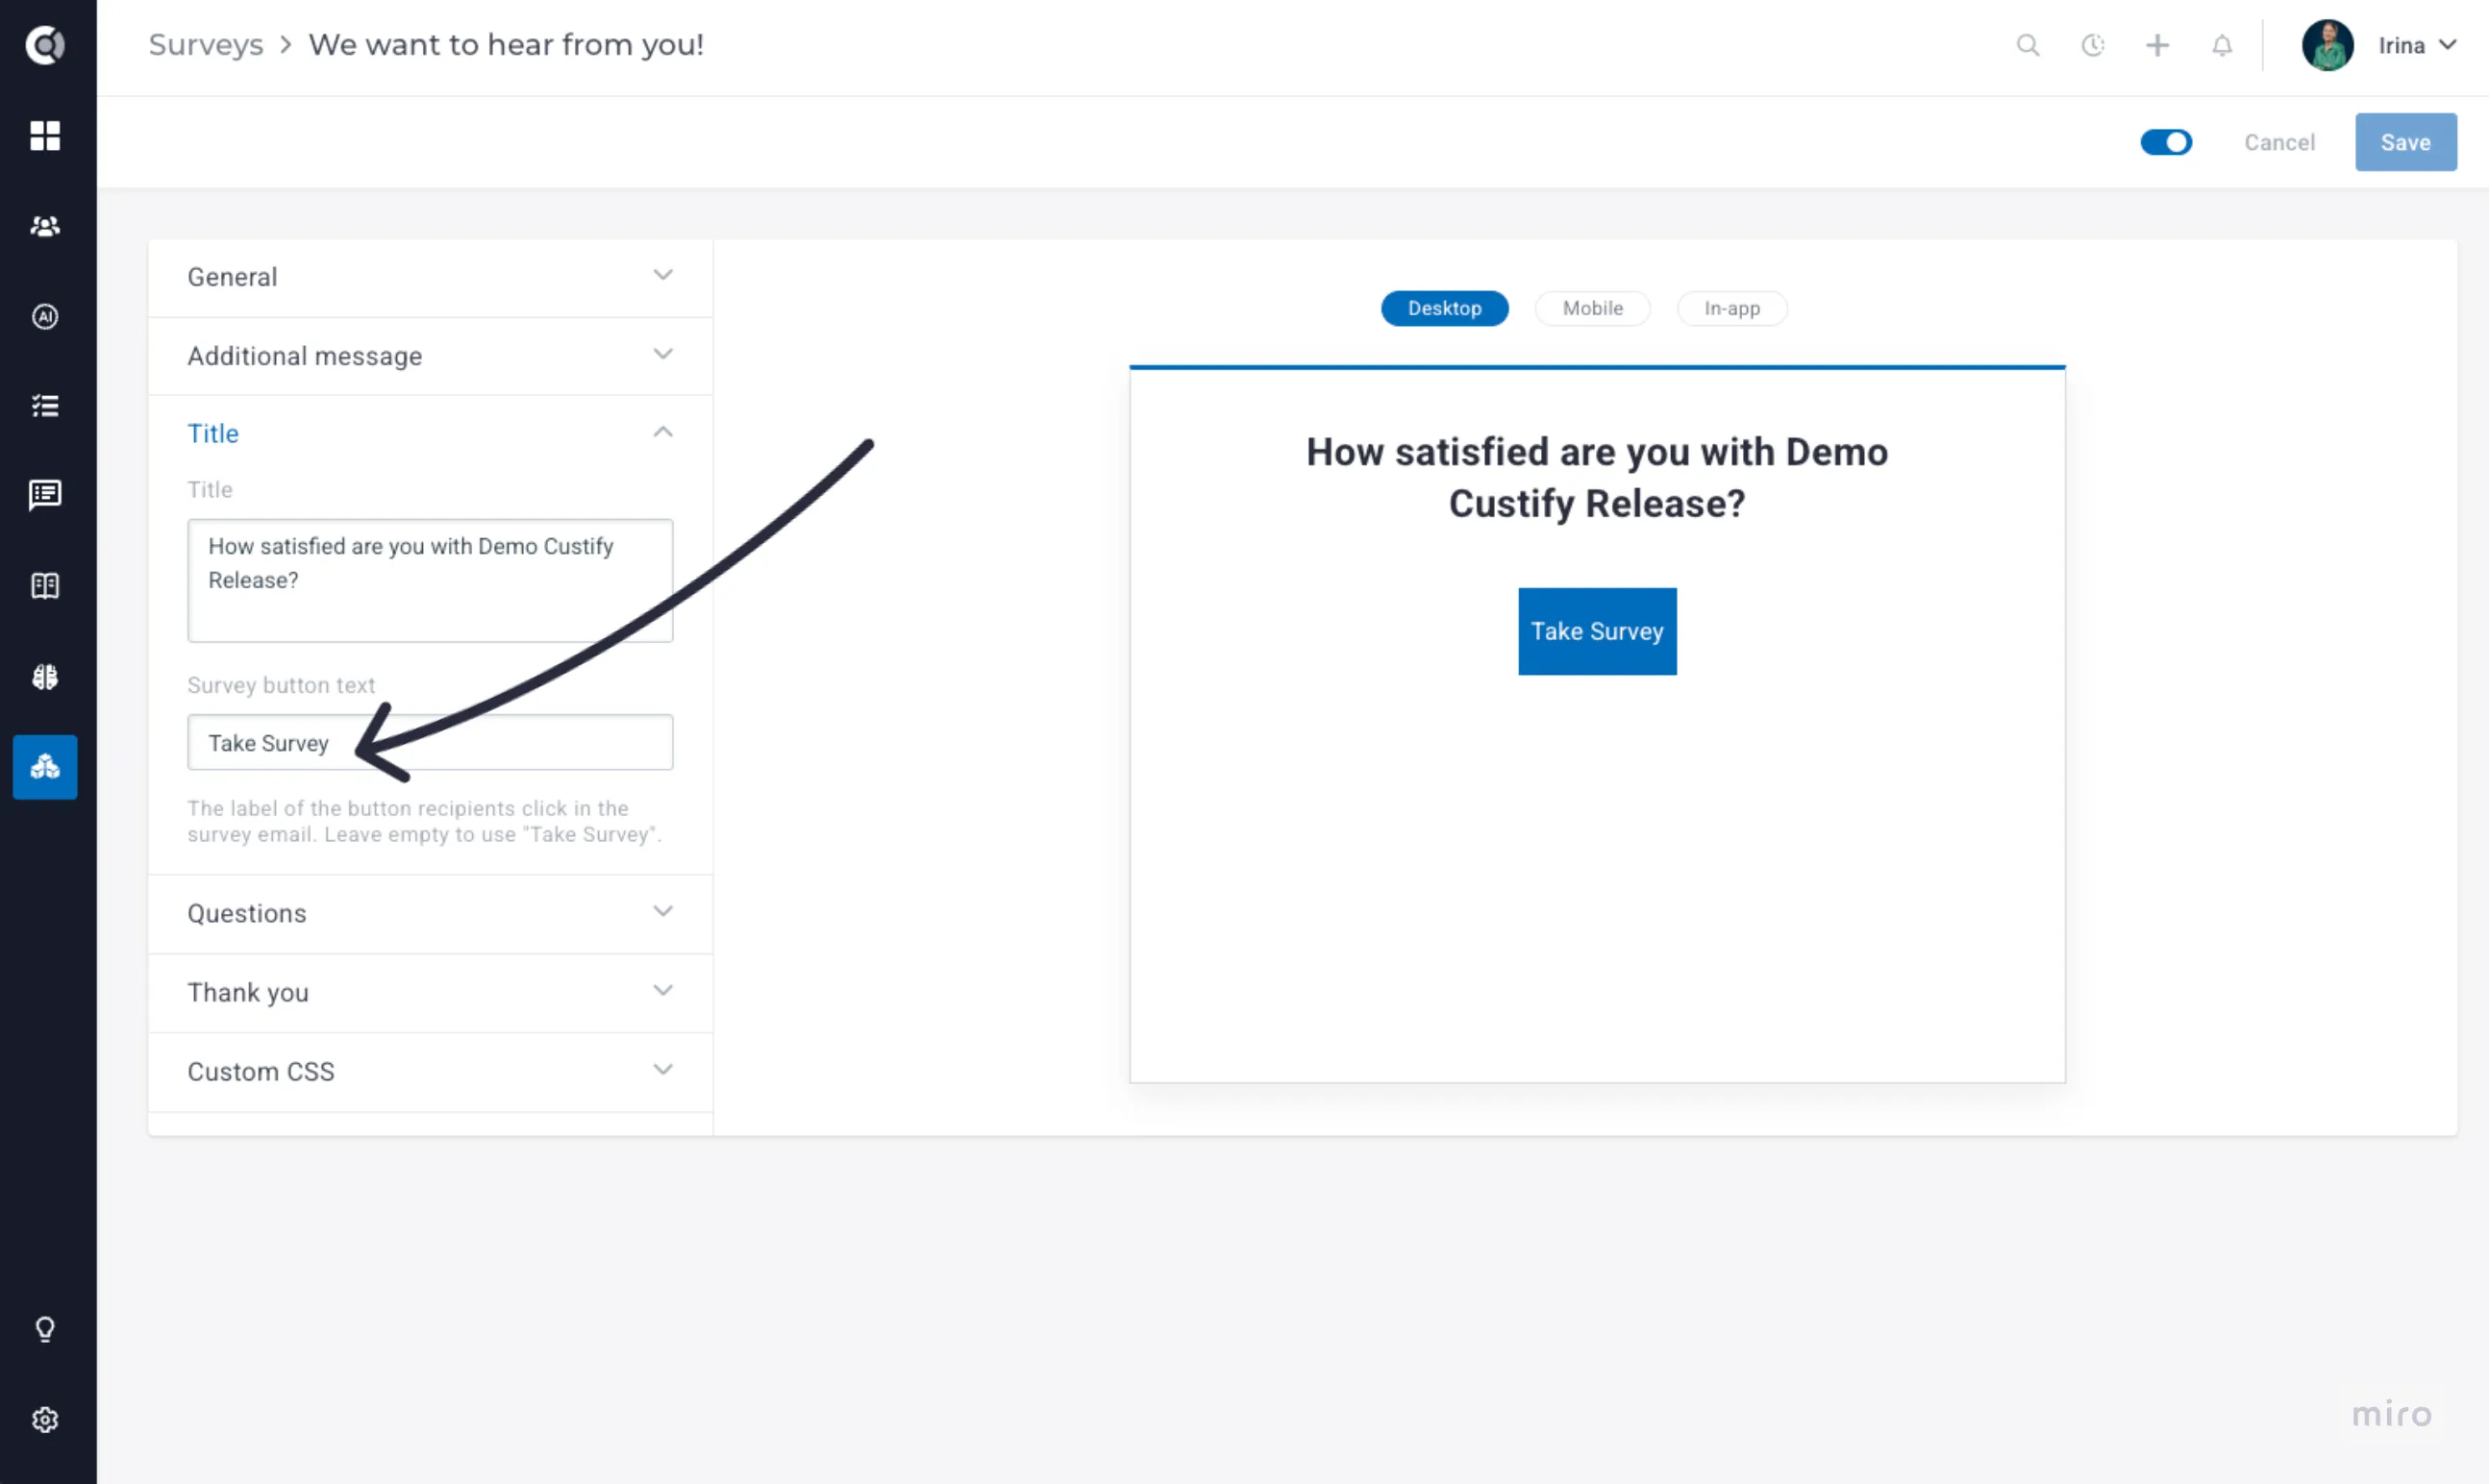
Customize the survey button text
Make every survey email feel personal. A new Survey button text setting lets you replace the standard “Take Survey” label with your own wording, for example in your customers’ language or matching the purpose of the survey. A more inviting button can mean more responses. Existing surveys keep showing “Take Survey” unless you fill in the new field.
More styling control for in-app surveys
Your in-app surveys can now match the look of your own product. They have a cleaner layout with better spacing between questions, and two new options give you more control:
- Custom CSS: style each in app survey individually. Your CSS only applies to in app surveys (not to emails or the public survey page) and is validated when you save.
- In-app preview: see exactly how the survey will look at real size, including your custom CSS, with a warning if the content is too large for the widget.
The widget size itself stays fixed. If you’d like to display it larger, you can override it with your own site’s CSS.
See who disregarded a survey response
Bring more transparency to your feedback data. You can now see who disregarded a survey response, which helps you make sure the option is used consistently, especially for responses with a negative score.
Customer Objectives
Customer Objective Templates
Consistent goals, without the manual work. Admins can now create reusable objective templates and apply them automatically through playbooks. The new playbook action Create objective from template adds the objective to a company’s Customer 360 as soon as the company reaches that step, ready for the CSM to personalize.
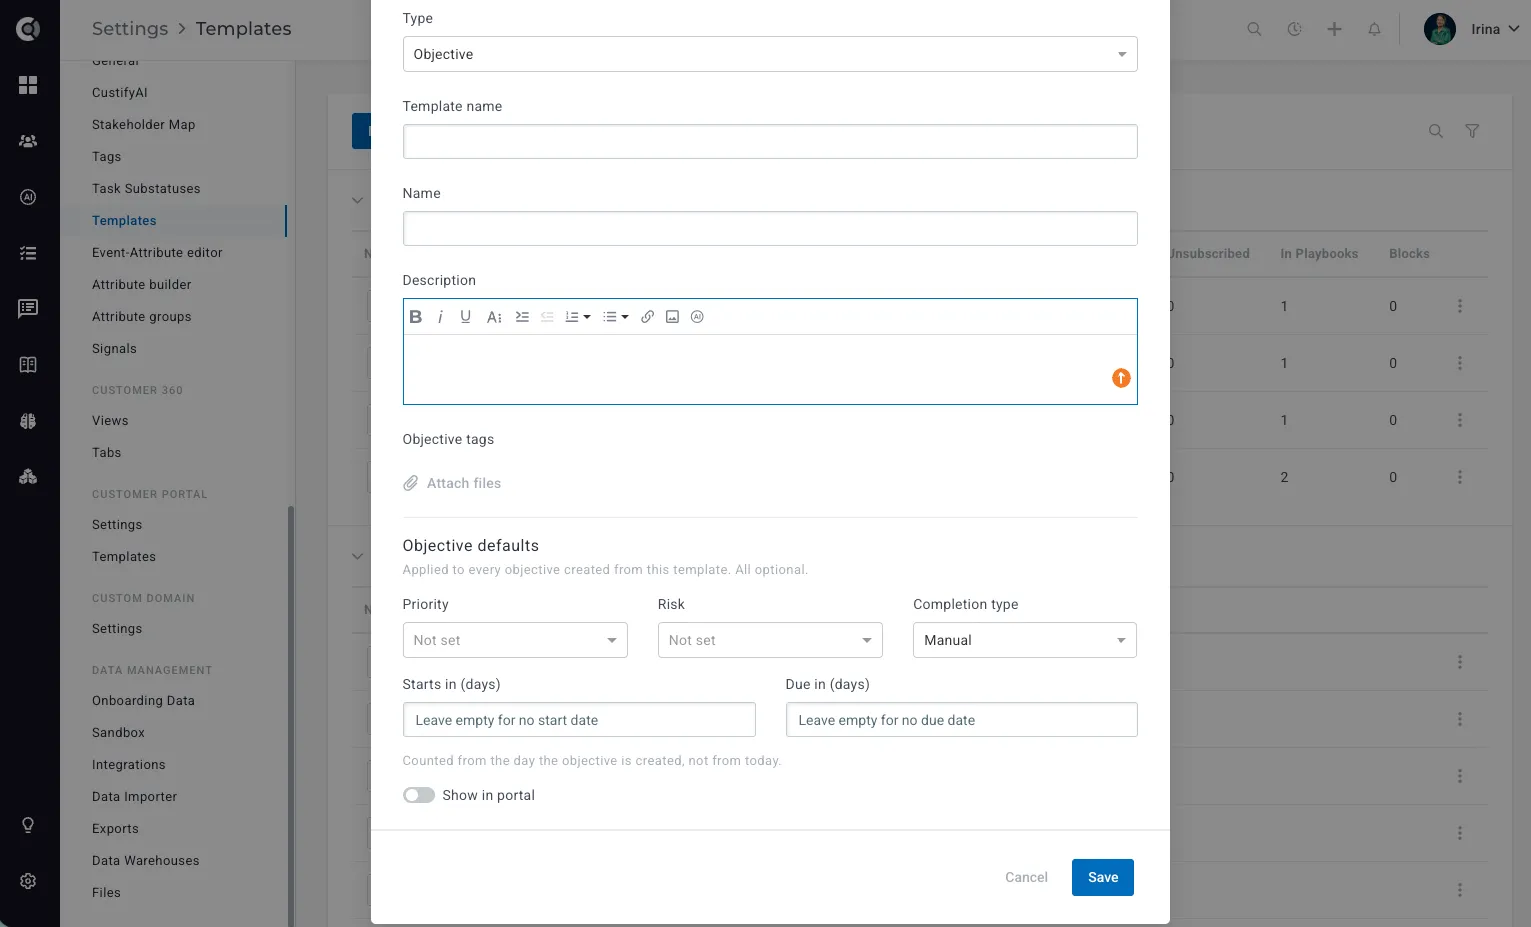
Objectives created from a template appear in the Objectives tab and count toward Value Realization, exactly like objectives added manually. This makes it easy to standardize goals for each stage of the customer journey, for example adding the same adoption objective to every new customer that enters onboarding.
How to use it: Go to Settings > Templates, click New template and select Objective as the type. Then add the Create objective from template action to the relevant playbook.
Stakeholders Map
Exclude people by tag
Keep your Stakeholders Map focused on the people who really shape the relationship. You can now exclude people using tags, for example contacts who have left the company or third parties. Choose the tags in Settings > Stakeholder Map, and anyone carrying them is removed from the map and from the active, at risk, and multithreading numbers, while their history stays intact. Adding or removing the tag on a person updates the map automatically.
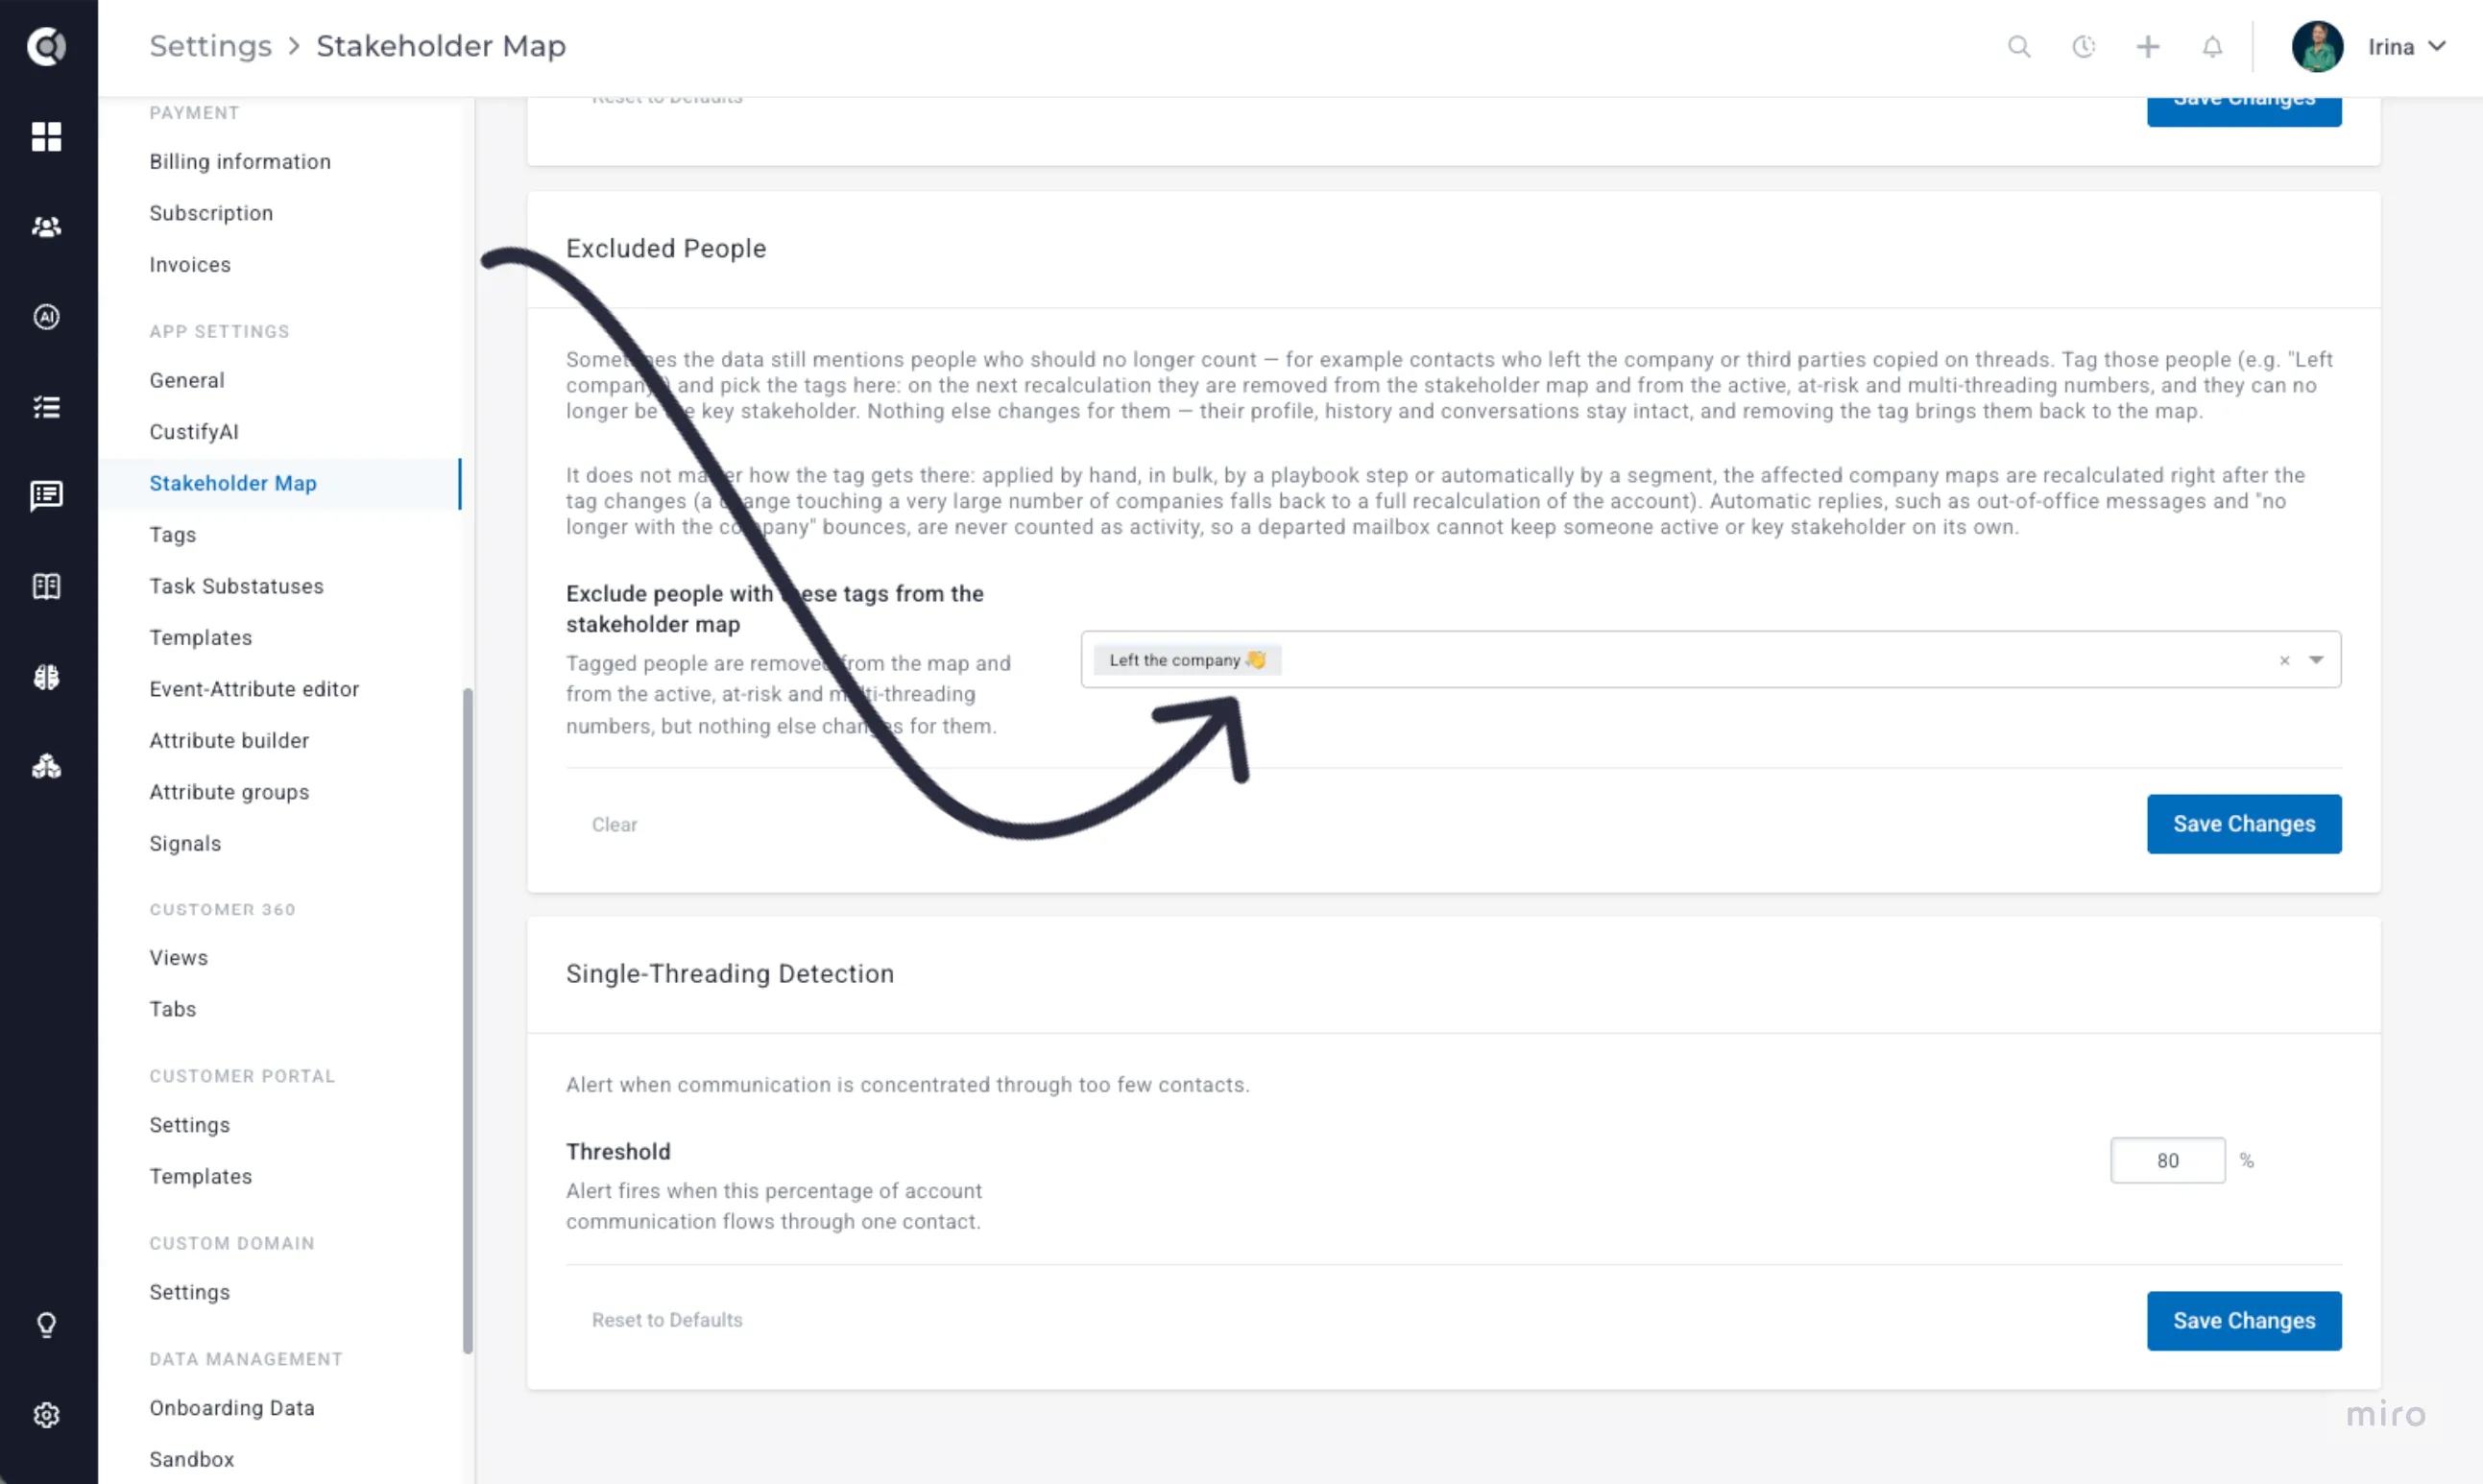
In addition, automatic replies (such as out of office or “I no longer work here” messages) no longer count as interactions, so your key stakeholder is always someone who’s actually engaged.
CustifyAI
Proactive Insights agent
The insights in MyCustify come from Proactive Insights, a new CustifyAI agent that works for you overnight. It reviews recent customer conversations in each CSM’s book of business and surfaces risks and opportunities, such as cancellation hints or competitor mentions, even when they’re buried in the middle of a long email.
You’ll find it under CustifyAI > Agents, with its own run history.
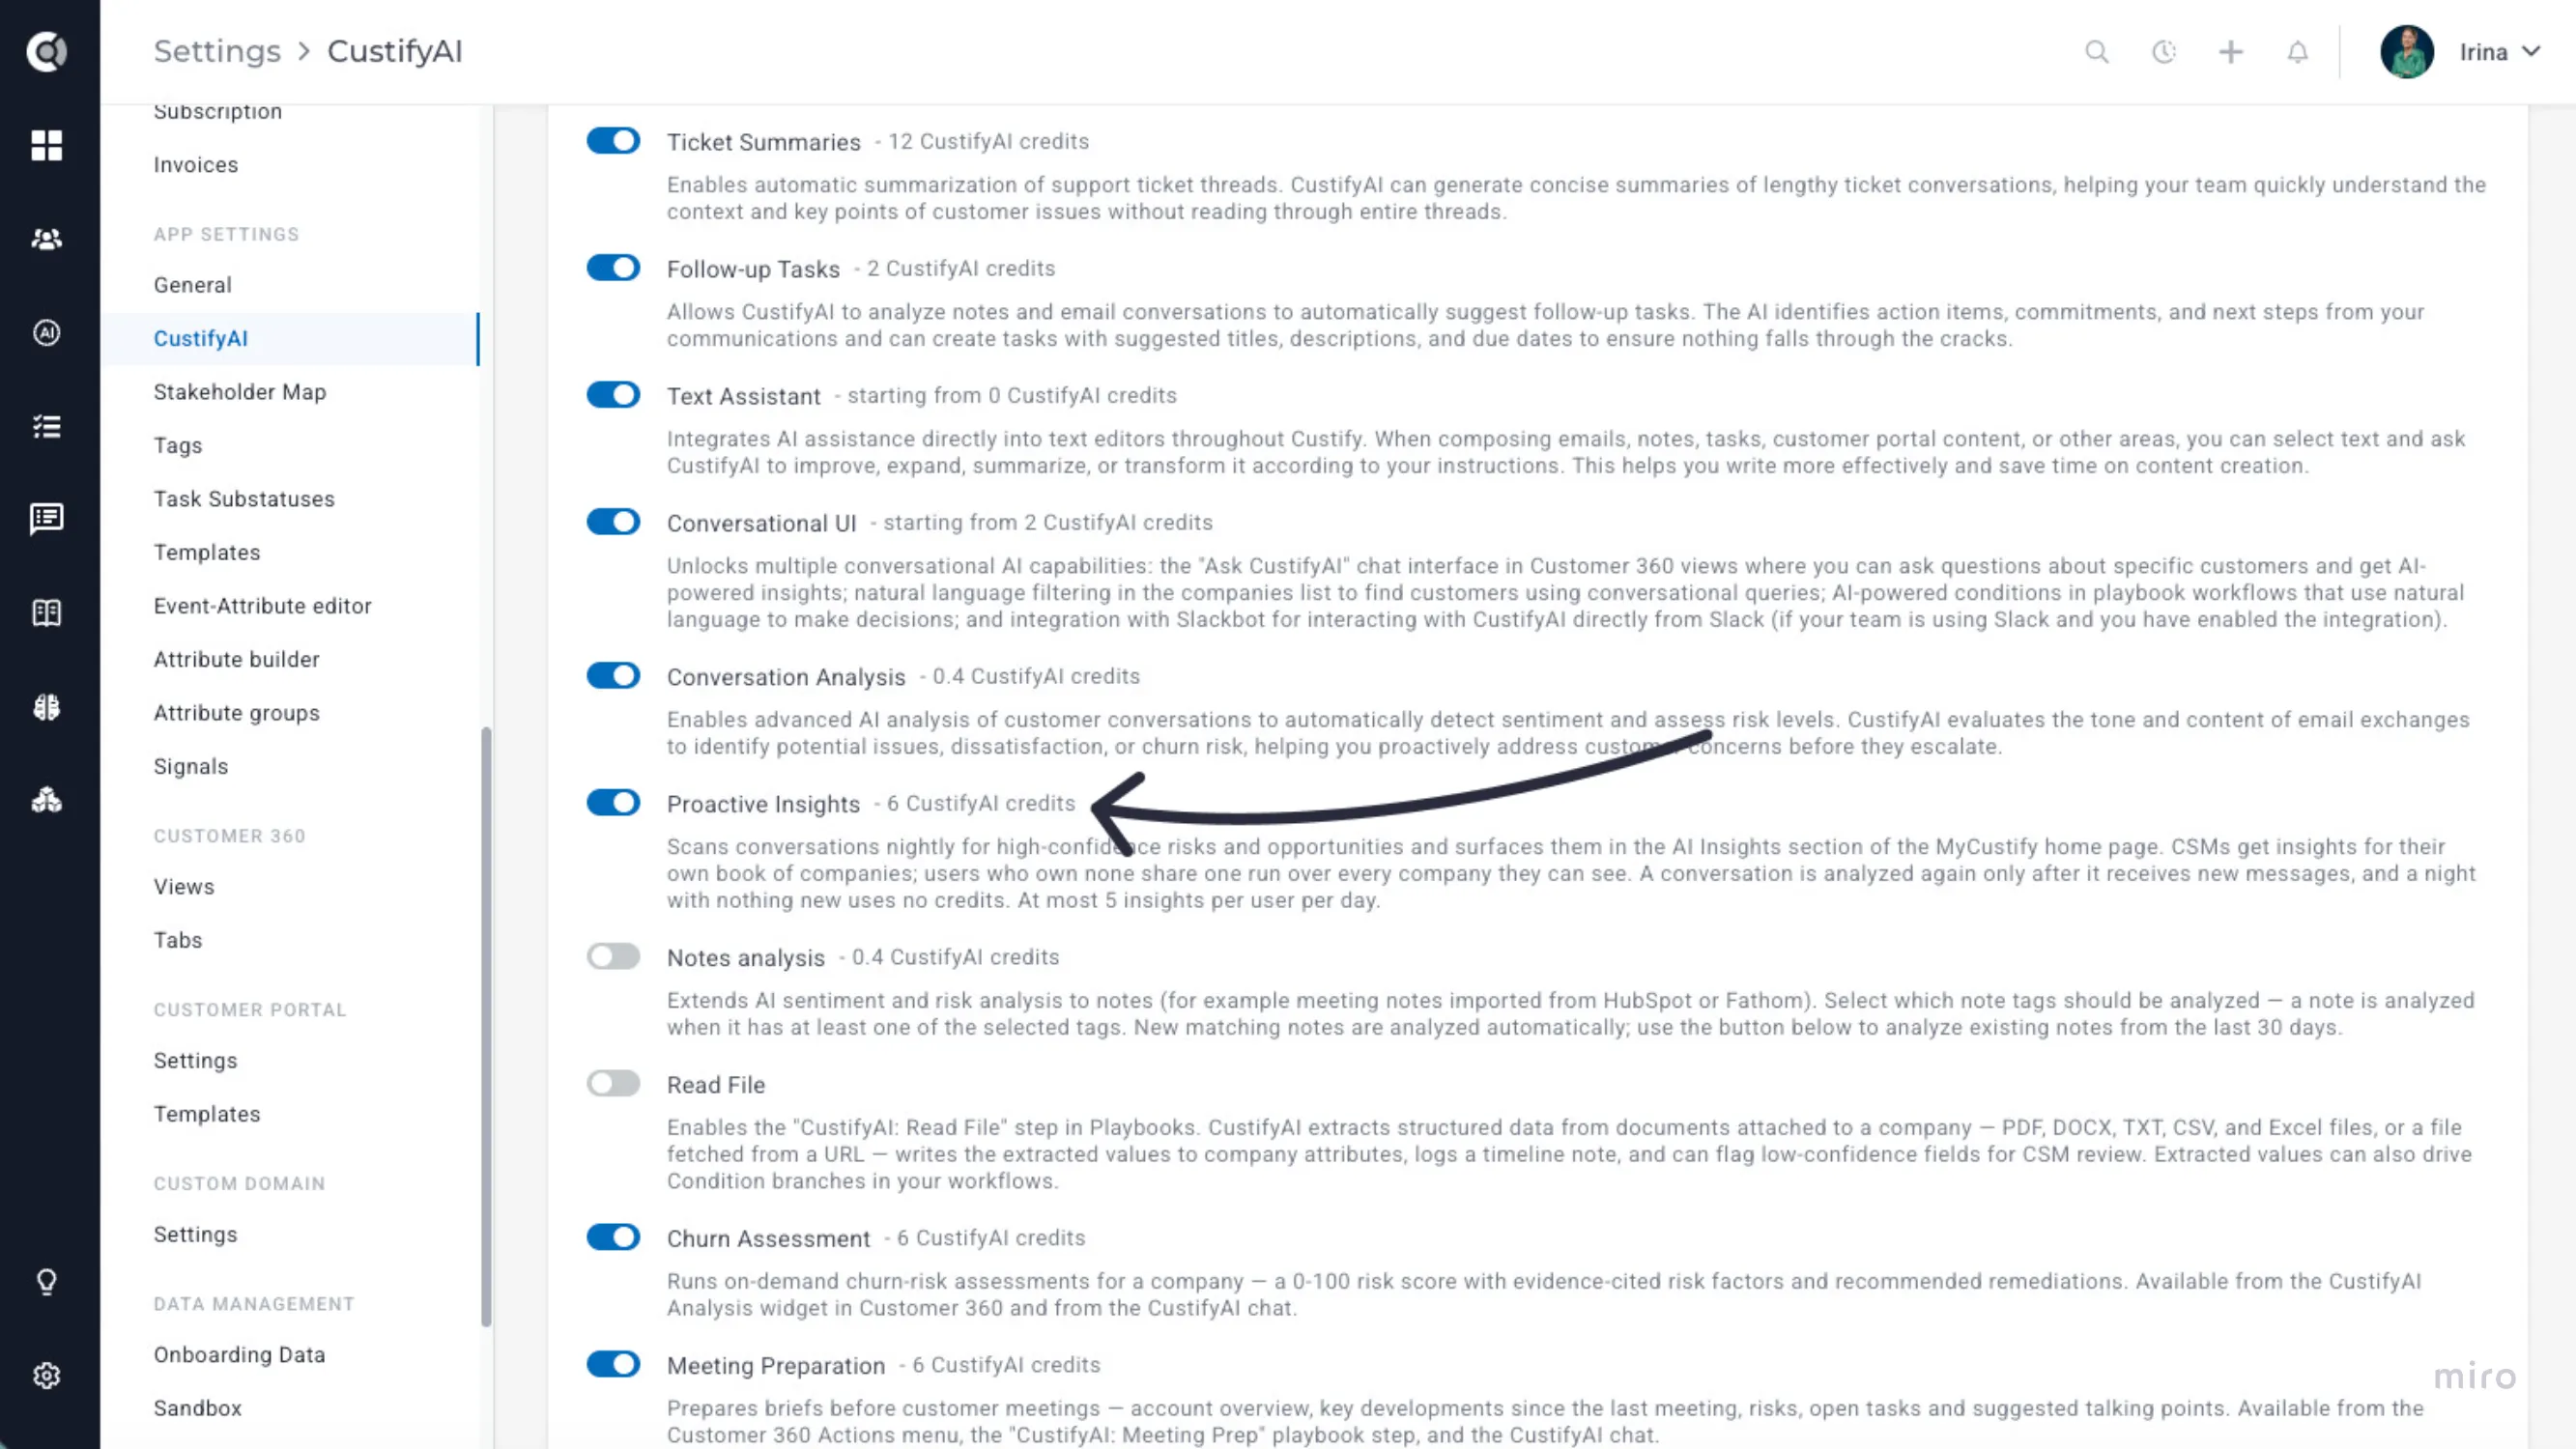
Good to know: Each run uses AI credits (6 credits per run, multiplied by the model tier), visible in Billing > AI Credits History. To keep usage predictable, it creates at most 5 insights per user per day, and each conversation is analyzed only once, so quiet periods use no credits.
Integrations
Segment Integration: Event Filtering
Keep your customer data clean and meaningful. Account admins can now block unwanted Segment events before they ever reach Custify, so test traffic and internal activity no longer distort customer timelines, usage data, and health scores. No extra setup is needed on the Segment side.
Rules are set per event type (Track, Identify, and Group). For each one, you can either block specific events or allow only specific events, and combine conditions with AND or OR logic. A preview lets you test your rules before saving, and ready made templates cover common cases such as excluding internal domains or test events.
Built-in safeguards protect your data:
- Delete requests are never blocked.
- An empty rule set never blocks all events by accident.
- If a rule can’t be evaluated, events are let through rather than lost.
- Rules only apply to new incoming events. Data already stored in Custify is not affected.
How to use it: Go to Settings > Integrations > Segment, turn on Filter incoming events, and define your rules.
Settings
New permissions for managing tags
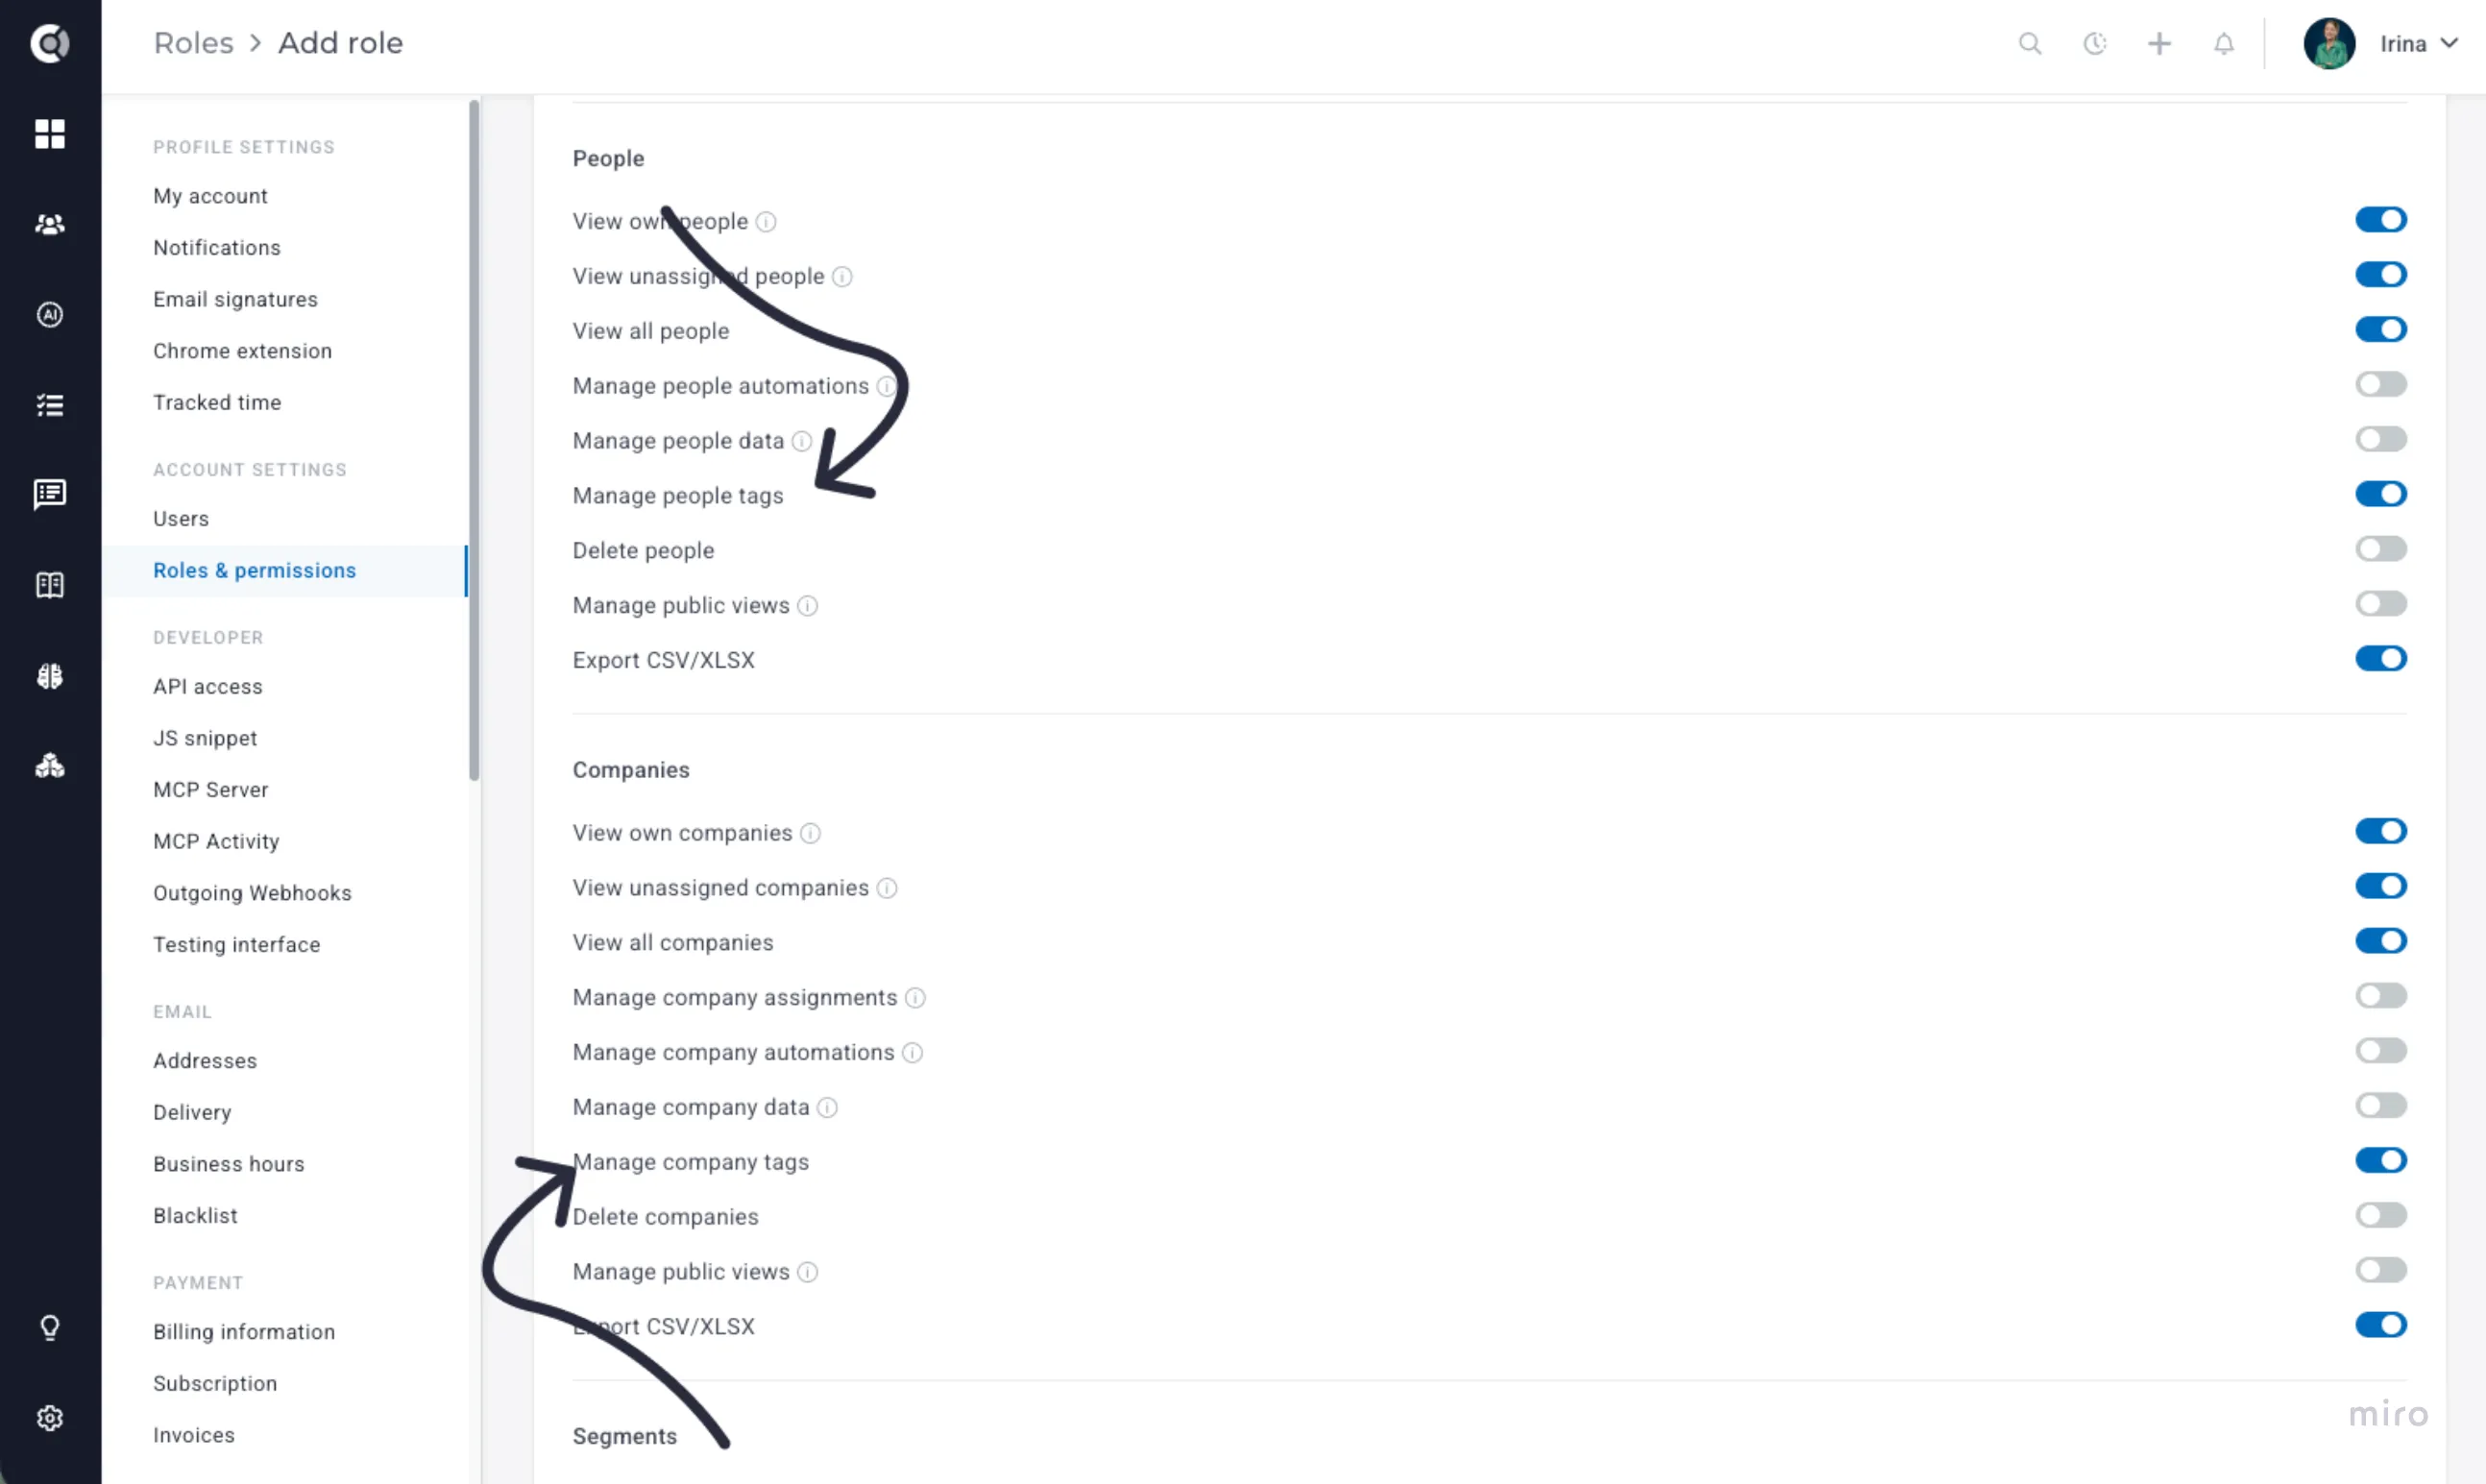
Keep your tags consistent and reliable. Adding and removing tags on companies and people now has dedicated permissions, Manage company tags and Manage people tags, so you decide exactly who can change how customers are classified. Set them for each role under Settings > Roles & permissions.
See who created a tag
Know where every tag comes from. Under Settings > Tags, next to when a tag was created and how many times it has been used, you can now see who created it. This applies to tags created from now on.
Rename dropdown options safely
Update your data as your business evolves. Renaming a dropdown option that was already in use (for example, a churn reason used to trigger a playbook) used to return an error. You can now rename dropdown options freely: when you change “Gold” to “Platinum,” Custify automatically updates every company, person, segment, playbook, saved view, and report that used the old value, so nothing breaks and no data is lost. Deleting an option that is in use is still blocked, as before.