Customer 360° Profile
Get a 360° view of your customers. See all the relevant data from various systems and platforms in one place. Customize the view to your needs with custom inputs and your own metrics.
Getting Started with the Customer 360° Profile
The Customer 360° Profile consolidates all the relevant customer data in one place, allowing you to:
- Visualize the full list of attributes and metrics for a customer
- Create and review notes, tasks, and emails
- Check product usage and activities
- View the emails sent to or received from the customer
- View the tickets generated by the customer (if you have an active integration with a ticketing system)
- See financial data related to this company (if you have an active integration with a financial application)
- Add any files that are relevant to the customer
- Have a quick overview of the customer’s Health Scores, Lifecycles, Playbooks, and Segments
Companies 360° Profile
Check all the existing data for a specific customer – all your attributes, events, metrics, communications and Custify tools in a single place.
Attributes
Check the full list of attributes and metrics (including default, custom, manual attributes, and also Calculated Metrics).

Side note! You can also create attribute groups to be displayed on the Customer 360, which can be defined in the Settings area of the product.
The available actions in the Attributes panel are as follows:
- Search attributes: Search by keywords to quickly find the attribute you are looking for.

- Add manual attributes: Only available if you have existing manual attributes. Learn how to create manual attributes.

- See attribute description: By hovering over an attribute, you can see the description set for it in Settings —> Event-Attribute Editor. This can help you better understand the data in the Customer 360° Profile dashboard.

Populate manual attributes: After adding manual attributes to the attributes list, populate them with values.
💡Custify Tip: Manual attributes can be string, date, boolean, numerical, or dropdown attributes.
- For string and numerical attributes, type in the values.
- For date attributes, select the date from the displayed calendar.
- For boolean attributes, you pick either “True” or “False” values.
For dropdown attributes, select from the available options to add to the company.

Observe the evolution of an attribute: Check how the value of an attribute evolved by clicking on the chart icon (only visible for numerical attributes).

Health Scores
Check the dashboard on the right to analyze the Company’s health scores.

💡Custify Tip: The Health Scores are displayed in the Customer 360° Profile in the same order as in the Health Scores module.
Click on a Health Score to see how it evolved from the moment it was created.

💡Custify Tip: If a Health Score you defined is not showing in the Customer 360° Profile, you may want to check the Health Scores restrictions. The customer may be excluded from the health score calculation.
Lifecycles
The list of Lifecycles the Company was/is a part of is also displayed in the menu on the right, along with the respective Lifecycle and goals/Tasks achievement statuses.

CSM Rating
Use an easy rating system to share your insights and expertise with other members of your team. Make sure you manually populate the CSM Rating after each customer interaction. Use the one-to-five point rating system to give the Company a score. Depending on how healthy and successful you consider the account to be, you may also add a comment for clarity.
💡Custify Tip: CSM rating is only available for Companies, not for People.

The CSM Rating can be changed anytime, but all previous scores will be kept in the history. As such, you can quickly review them and observe the customer's evolution. Use the CSM Rating to segment Companies by score or create automations based on bad/good CSM ratings.
💡Custify Tip: You can edit the CSM Ratings and comments by clicking on the Pencil icon.
🎯 Use Case Ideas
- Bad CSM Rating: Use Playbooks to create Tasks for additional check-ins automatically.
- Very good CSM Rating: These customers can be seen as upselling opportunities, so you may want to reach out to them.
- Create a Health Score based on the CSM Rating and set the impact you want it to have on the Global Health Score.
- Create an MRR exposure widget based on CSM Ratings to see how much of your monthly revenue is at risk.
CSAT Score/Promoter score
The CSAT Score and the Promoter Score are attributes that get populated from external Integrations (e.g. Wootric) or when a customer completes a Promoter/CSAT survey sent from Custify.

Here’s how the CSAT Score and the Promoter Score work in both cases:
- Via Integration: Once the Integration with the external Promoter Score tool is enabled, the Score will be sent to Custify based on email address. Then, the embedded Promoter Score formula will take the value of the latest response and calculate the Company Promoter Score using the Average Promoter Score method. This method returns an average of the latest response from each person and maps the score to the Company they are assigned to.
- Via the Internal Survey module: Once a user completes a survey (CSAT/Promoter Score), their result will be mapped in their People profile and in the profiles of all companies they are assigned to. The Company-level score is calculated as an average of all the scores received from all the People assigned to that company. The score taken into account is always the most recent one.
💡Custify Tip: You can also check the CSAT/Promoter Score history and comments.
Tasks
Have a quick overview of all the open, overdue, done, and irrelevant Tasks defined for a customer. You can also define new Tasks directly from the Company 360° Profile.
Notes
Post notes to your customers’ accounts, tag users in them, modify them, or mark them as sticky to always have the important notes on top.
Notes can be created either manually in the Company 360° Profile or automatically through Playbooks or imported from connected CRMs. In any situation, they can be reviewed on the Company 360° Profile or in Touchpoints.
Creating notes manually: Enter your text and use the formatting options to structure it. Add tags to have a better understanding of the note’s purpose or use a predefined note by loading a template. You can also mark a note as sticky, which will keep the note at the top of the list.

Creating notes automatically: Automatically post a note when a customer enters or leaves a segment. Schedule or trigger the note by manually adding a Company to the Playbook. Add dynamic data to your note (e.g., Health Scores values, attributes, metrics, etc.) to decrease the manual work your team has to do

Once a note is created, you can also:
- Edit the note
- Mark note as sticky, so it will show on top of the notes
- Add a note tag
- Add a note comment
- Delete it.
💡Custify Tip: Notes can include pictures or files, too. This can make it easier for your team to check important documents without having to log into multiple systems.
In the Notes tab, you will be able to:
- See the notes added manually by the CS team
- See the notes added automatically through Playbooks
- See the notes added through Integrations, which will carry the icon specific to the app that imported the note
- Filter notes by tag and author
- Search for notes with keywords
You can choose to export notes from Custify to other systems (e.g. CRMs, like Hubspot and Salesforce). This can help improve the communication between your internal departments (e.g. Sales — CS team), if they are using different systems in their daily activities. Check the integrations settings to see if this option is available.
Meetings
Automatically import meetings from Gmail and Outlook to enhance customer records with valuable meeting insights.
The logic for importing meetings is similar to email mapping – meetings are mapped based on email address/company domain. To import meetings, you just need to be connected to Gmail/Outlook or reconnect your mailbox if you are already connected.
Past and Upcoming meetings will be imported, and you will have the option to search, filter or add notes to a meeting.
Communication
Depending on your email delivery settings, the Communication tab will collect all emails sent from Custify, as well as those synced from your email integrations.
Once you enable yourGmail/Outlook integration and connect your email account to Custify, the emails from your inbox will be mapped in Company/People profiles. You will then be able to see the conversation history directly in the Company 360° Profile.
💡Custify Tip: When you turn on the Gmail integration, the last 10,000 emails will be synced to Custify, as well as all the new emails you receive.
To send an email from Custify, you can either create it directly in the Company 360° Profile or automate the process using Playbooks.
When the Enable company-dependent people roles is active in Settings - General, the email composer gains a new way to target recipients by role. Because roles are now scoped to the company, the same person can be a Champion on one account and a Power User on another, and the email goes to the right people on each one.
In the recipients dropdown, you will find a new option, People with a particular role, sitting just before A particular user. Pick a role from the list, and the email goes to every person who holds that role on the company you are sending from. People who do not have a role set on the current company are excluded — assign them a role from the People tab first if you want them included.
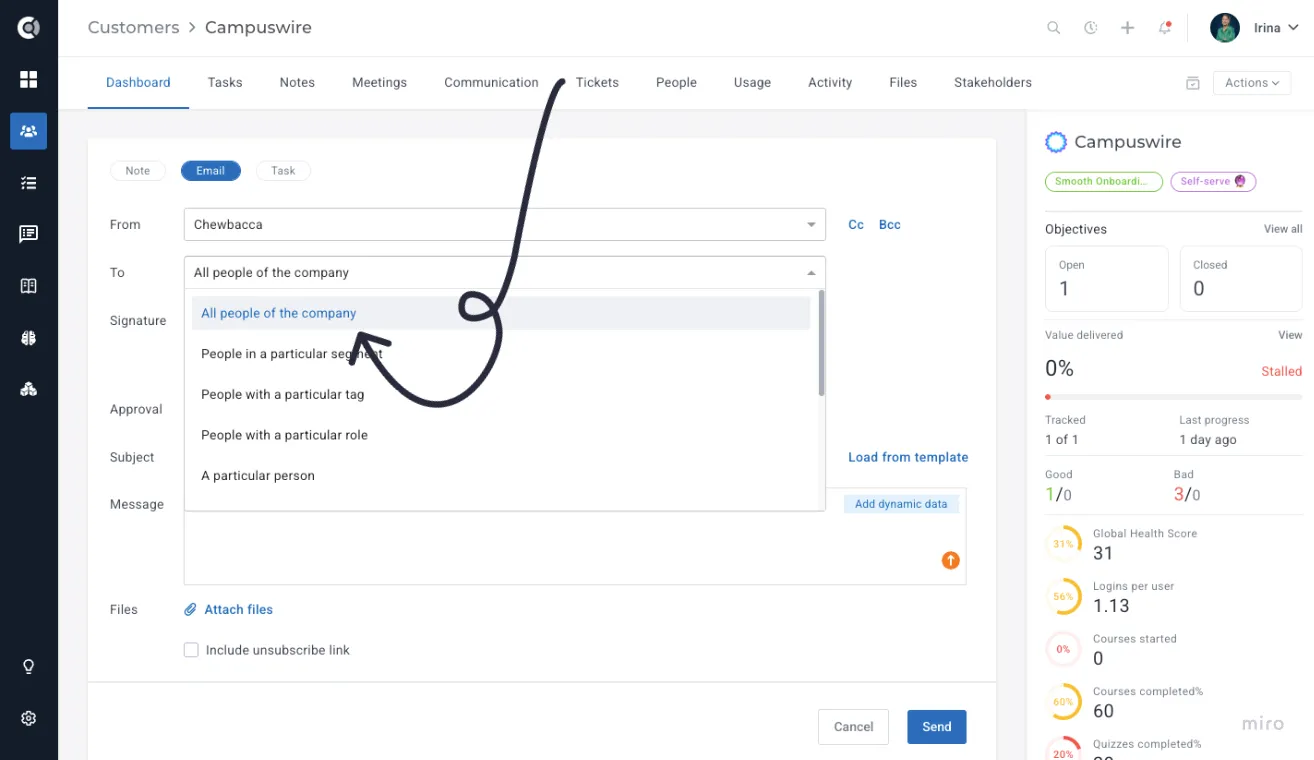
When the same email runs through a Playbook across many companies, the role is resolved at send time for each one. A person who is a Champion on Company A and a Power User on Company B will only receive the message on the company where the matching role applies.
The dynamic data picker also gets a new Relationship category with relationship attributes you can drop into the subject or body:
• {relationship:role} — the role of the recipient in this company.
• {relationship:linked_at} — the date the recipient was linked to this company.
• Any custom relationship attribute you defined under People-Company attributes (for example, {relationship:department_on_account}).
Each token resolves per recipient, per company, so the same Playbook run can produce different values for the same person across different accounts.
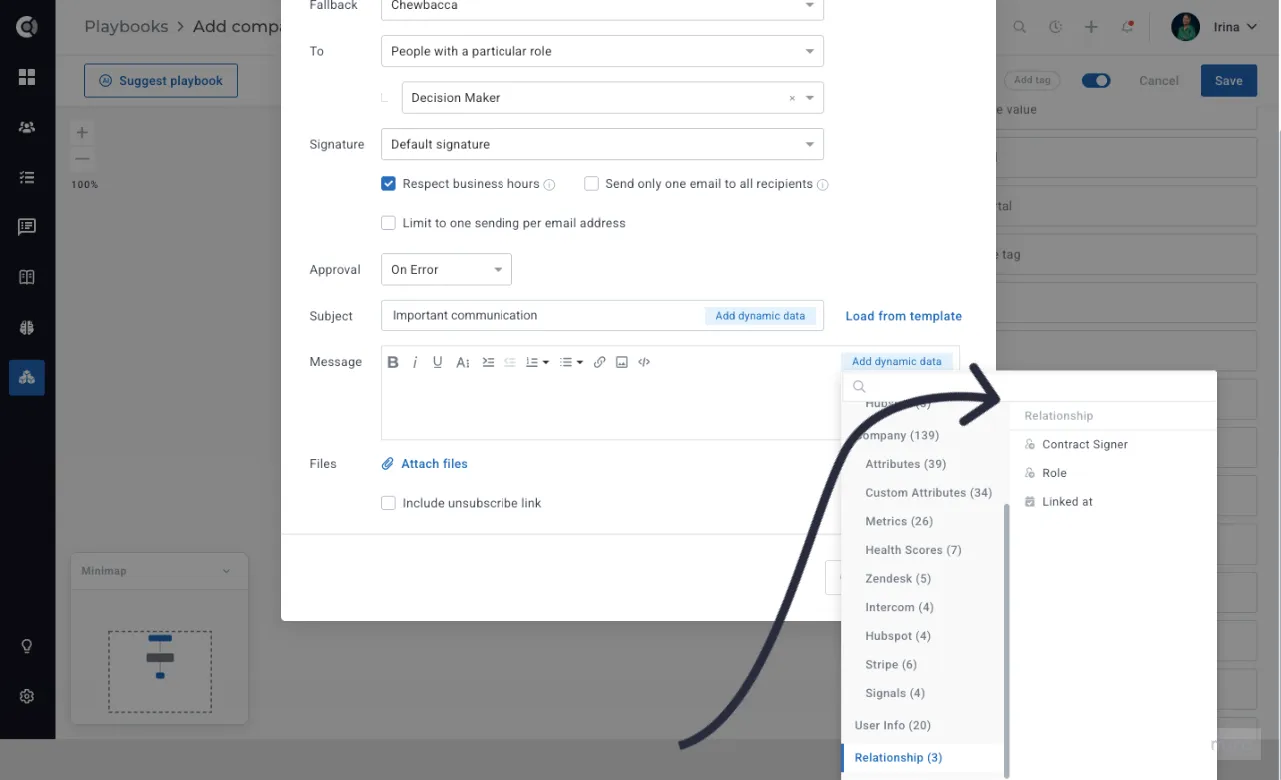
Custify Tip: If a recipient has no value for a relationship attribute, the dynamic field resolves to an empty string.
There are also several email customization options available:
- You can choose to send emails to:
- All People of the Company
- People in a particular Segment
- People with a particular tag
- Custom email address
- A particular user
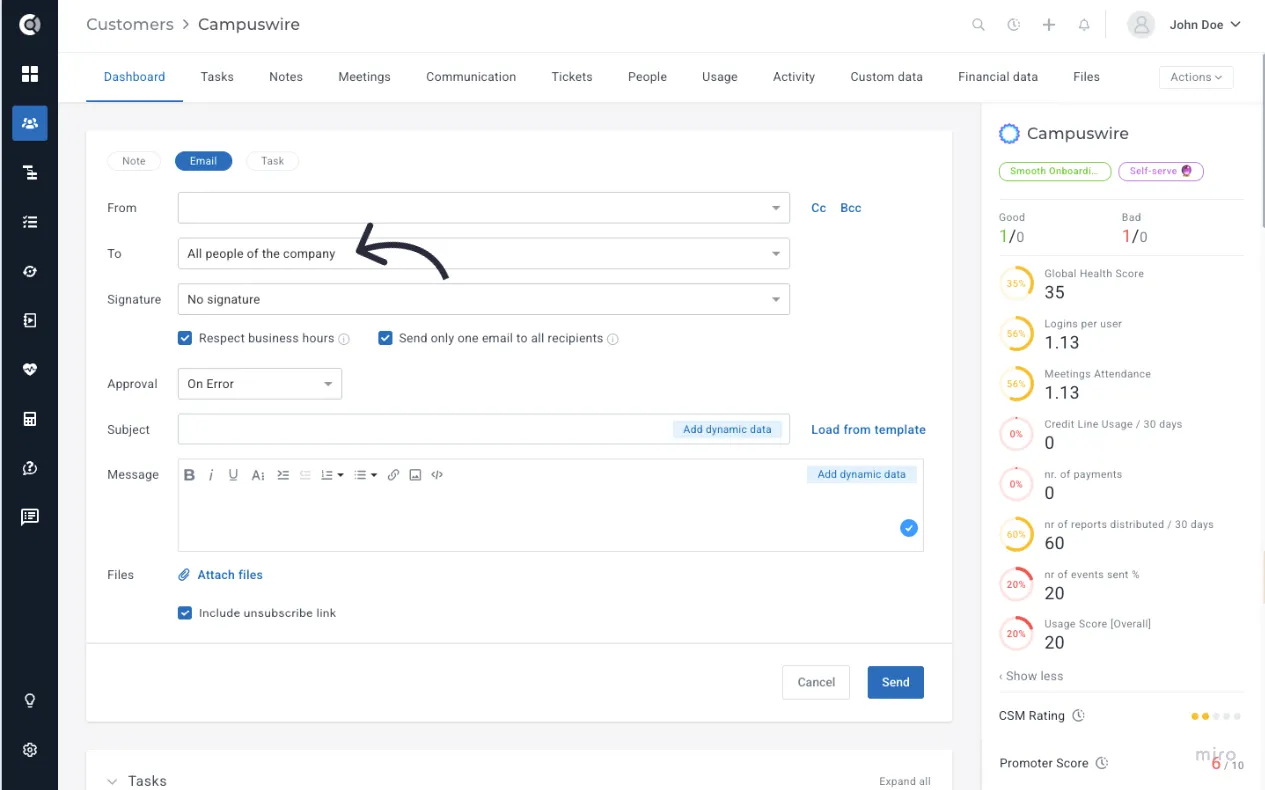
- Load from template: Define your email templates in Settings and build emails using predefined information. Save time by using predefined emails instead of recreating them for each customer.
- Add dynamic data: Add dynamic data to the email subject or body to automatically customize the text. You will be able to choose from attributes, metrics and Health Scores. These will be automatically populated with values the moment the email is sent.
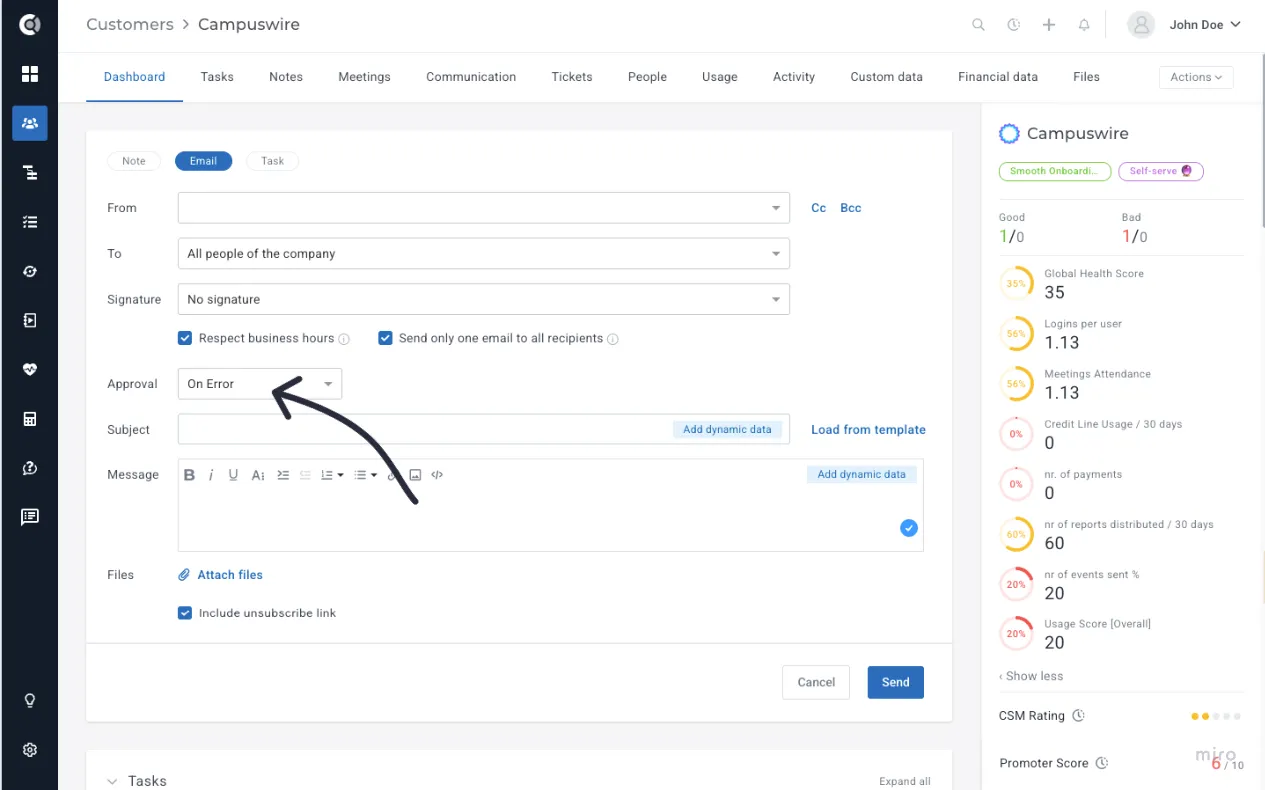
- Respect business hours: This option prevents sending emails outside working hours. Business hours can be set in Settings.
- Send one email to all recipients: A Company can have multiple People assigned to it. So, instead of sending an email to each person, you could check this option and generate a single email for everyone. It will act like sending an email to a Distribution list by automatically adding all the recipients.
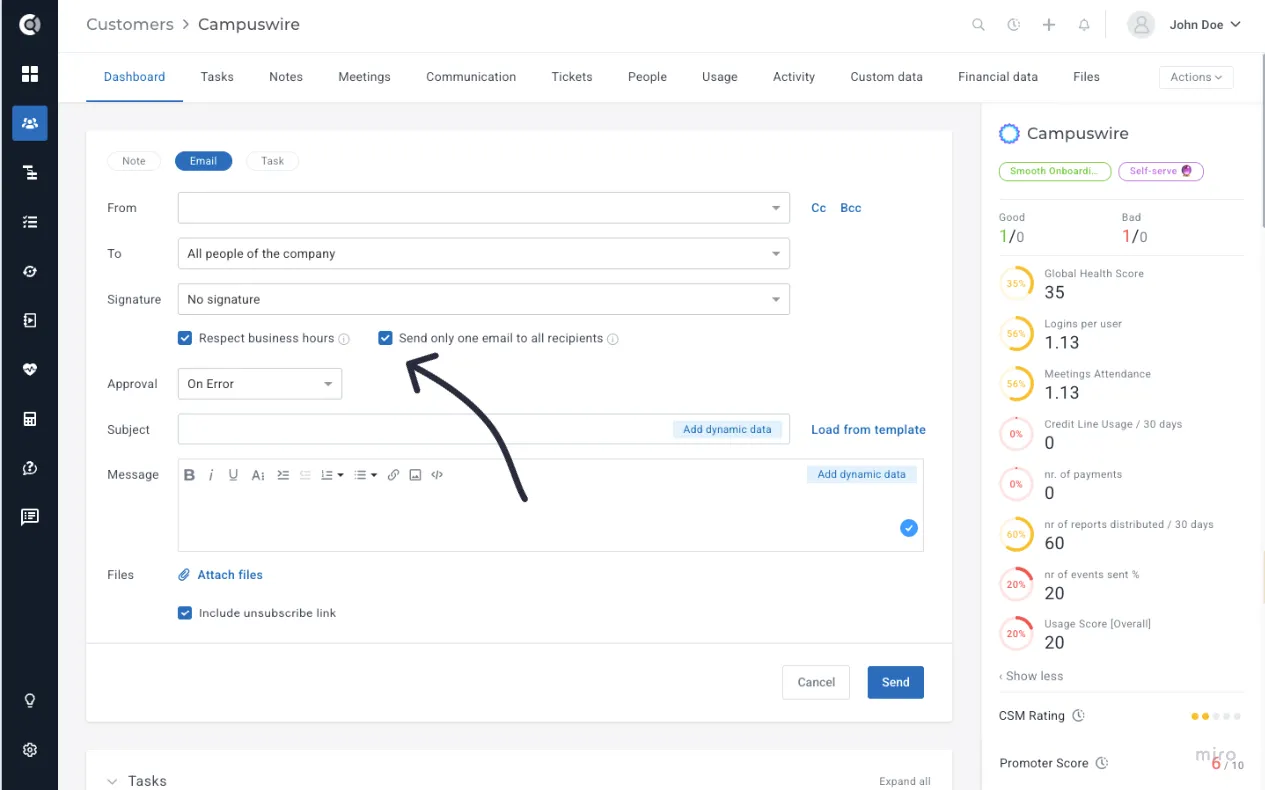
- Add Signatures: In the Signature dropdown, you can choose between no signature, adding the default signature, or adding a customer signature created for the user listed in the “From” field.
- Add Approval Flow: The Approval Flow menu allows you to choose if you want to approve the emails before sending them every time, only if there is an error, or never. You can edit, delete, and send the emails in the Touchpoints - Pending approval section.
- Attach files: Attach the files that you want to share with your recipients.
- Include Unsubscribe link: Selecting this option will include an “Unsubscribe” link to your emails. If a customer clicks on it, they will not receive emails sent from Custify anymore.
The unsubscribe link only appears if the email includes at least one recipient who exists as a person in Custify. If the email is sent only to a custom email address (not an existing Custify person), the unsubscribe link will not show up — even if the option is checked.
Tickets
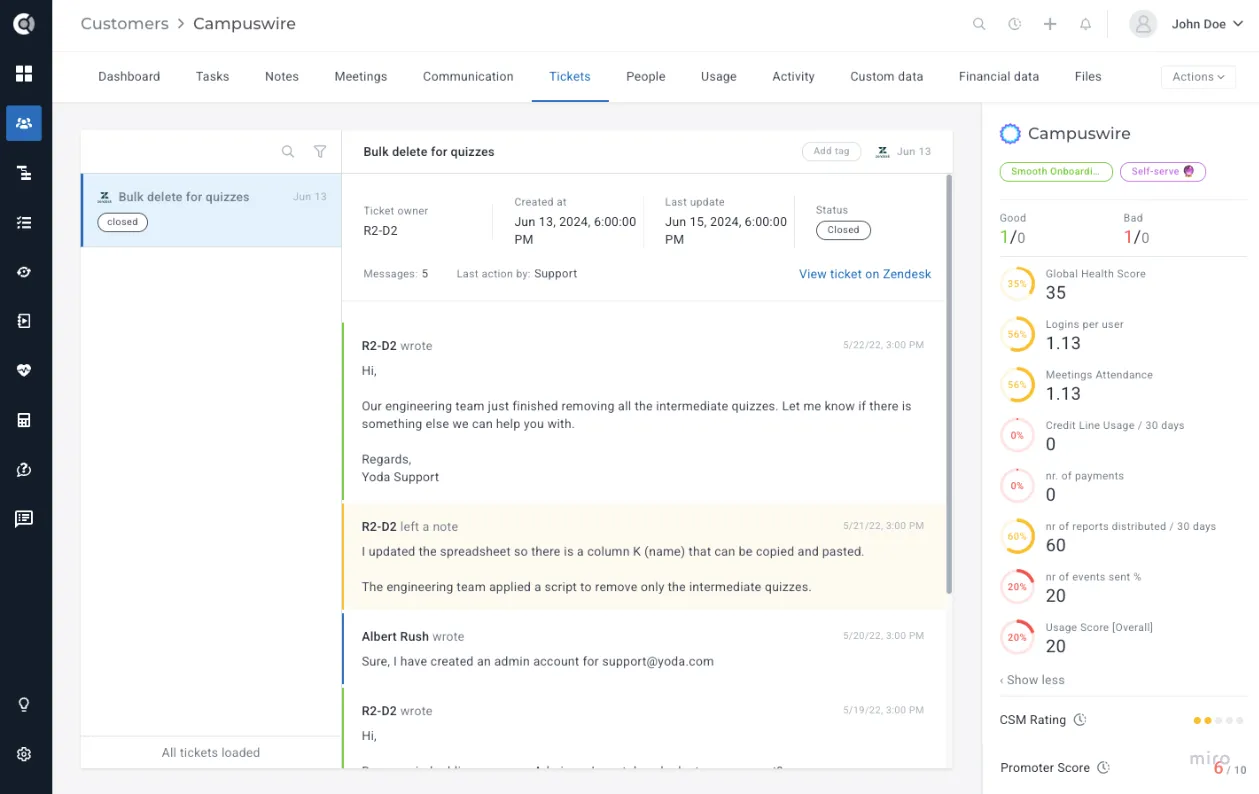
Import tickets from your ticketing tool into Custify to quickly check their status and history.
Tickets will be imported based on the email address and will be mapped to each user’s account. They will also be reflected on the Tickets tab of the Company/Companies the user is assigned.
💡Custify Tip: You cannot create new tickets, you can only import them from specific Integrations. Tickets will be synced in the View only mode —you cannot edit them in Custify. Any modification should be performed in the ticketing tool directly.
Child Companies
Access the full list of Child Companies assigned to the given Company.
You can change the Child Companies tab view by changing the list of attributes, reordering the attributes, and sorting the Child Companies by attribute values.
People
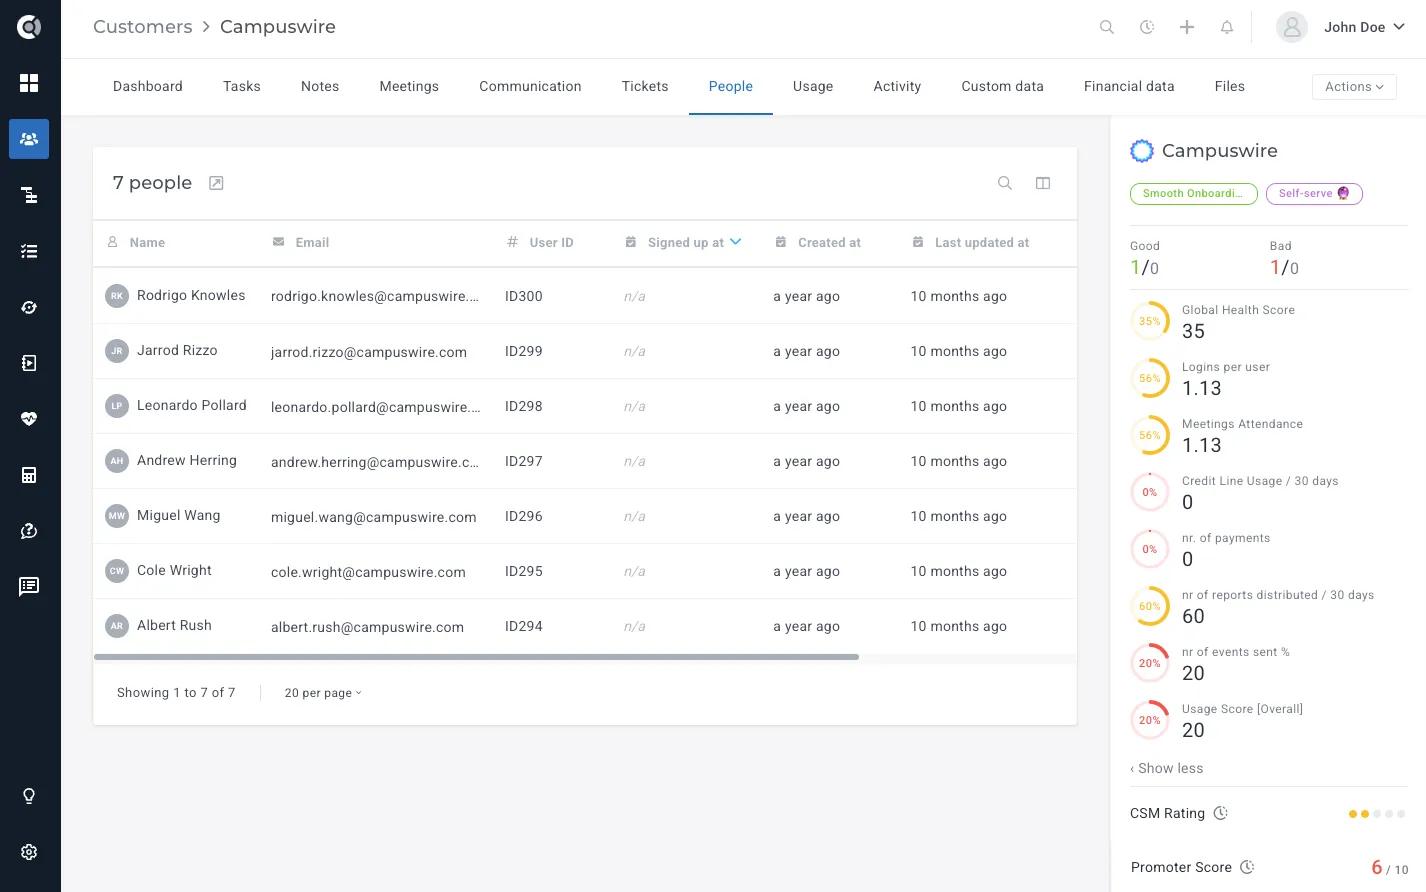
Access the full list of People assigned to the given Company. Accessing this will open the People List View with reduced functionality (you will only be able to add/remove columns and change the display order).
You can also view the Activity graph per user. The graph is populated based on the events that the users are generating.
Company-dependent people roles
People can hold different roles in every company they are assigned to. The same person can be a Champion at one account, and a Power User at another, and the role you see in the People tab always reflects the company you are currently viewing.
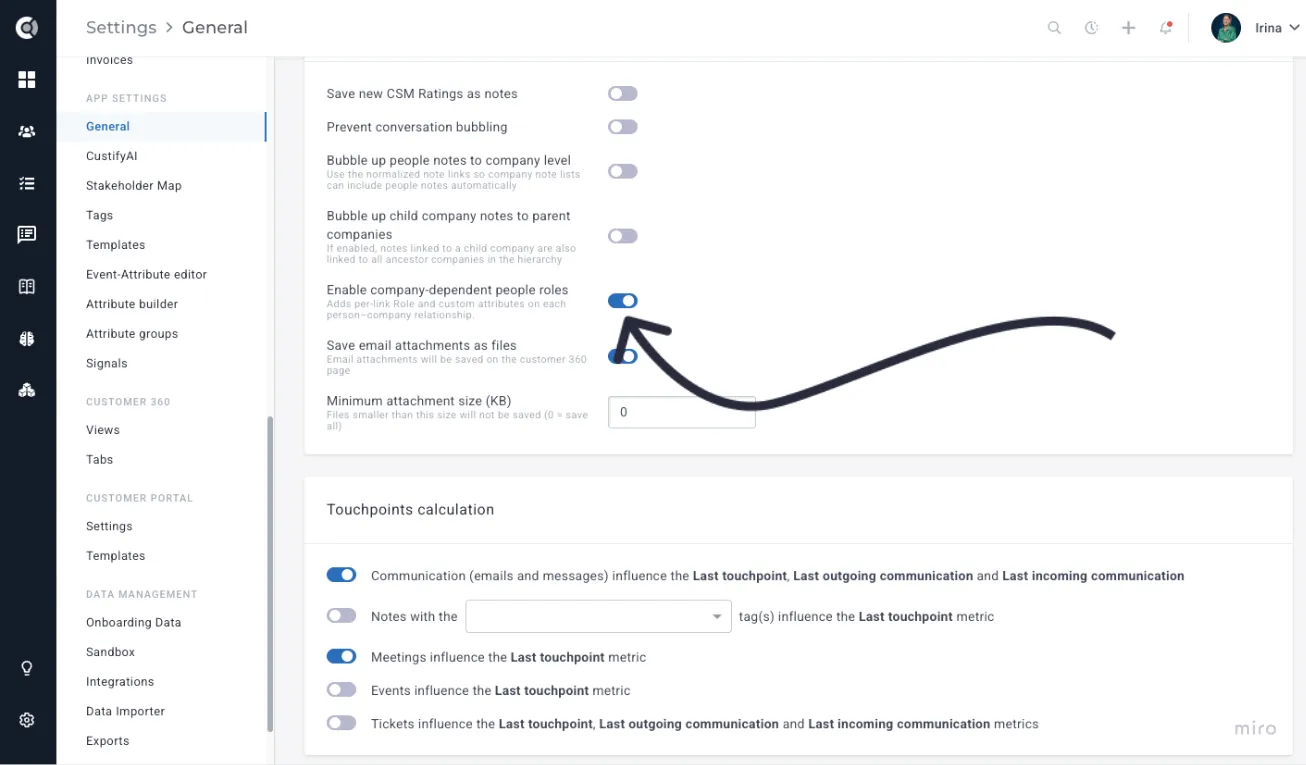
To turn this on, go to Settings - General and enable Enable company-dependent people roles (the roles can also be set through API, once the feature is enabled). The toggle is off by default. When you flip it on, Custify schedules a backfill job that creates the relationship records for every existing person-company pair, so you do not need to re-import any data.
Once the feature is active, two new columns become available in the People tab, on the Company level:
- Role: A dropdown that shows the role this person holds on this specific company. Click the cell to pick a value, save, and the change is scoped to the current company only — the same person on a different account keeps their other role.
- Linked at: The date the person was first connected to this company. This is read-only.
You can also add custom relationship attributes (text, number, date, dropdown, or boolean) to capture data that only makes sense in the context of a person-company link, such as Department on this account, Onboarding owner, or Contract signer.
Manage these in Settings - Events and attributes editor by filtering the list to the People-Company attribute type.
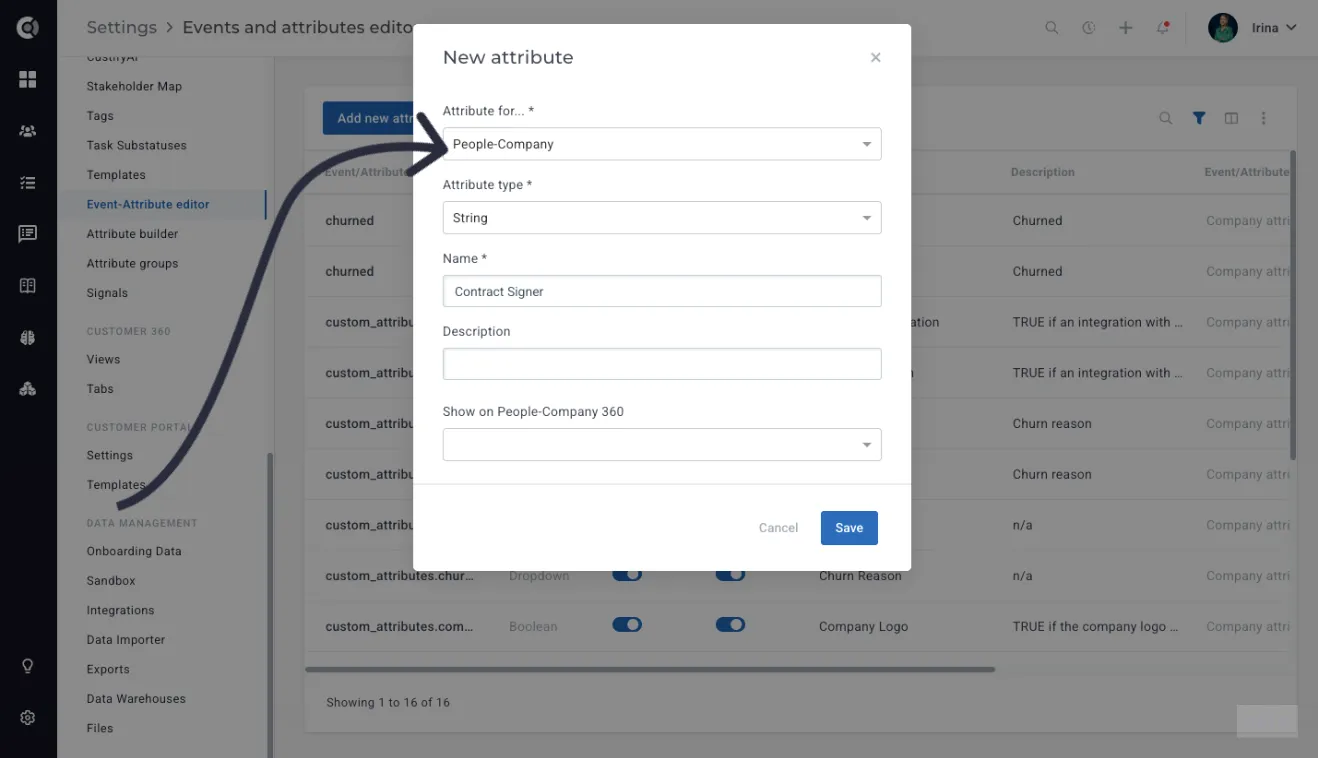
Both default columns and any custom relationship attributes are hidden by default. Use the column toggler to add them to the table, reorder them, and sort by their values. Inline editing of the Role column requires the companies.manage_data permission.
Custify Tip: The Role attribute itself cannot be deleted from the Events and attributes editor. You can rename, reorder, and add or remove individual dropdown values, but the underlying attribute is preserved, so historical assignments stay intact.
Value Delivered: Before this feature, "role" was a property of the person — so if Jane was a Champion at Account A but only a Power User at Account B, you had to pick one, and your data was silently wrong on the other account. Now, role is a property of the person–company relationship, so the People tab always shows the role that's accurate for the company you're currently viewing.
Usage
Explore meaningful insights into events’ frequency, active users, time in product, and Segments.
The following widgets are available in the Usage tab:
- Event frequency in the last 6 months: Displays activity frequency per day for a predefined period of 6 months. Different activity frequencies (from less to more) are marked in different shades of blue.
This will help you understand when events were generated more frequently for a customer to identify the timeframes for further analysis of events over time.

- Events over time: Observe the evolution of specific events over time.
- Customize the timeframe for which you want to display the events.
- Select events using the Add event option.
- Display the graph in a Detailed or Aggregated view:
- A detailed view will display a graph with the number of events per day.
- The aggregated view will display a pie chart with the total number of events for the selected period of time.
💡Custify Tip: This will only display the event occurrence, not the metadata of the event.

- Active users: Explore a detailed view of user activity. The graph will display and compare:
- Product users: Total people count
- Monthly active users: unique users that generated at least one event in the last 30 days
- Daily active users: unique users that generated at least one event in the last day.

- Time in product: This time tracking feature returns the total time users spent on different pages of your app. This information can be sent using a JavaScript snippet.

💡Custify Tip: Time in product only shows up if there is any data sent. The time will be displayed in seconds. The graph can also be displayed in two modes: aggregated or detailed.
- Segments: See the full list of Custify Segments the Company is part of. You can see when the Company joined a particular segment by hovering over it.

Activity
Explore detailed insights into the activity of your customers in the Activity tab.
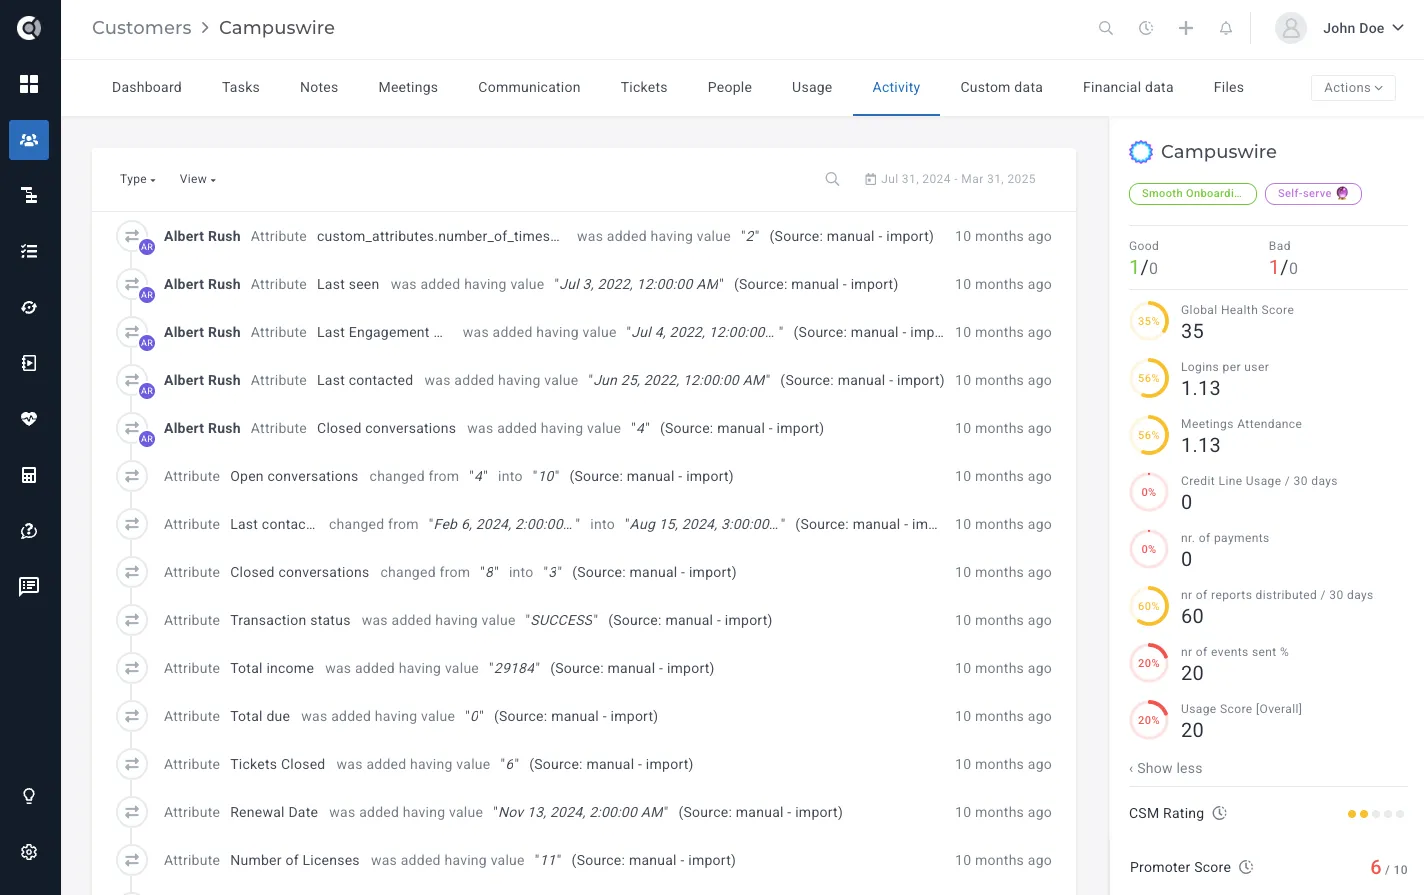
- Customer activity overview: The list of all new activity, new attributes, changes in metrics, and existing logs for a specific customer. The items you can track in the overview include:
- Communications
- Health metrics
- Lifecycles
- Notes
- Playbooks
- Attributes
- Events
- Segments
- Tasks
- Filter activities: Shrink down the list of activities by adding filters:
- Type (activity types are listed above)
- View (show People/Company activities)
- Timeframe (select a specific time frame for the activities)
Activity details: Find activity details such as event metadata, where applicable.
💡Custify Tip: For attribute updates, you can check the source of the update (API, Manual, Integrations).
Custom Data
Import Custom Data in a table format to expand on the information available in the Company 360° Profile. Learn more about importing custom data.
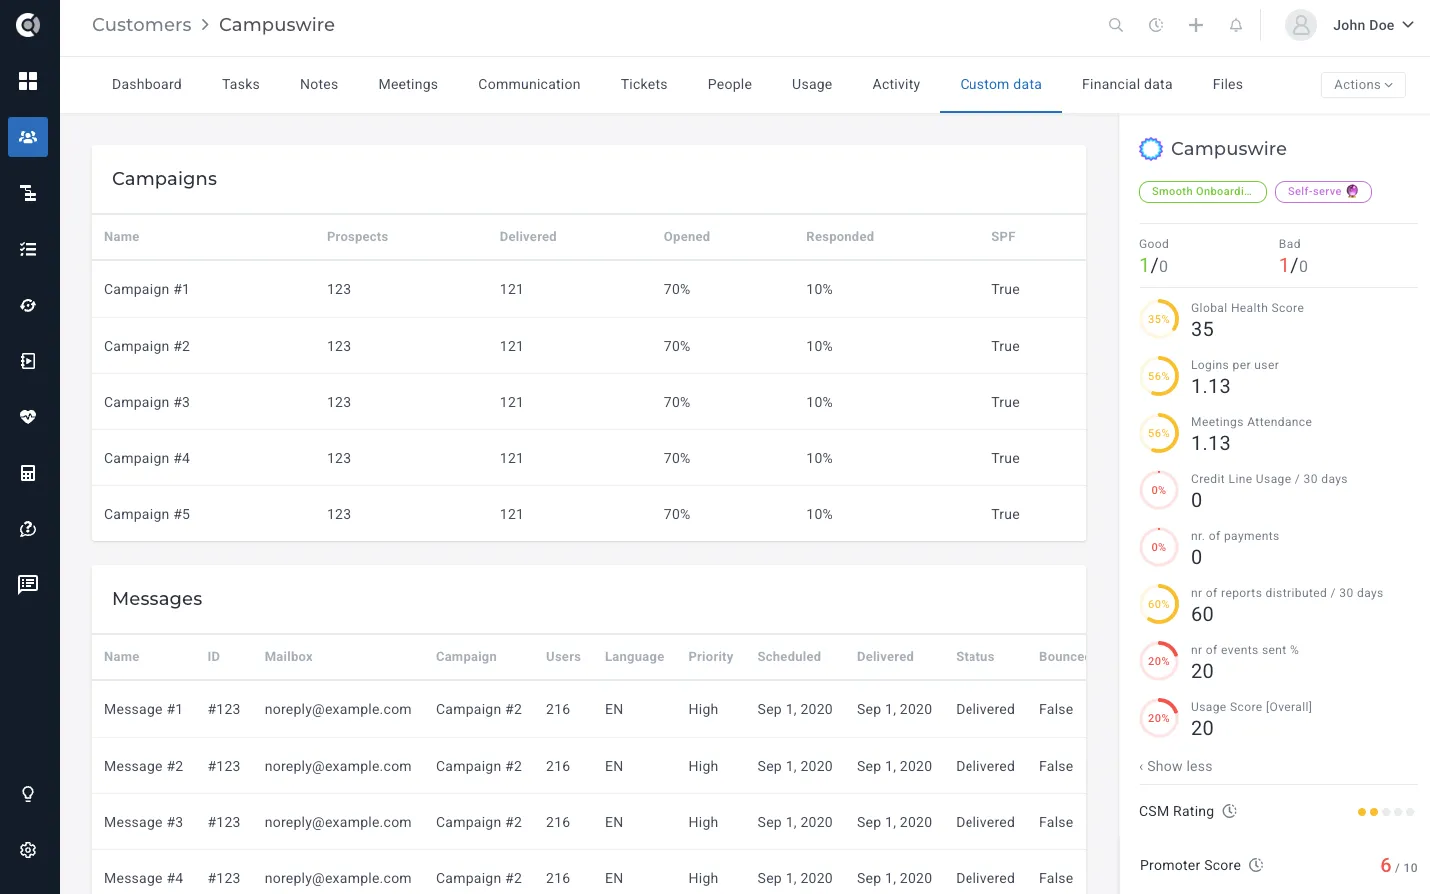
💡Custify Tip: Custom data is available for viewing only. The details in the table cannot be edited, but they can be used in Calculated Metrics formulas.
Financial Data
See all the information imported by any financial app integration, as well as deal information from CRM integrations.
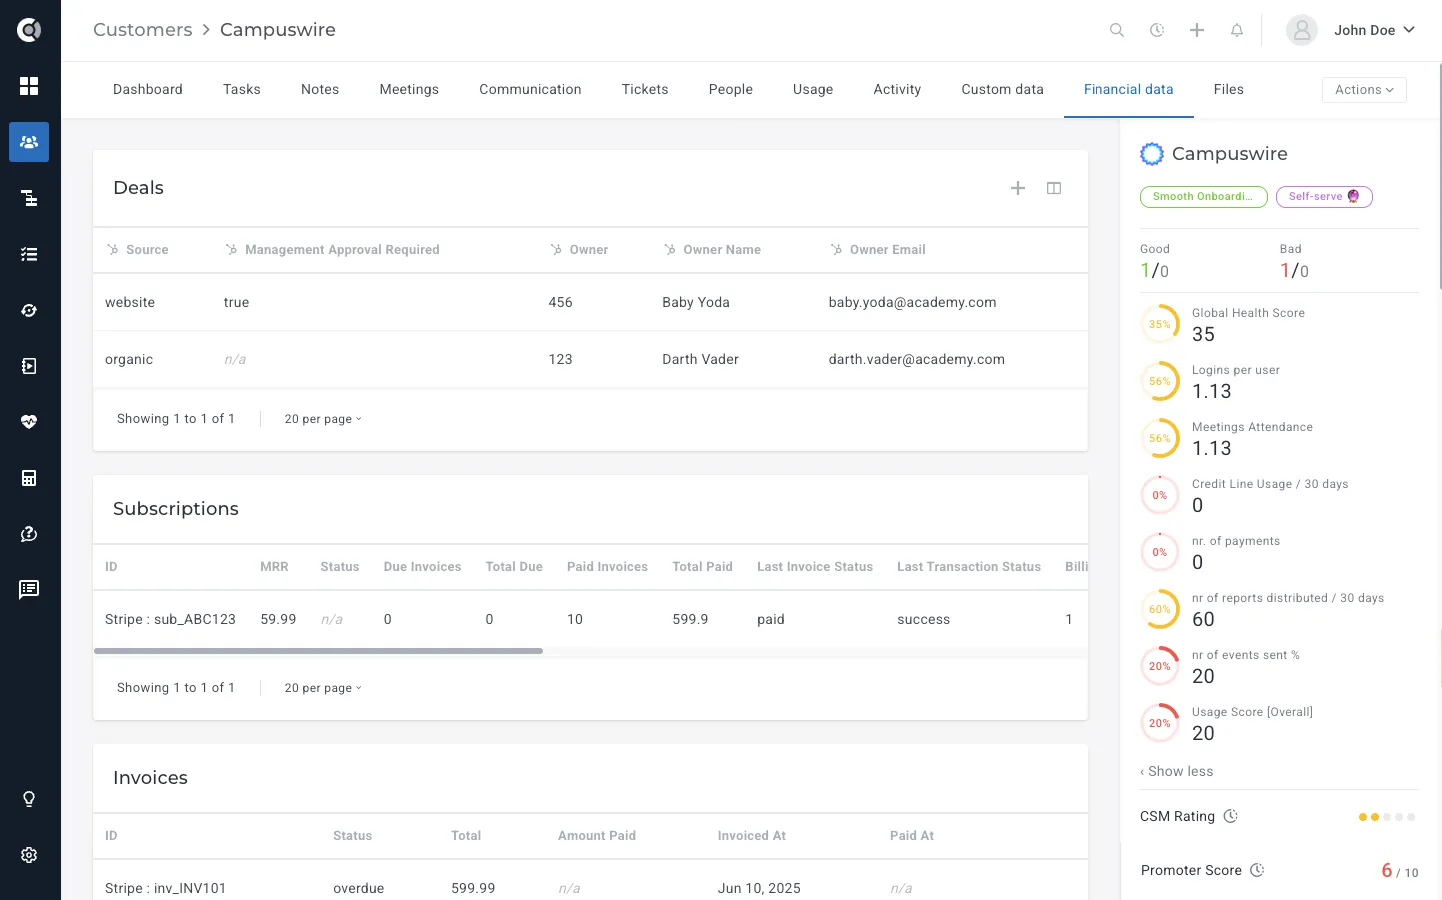
The following data is available in the Financial Data tab:
- Deals: status, value, and dates (closed, won, lost at)
- Subscriptions: total/monthly income, dates (start, end, next billing date)
- Invoices: status, amount, dates (invoices at, paid at)
💡Custify Tip: Financial data is available for viewing only. The details in the table cannot be edited, but they can be used in Calculated Metrics formulas.
Files
Use the Files tab to upload any files related to the Company that could be helpful in the day-to-day operations of your CS team. Once uploaded, the files can be downloaded or deleted by clicking on the three dots next to the file.
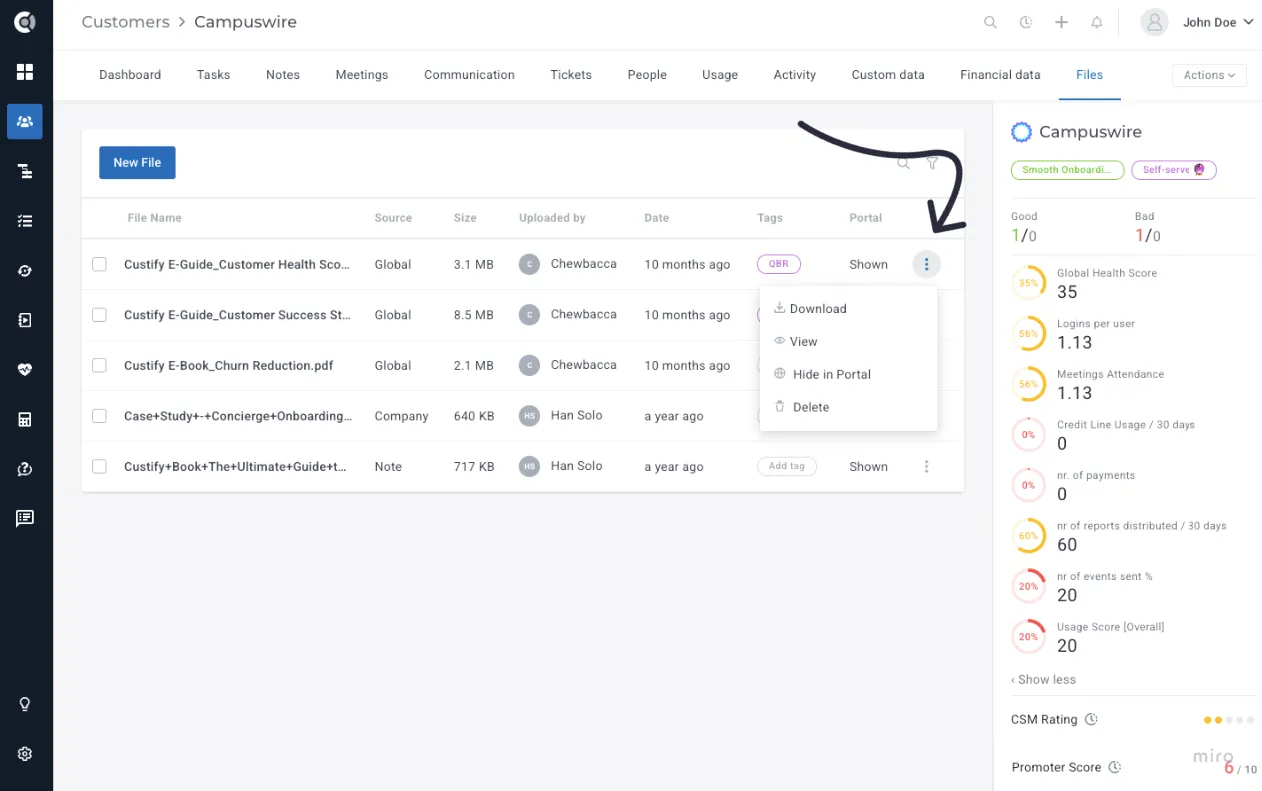
For example, you can upload the following types of files to the Company profile:
- Contract-related details
- Files related to onboarding
- Flows/procedures that are specific to this particular account
- Company organizational chart.
Actions
Manage your customers better using the set of Actions available. The possible actions on a Company 360° Profile are:
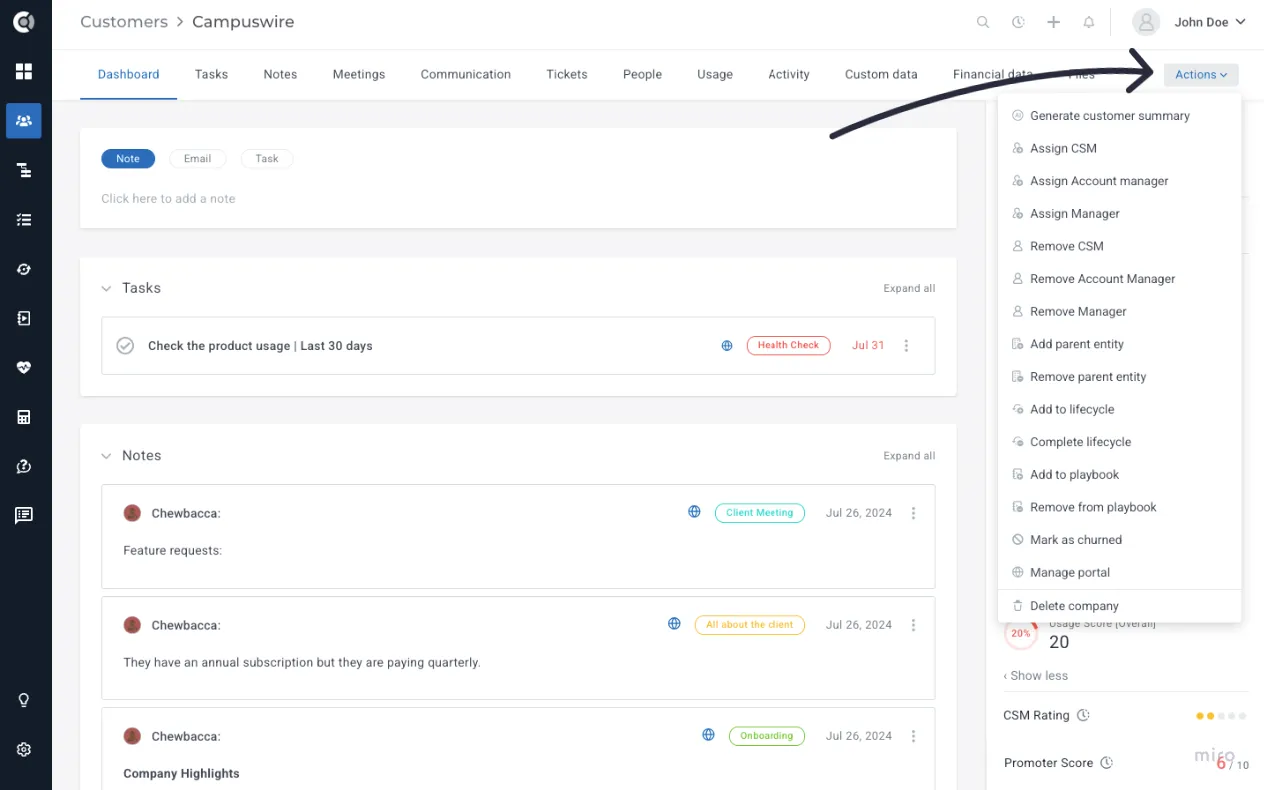
- Generate customer summary: Use CustifyAI to generate a comprehensive customer summary that can be saved as a note
- Assign/Remove CSM: Assign a Customer Success Manager to the Company
- Assign/Remove Account Manager: Assign an Account Manager to the Company
- Assign/Remove Manager: Assign a custom role (defined under Settings) as manager of the account (e.g. Onboarding Manager)
- Add/Remove Parent Company: Assign a Parent to the Company
- Add to lifecycle: Manually add the Company to a Lifecycle
- Complete lifecycle: Manually complete a Lifecycle
- Add to playbook: Manually add the Company to a Playbook
- Remove from playbook: Manually remove the Company from a Playbook
- Mark as churned/Unchurn: Mark a company as churned or undo this action
- Activate/Manage Portal: Activate the Customer Portal or edit it (if active already)
- Delete company: Manually delete a Company from Custify.
People 360° Profile
The People 360° Profile provides a centralized view of all data related to a specific person in your system. This includes attributes, events, metrics, communications, and all relevant Custify features—organized in one comprehensive dashboard.
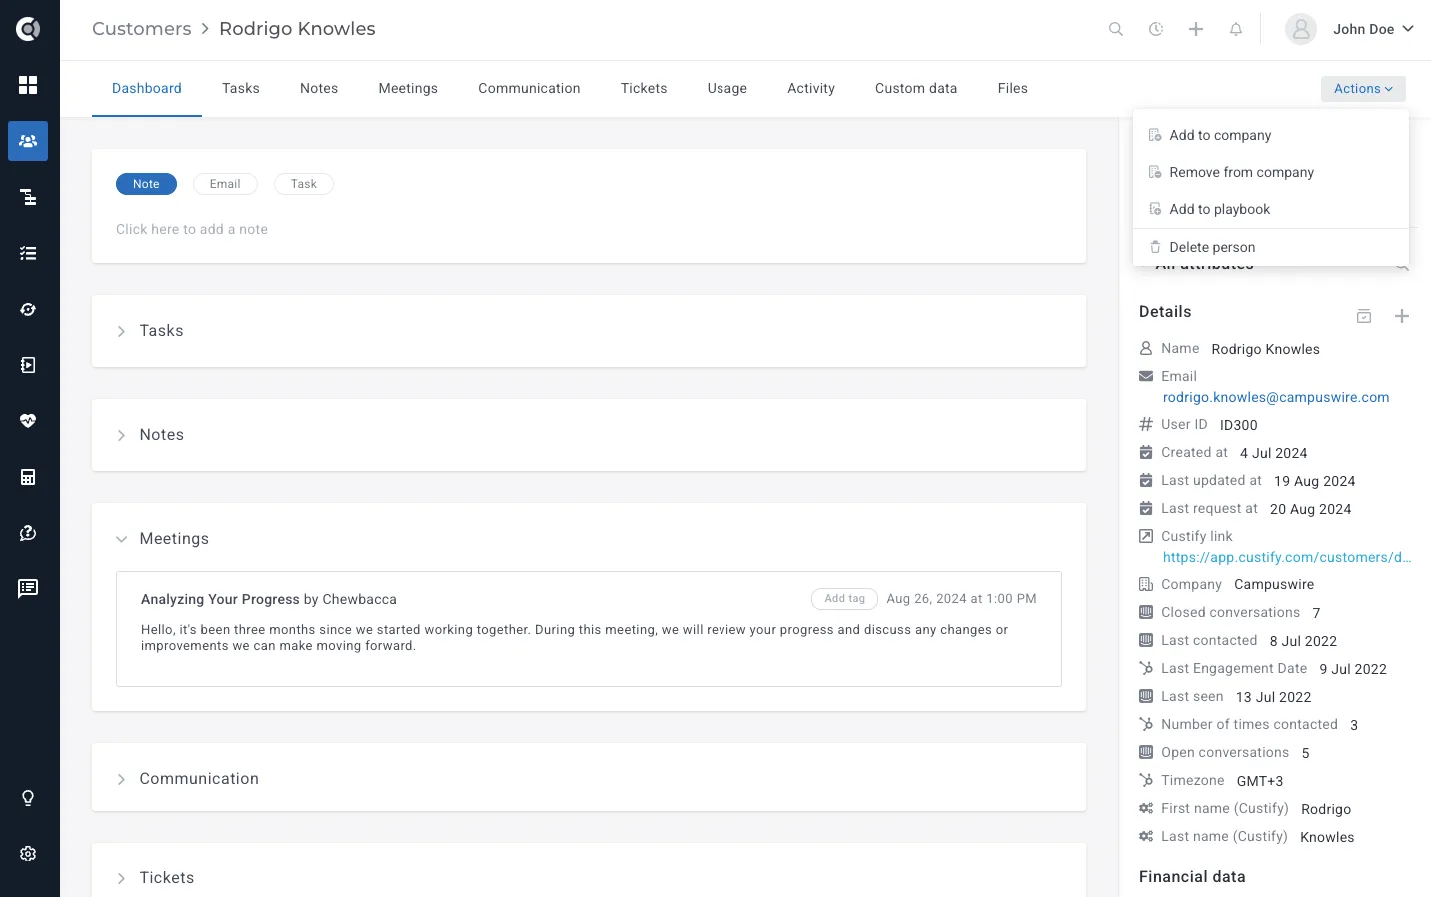
It closely mirrors the Company 360° Profile, with a few key differences to keep in mind:
- All features described above are available at People level too, except for the tools like Health scores, Lifecycles, CSM Rating and Child Entities (features that are only available at Company level).
- People attributes are different than company attributes and they do not bubble up to the company level (e.g. email address, phone number).
- Notes taken at People level do not bubble up to the Company level
- Tasks, tickets, meetings, communications, events created/sent at People level also bubble up to the companies the person is assigned to (if the person is assigned to multiple companies, the data points will be displayed on all of them).
- Attribute evolution graph is not available yet for People.
- The available actions are:
- Add to/Remove from company: Assign to or remove a person from a company.
- Add to/Remove from Playbook: Add to or remove a person from a playbook.
- Delete person: Manually delete this person’s account from Custify.
Dynamic Customer 360 Views
Dynamic 360 Views empower teams to design and personalize customer profiles tailored to their unique workflows. By customizing tabs, layouts, and content blocks, users can surface the most relevant information for their role, whether it's onboarding details for Customer Success Managers (CSMs), account health metrics for executives, or historical engagement data for support teams.

To start configuring your Views, go to Settings - Customer 360 section. Learn more about this feature in this article.

Merging Companies
The Merge Companies feature allows users to combine two company records directly in the UI, with full control over which data is retained or transferred. It helps resolve duplicates, streamline data, and prevent data loss.
To start the merge, go to the Company 360 page of the Destination company (the one you want to keep in Custify). In the merge modal:
- Select the Source company (the company whose data will be merged and then deleted).
- Review the behavior.
- Choose which data to move.

What happens during the merge:
- The Destination company keeps its ID, name, and website (or uses the Source’s website if missing).
- It also receives selected data from the Source.
- Attributes that only exist on the Destination are preserved.
- Attributes that only exist on the Source are copied over.
- For attributes present on both, you can choose whether to keep the Source or Destination value.
- Company-only events are also moved to the Destination
- The Source company is permanently deleted, along with all of its subentities (e.g., activity, history)
What is not moved:
- Health scores
- Calculated metrics
- Attribute history
- Activity logs.
For all other data types - including notes, tasks, people, child entities, communication, meetings, tickets, files, Custom Data, and Financial Data - you can define the behavior directly in the modal during the merge.
This feature ensures clean, accurate company data with flexible, user-controlled merging.
