Insights
The place where you visualize your data through default reports and custom graphics and tables.
1. Getting Started with Reports
Pre-built reports that facilitate the reporting of Customer Success KPIs. Available reports:
- Team Performance
- Revenue
- Retention
- Churn
- Cohort Analysis
- Cashflow Forecasting
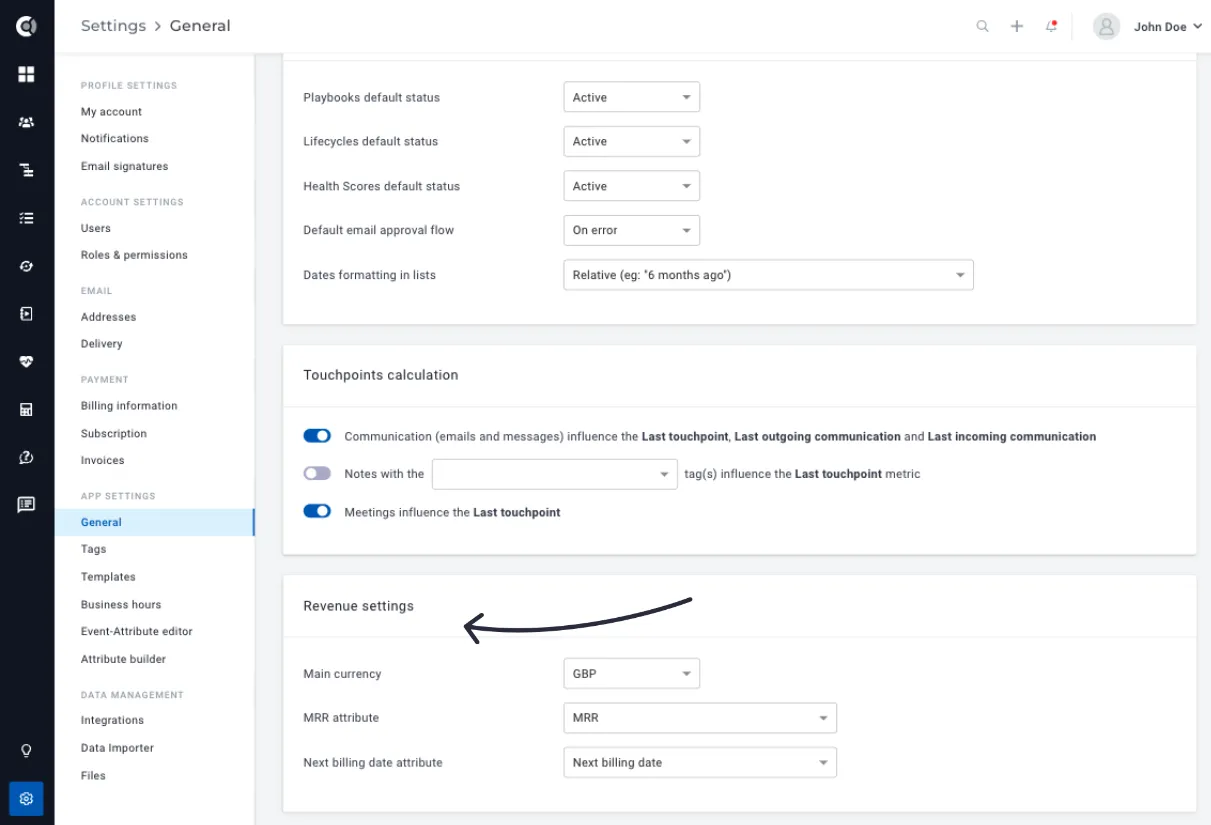
Custify Tip: In order for the Financial Reports to be correctly generated, make sure you select the right Main Currency, MRR attribute and Next billing date attributes under General Settings.
Team Performance
This pre-built report provides more insight into the team’s activity and performance to help CSMs and CS leaders understand the scope and impact of the team’s work.
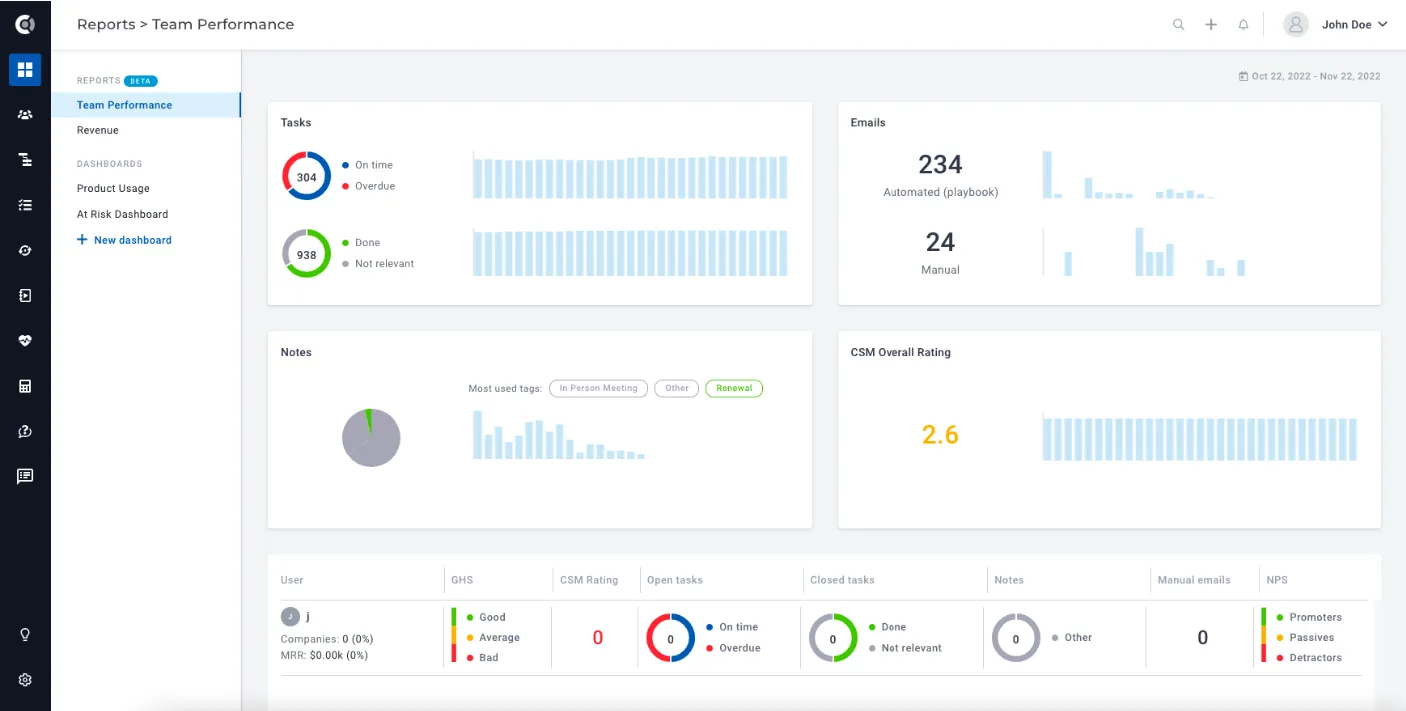
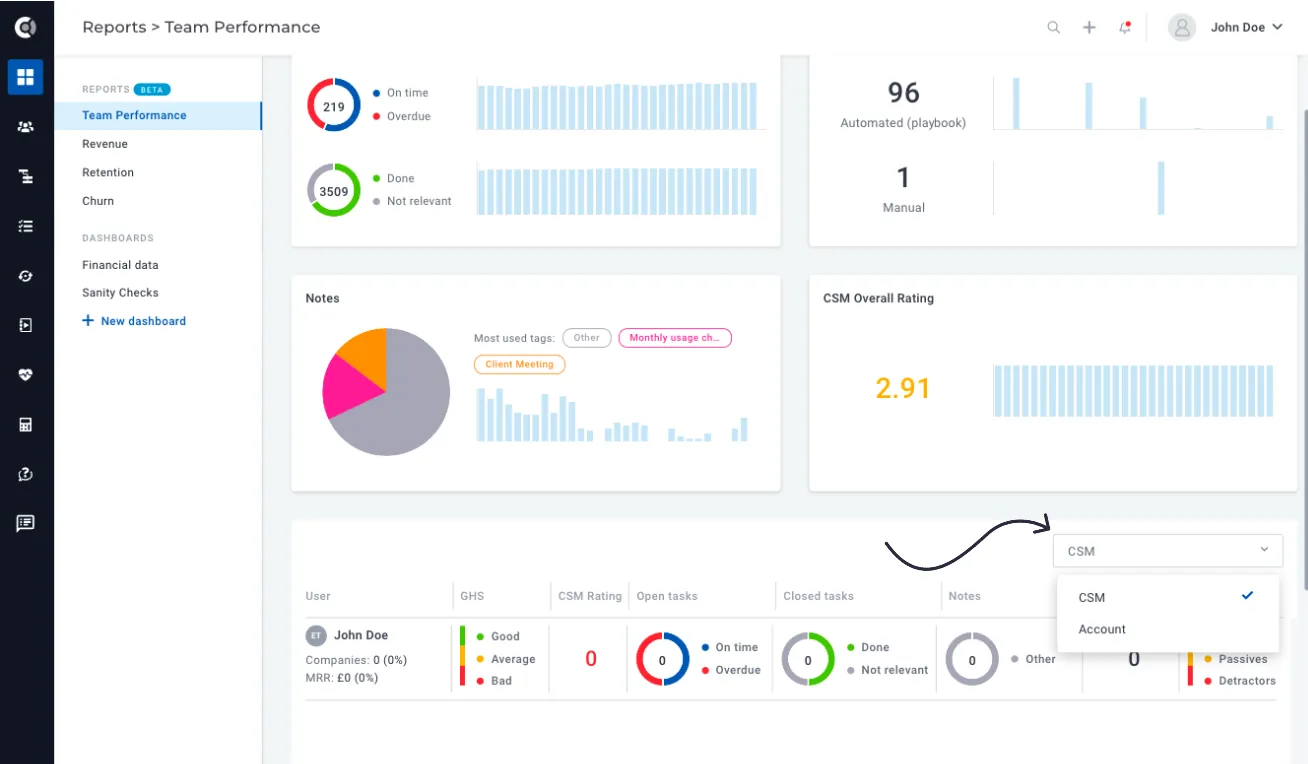
The first report section displays a summary of the team’s overall activity on a customizable timeframe.
- Tasks: Total number of tasks closed on time/overdue for the given period
- Emails: Total number of emails sent in the given time period, split by type — automated (sent through Playbooks) or manual (sent from the Customer 360° Profile)
- Notes: Top 3 most used tags in the given time period
- CSM Overall Rating: Average CSM rating value and how it evolved in the given time period
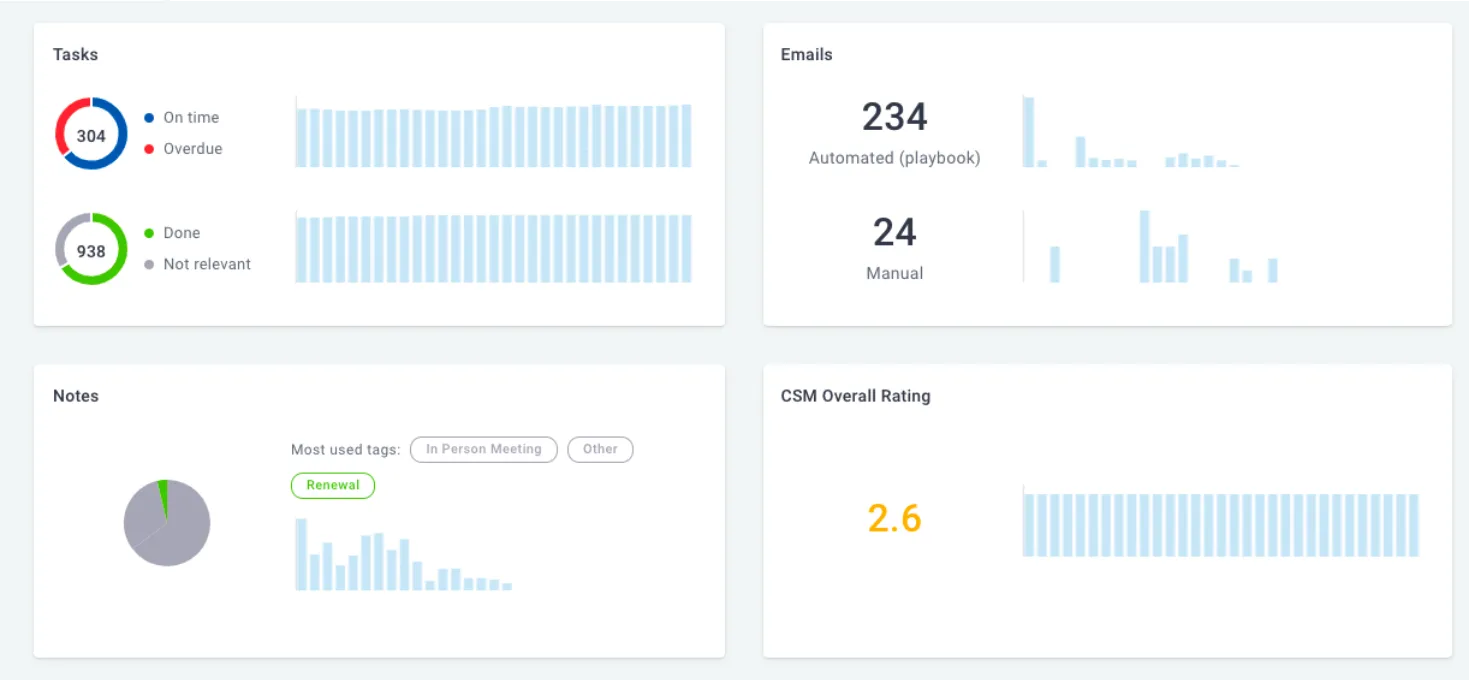
Custify Tip: The time frame selected at the top of the page applies to the calculation of all widgets in the report.
After reviewing the totals, you can take a closer look at the activities per Custify user. Team performance can be broken down by CSM or Account Manager. When you select the desired category, the chart is recalculated based on the metrics for the companies to which the users are assigned as CSMs/Account Managers.
For example, if a user is assigned 10 customers as CSM and 0 customers as Account Manager, the value 0 will be displayed under the Account Manager filter (0 assigned companies, 0 managed MRR, etc.).
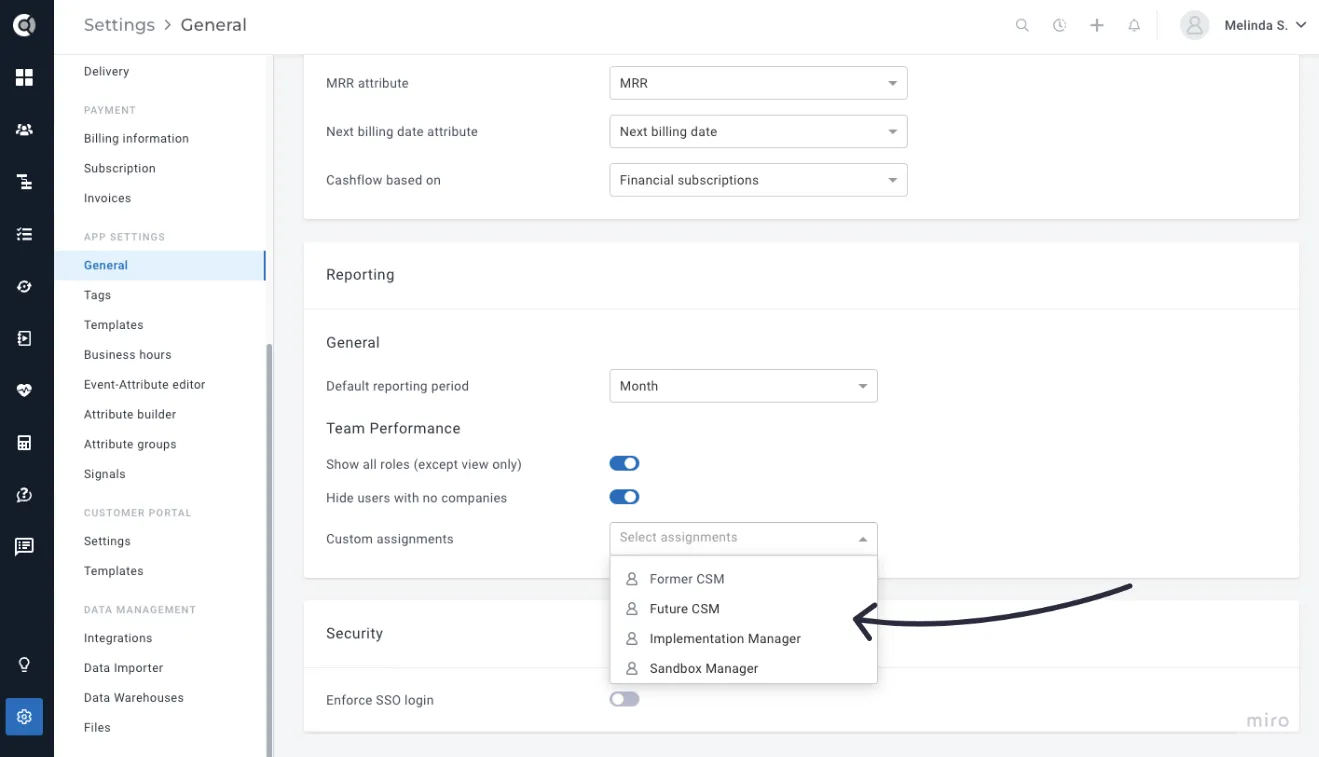
Team Performance details can be displayed for Custom Roles as well. This provides comprehensive insights into team workload and customer health for each role, including Onboarding Managers, Enterprise CSMs, Implementation Specialists and others.
For the custom roles to show in the list, an admin has to select the roles that should be displayed under Settings - General - Reporting - Custom Assignments. The data in the table will be computed from the moment the reporting was enabled for custom assignments too.
Custify Tip: The table shows the performance of all Custify users, except for the default View-Only roles. The option to select the roles to display in the team performance breakdown table will be added in the future.
The team performance metrics available in the table are:
- GHS: Evolution of the Global Health Score for the customers the user is assigned to
- CSM rating: Average of the CSM rating for the customers the user is assigned to;
- Open: Total number of tasks open, split by status
- Closed Tasks: Total number of tasks closed, split by status
- Notes: Total number of notes taken using the top 3 most used tags
- Manual Emails: Total number of emails sent manually (from the Customer 360° Profile)
- Promoter Score: Displays the evolution of the Promoter Score for the customers the user is assigned to.
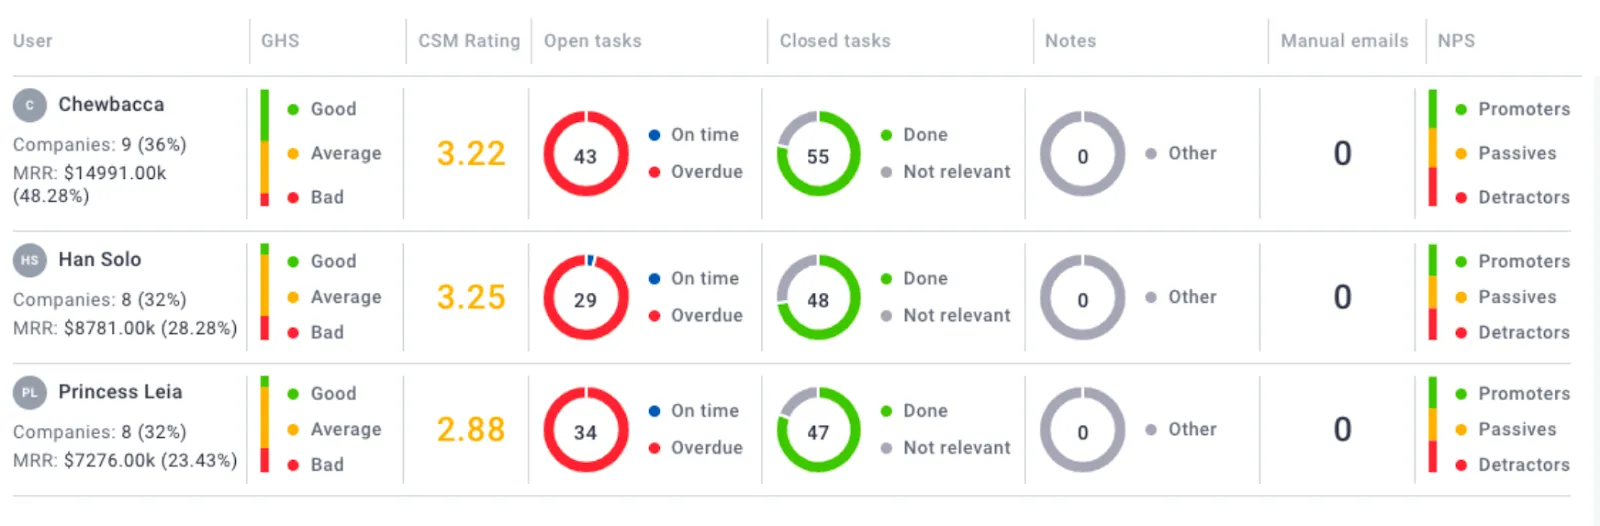
The values are calculated every day, and the numbers are actionable, so you can click on each metric and observe how it evolved over time.
Revenue
This pre-built report provides more insight into your business’ financial performance and helps you make informed strategic decisions.
The first report section returns the MRR evolution overview for the last 12 months.
Formula: current MRR = New MRR + Expansion MRR + Existing MRR – Churn MRR – Contraction MRR
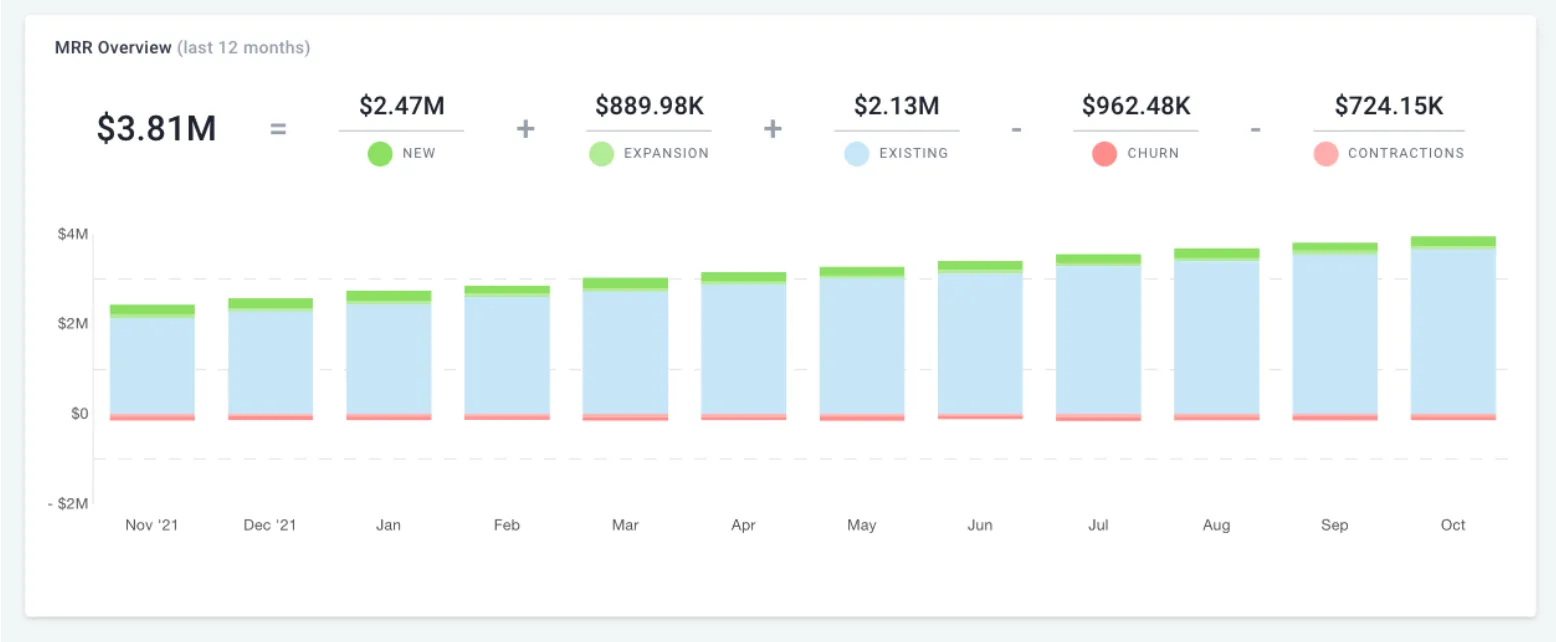
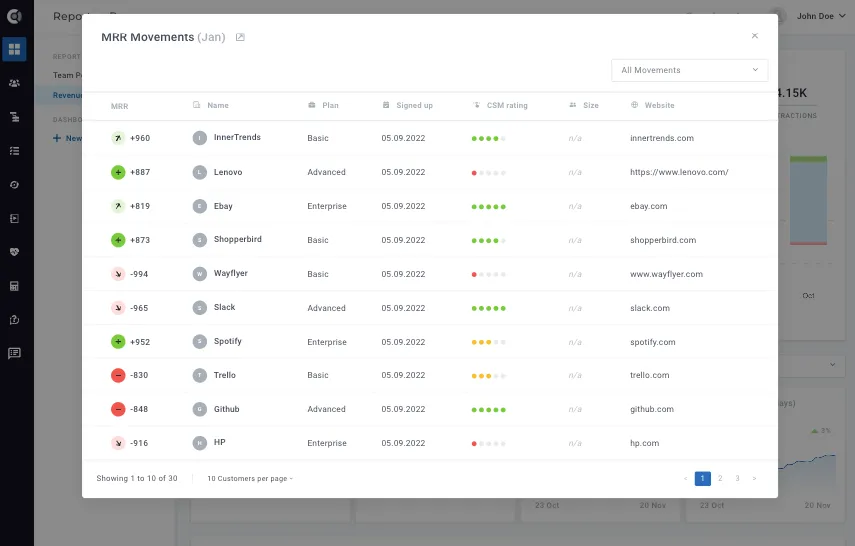
The evolution bars are clickable, so you can observe which companies have increased their MRR, which have remained constant, and which have decreased or lost MRR.
The second section of the report shows more details about renewals, existing clients, and the current MRR:
- Renewals by GHS: Global Health Score distribution for customers renewing in the next 30 days (based on Global Health Score and Next billing date)
- Renewals by CSM: CSM Rating distribution for customers renewing in the next 30 days (based on CSM rating and Next billing date)
- Customers: Total number of paying customers renewing in the selected time period (based on MRR attribute – MRR>0)
- Total MRR: Total MRR evolution in the last 30 days (based on MRR attribute value).
- Growth: ARR, Net New MRR (with a mini bar chart that shows green for positive months and red for negative ones), and MRR Growth Rate.
- Unit Economics: ARPA (with the paying customer count next to it), LTV, and Quick Ratio. Quick Ratio shows the current month value alongside a 3-month rolling average and a colored health badge — Shrinking, Moderate Growth, Healthy Growth, or Excellent.
- Risk: A Revenue Concentration widget that displays what percentage of total MRR comes from the top 10% and top 20% of customers, with a risk indicator and a Details link to the contributing accounts.
Each card carries an info icon with the formula and a short note on how to interpret the number, so you do not need to leave the page to look up the math. The cards respect the report's date range and segment filters, so applying a filter at the top recomputes the section automatically.
When the Revenue Type is set to ARR, the ARR card hides itself and the remaining cards in Row 1 reflow to fill the row. LTV displays an infinity symbol in green when there is zero churn in the period — that is a positive signal, not missing data.
Custify Tip: The Revenue Concentration widget needs at least 10 paying customers to compute a meaningful split. Smaller datasets show a graceful empty-state message instead of a misleading number.
LTV Tracking
LTV (Lifetime Value) appears as a card in the Revenue Health Metrics section of the Revenue report and is computed from the same MRR data used for the rest of the report.
Formula: LTV = ARPA / monthly churn rate
Where:
• ARPA: average revenue per paying account (sum of MRR / number of paying customers).
• Monthly churn rate: revenue churn rate for the selected period.
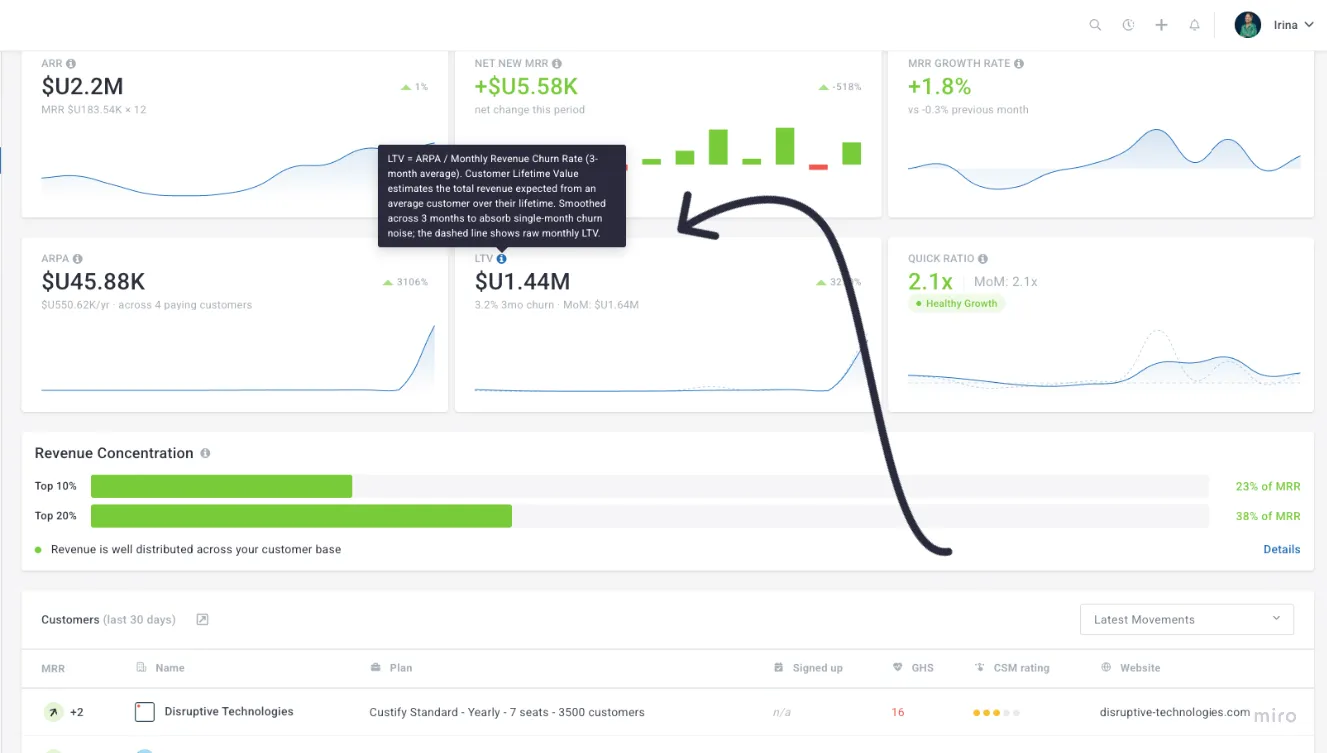
When the period has zero revenue churn, LTV displays an infinity symbol (∞) in green together with the message No revenue churn this period. This is a positive signal — it means no MRR was lost — and is intentionally shown as ∞ rather than as missing data or a placeholder.
LTV respects the report's date range and segment filters, so applying a segment at the top of the Revenue report recomputes LTV against that subset of customers. This makes it straightforward to compare LTV across plans, regions, or any other segment you already track in Custify, without rebuilding the metric for each cut.
The card also includes an info icon that surfaces the formula inline, so anyone reading the report can see how the number was derived without leaving the page.
The third report section provides details about:
- Latest MRR movements (based on MRR attribute evolution);
- Renewals by GHS (based on Global Health Score and Next billing date);
- Renewals by CSM (based on CSM Rating and Next billing date).
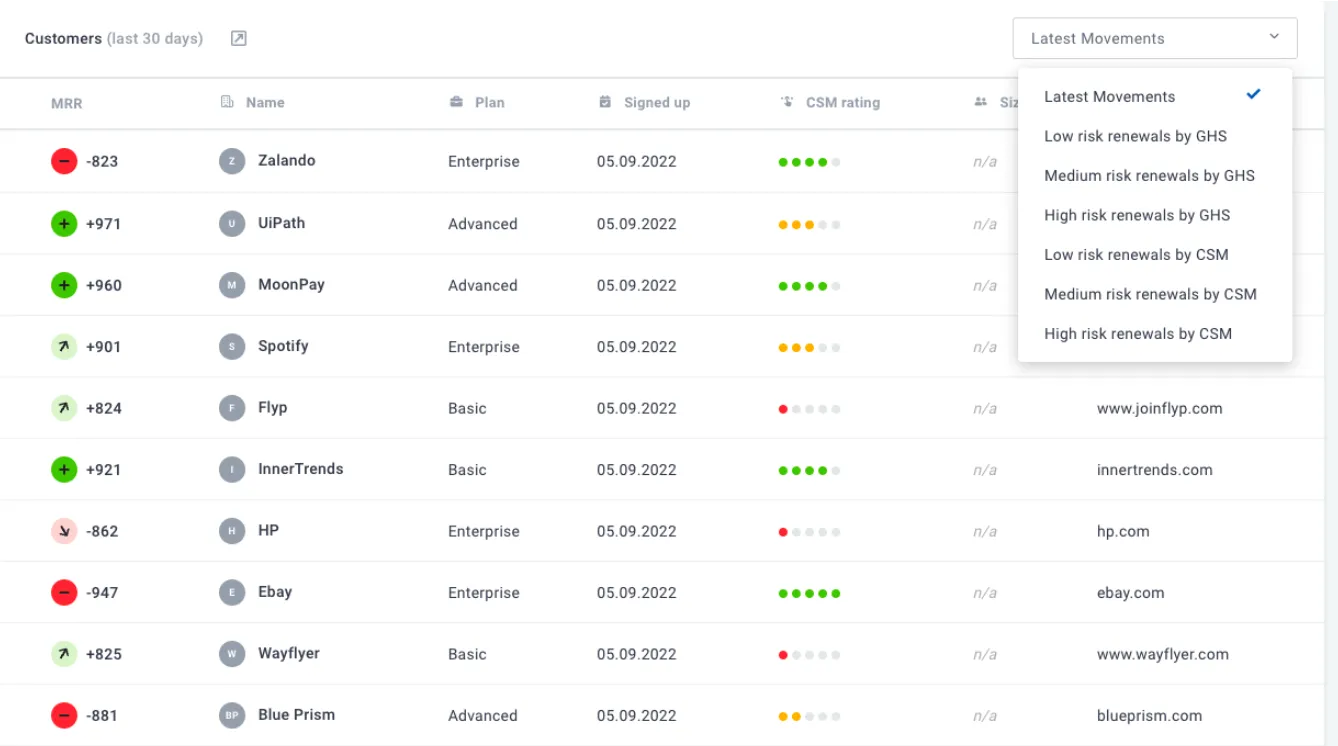
The Revenue report tracks Reactivations as a separate MRR movement type, alongside New, Expansion, Contraction, and Churn. A reactivation is recorded when a company that previously paid, churned (MRR dropped to 0), and then comes back with a paying subscription. Without this distinction, returning customers would be classified as New MRR — which inflates net new business and hides the recovery part of the revenue story.
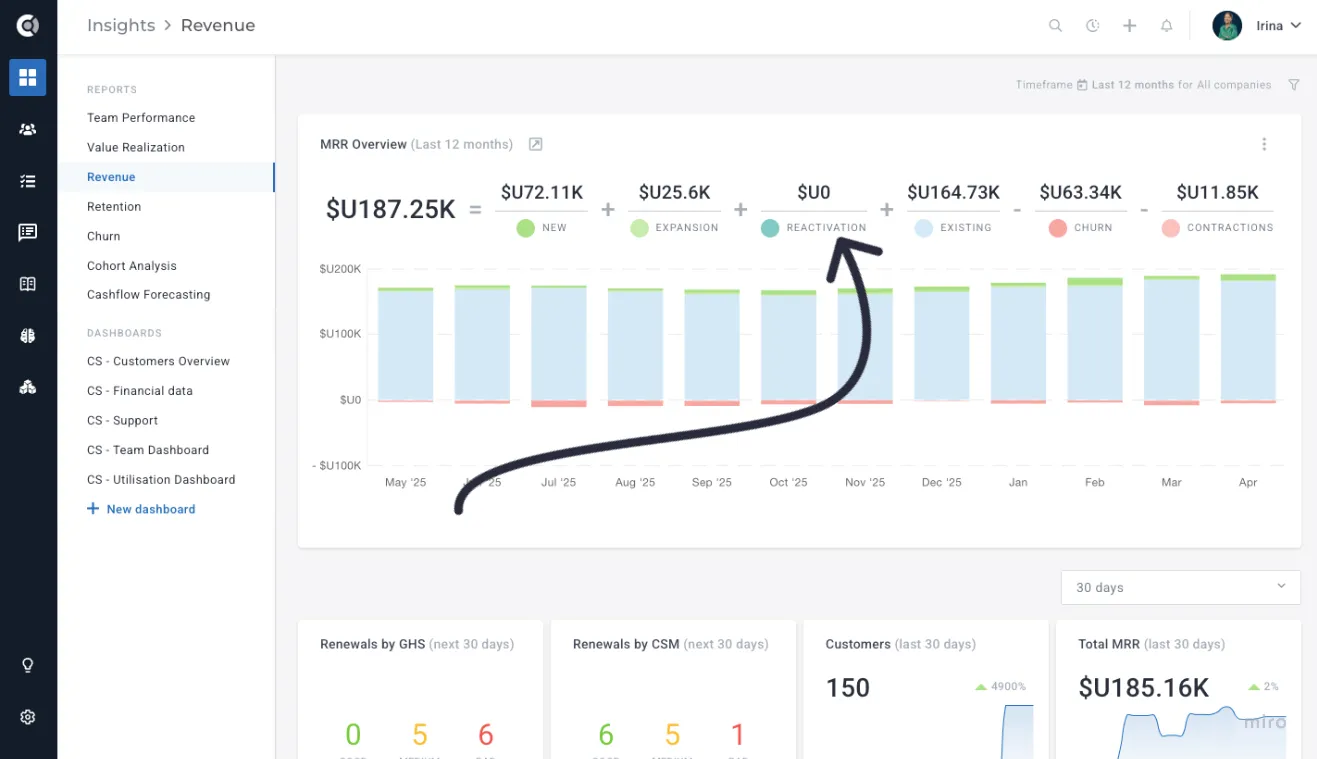
Reactivations are off by default to keep historical numbers backwards-compatible. To turn them on, go to Settings - General Settings - Revenue and enable Track reactivations separately. Once the toggle is on, Custify reclassifies the relevant MRR movements going forward (the report is automatically generated). The new movement type appears in the Latest MRR movements table and in the underlying revenue calculations:
• New: First-time paying customers (no prior paid history).
• Reactivation: Returning paying customers (had MRR > 0 in the past, churned, and are now paying again).
• Expansion: MRR increases on existing customers.
• Contraction: MRR decreases among existing customers.
• Churn: Customers whose MRR dropped to 0.
The bars and rows tied to reactivations are clickable, just like the other movement types, so you can drill into the exact list of returning accounts and their corresponding MRR.
Custify Tip: Reactivations are most useful for businesses with seasonal or paused customers — for example, accounts that cancel between contract cycles and come back later. If most of your churned customers never return, you can leave the toggle off and keep the simpler New / Expansion / Contraction / Churn breakdown.
Retention
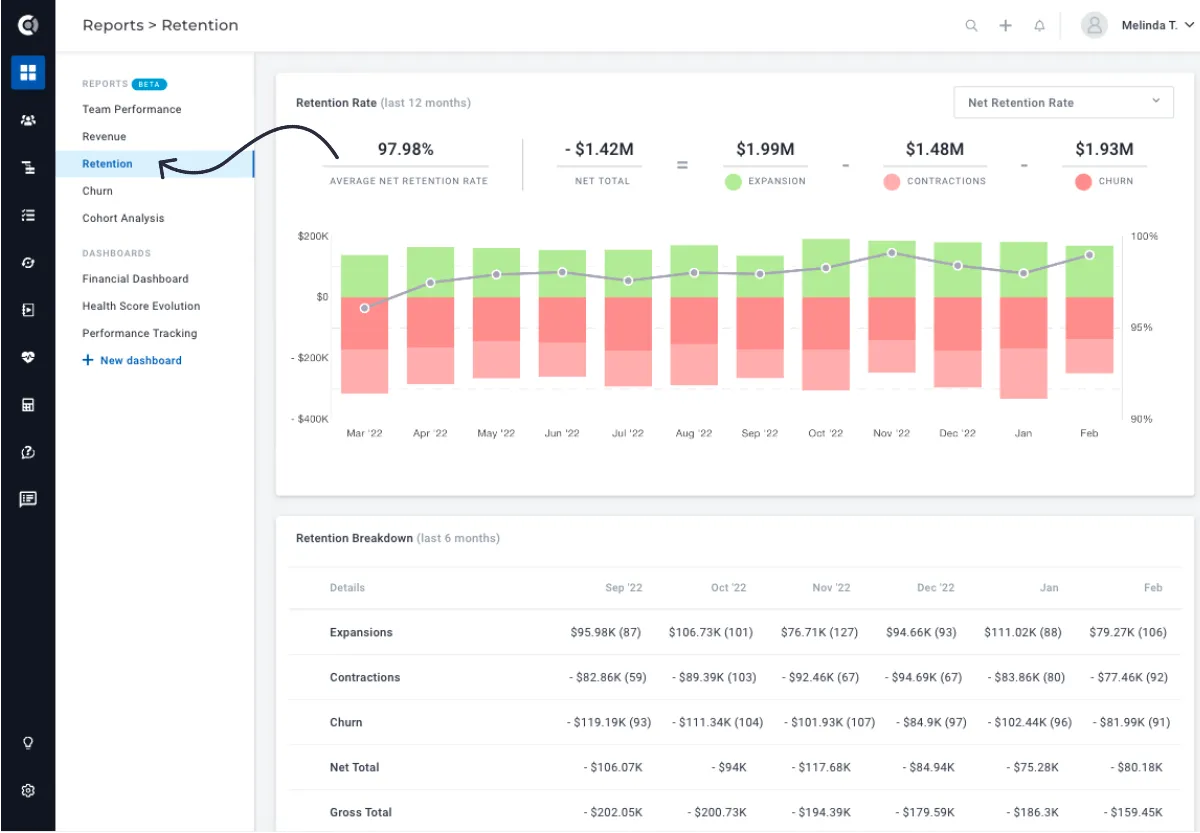
This pre-built report provides more insights into customer retention KPIs and helps you understand what MRR your company has retained month over month.
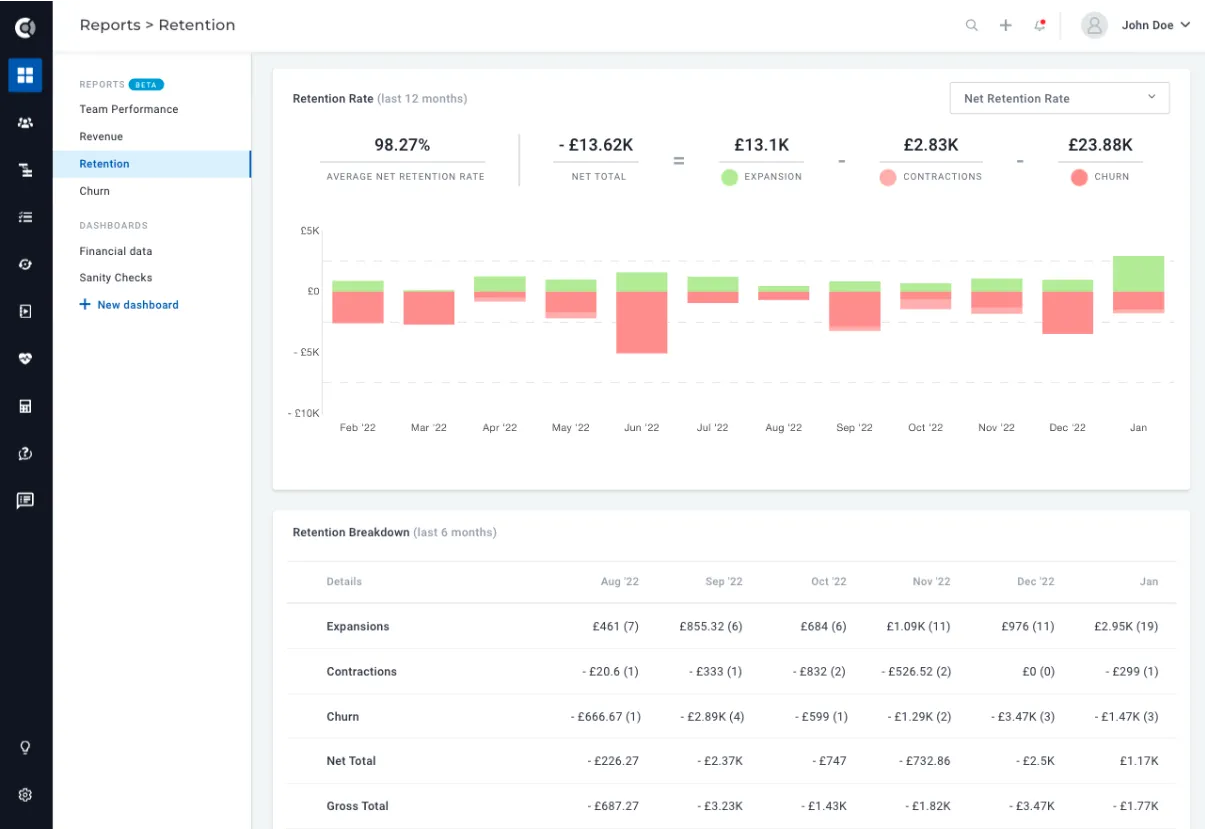
The report contains two sections: Retention Rate and Retention Breakdown.
Retention Rate
The graph can be filtered by Net Retention Rate or Gross Retention Rate.
The gross retention rate measures the percentage of the monthly recurring revenue (MRR) you retain each month after subtracting the impact of churn or downgrades, but not the impact of upgrades.
The net retention rate is very similar to the gross retention rate, but it is factoring in the MRR coming from upsells.
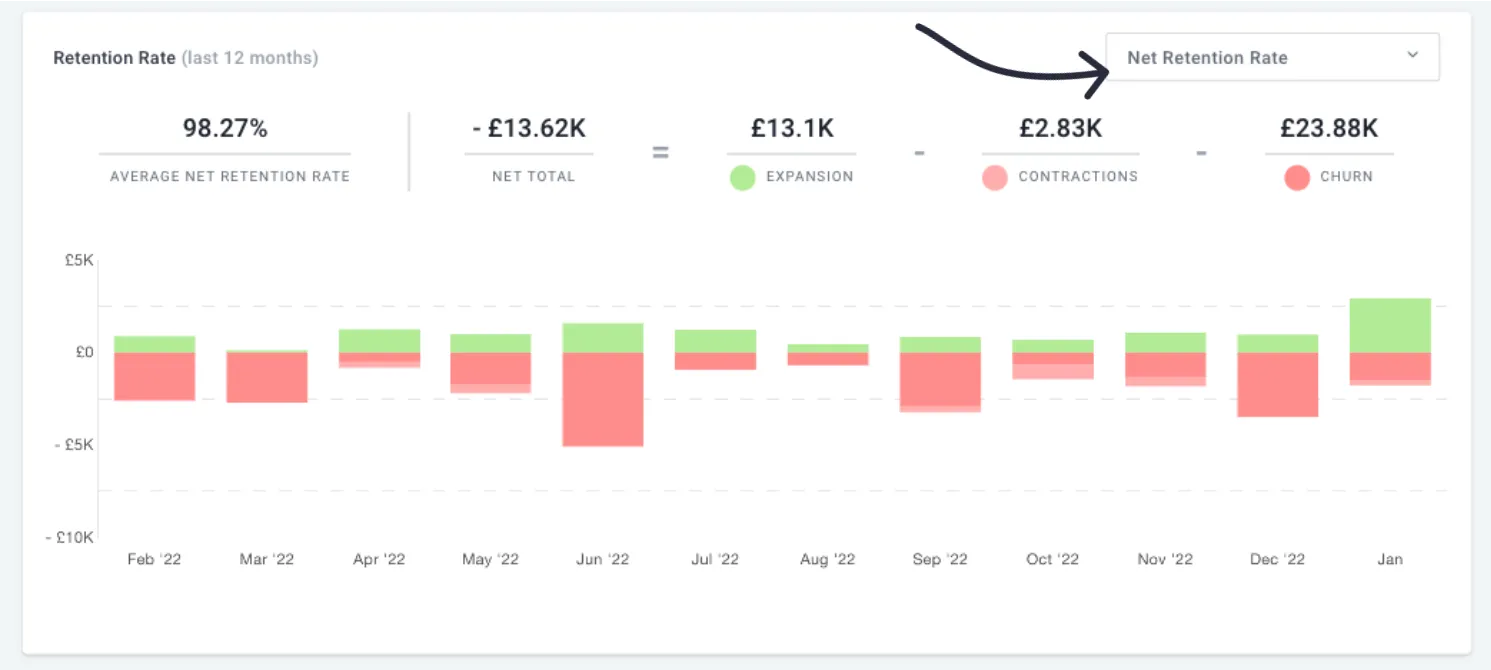
- Average net retention rate = average of NRR per month
- Average gross retention rate = average of monthly GRR
Retention Breakdown
The Retention breakdown table returns the retention details for a fixed amount of time (6 months).
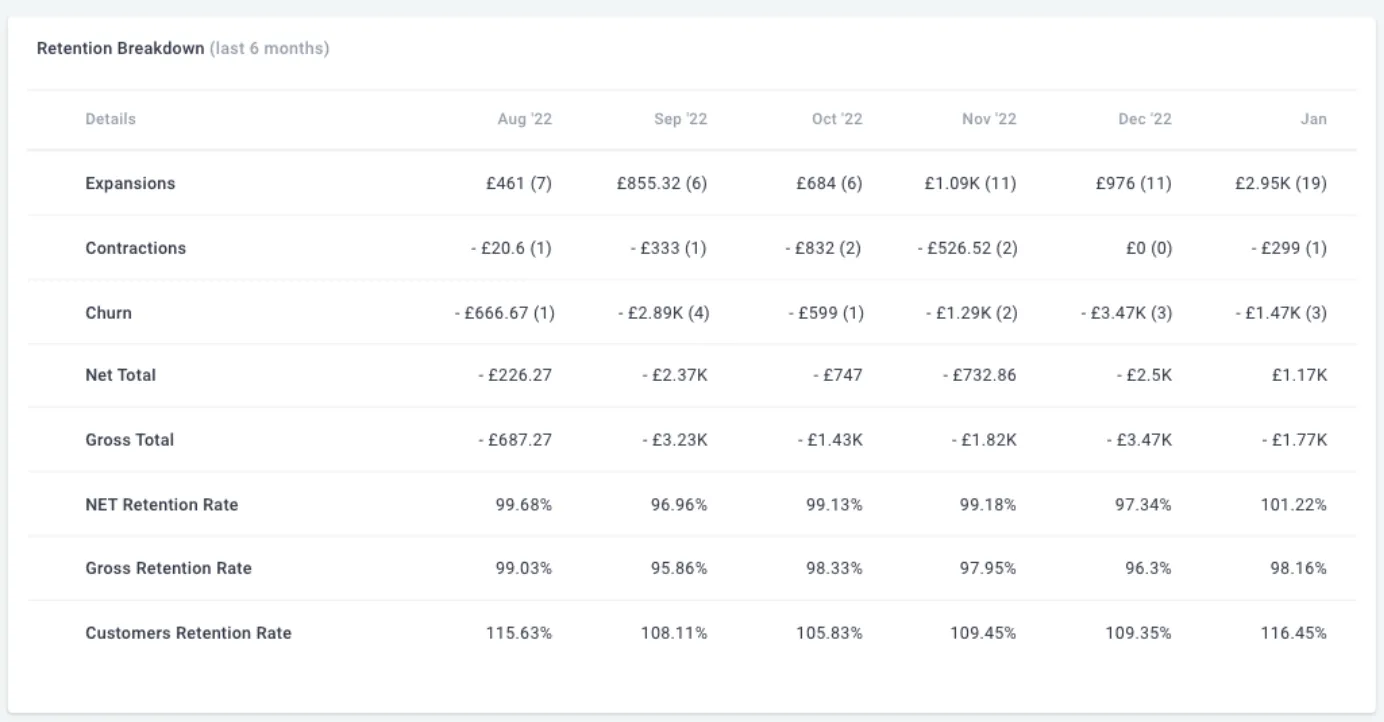
- Expansions: (MRR end of month – MRR start of month) > 0
- Contractions: (MRR end of month – MRR start of month) < 0
- Churn: Lost MRR
- Net total: Expansions – contractions – churn (MRR)
- Gross total: Contractions + churn (MRR)
- Net Retention Rate: ((initial_mrr + expansion – lost – contraction) / initial) * 100
- Gross Retention Rate: ((initial_mrr – lost – contraction) / initial) * 100
- Customers Retention Rate: ((initial_number_of_customers + number_of_expansion_movements – number_of_lost_movements – number_of_contraction_movements) / initial_number_of_customers) * 100.
Churn
This pre-built report provides more insights into churn KPIs and helps you understand the big picture of your company’s churn trends.
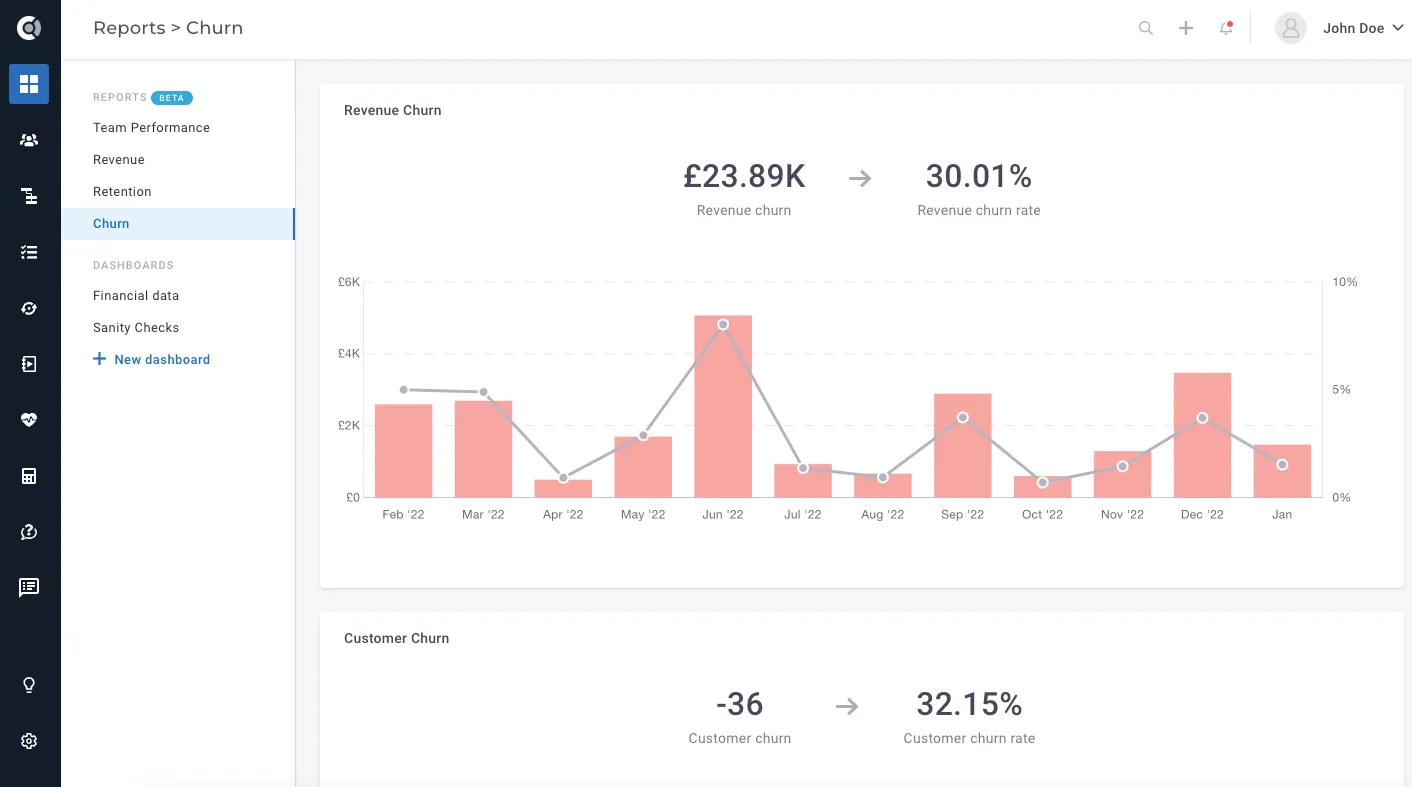
The report is based on two main metrics: Revenue churn and Customer churn
Revenue Churn
The graph contains a split per month (for the last 12 months) with details about Revenue Churn (MRR churn) and Revenue Churn Rate.
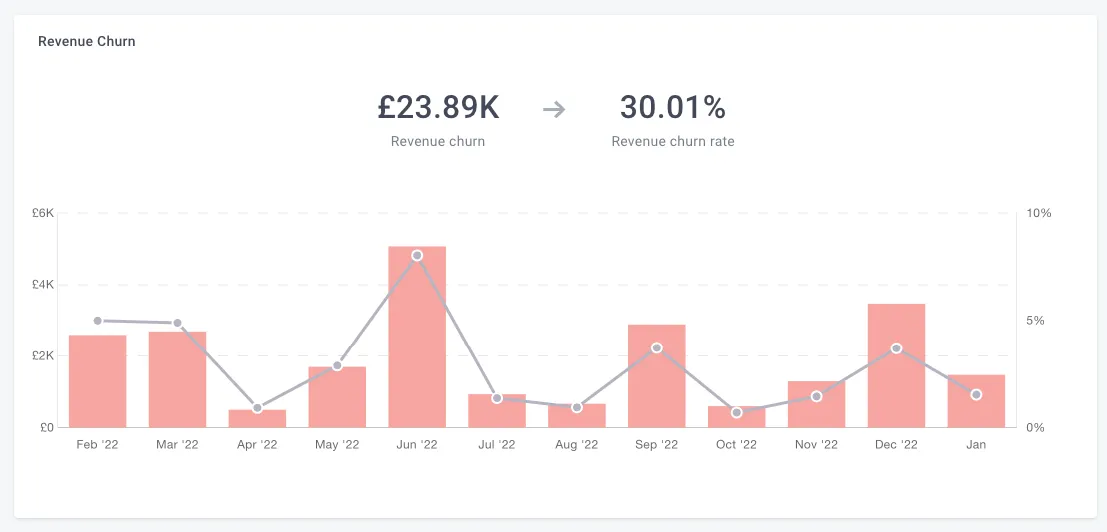
The numbers on top of the graph display the aggregated churn numbers for the last 12 months:
Revenue churn = sum of monthly MRR churn in the last 12 months
Revenue churn rate = [1 – (1 – average monthly churn rate / 100) ^ 12] * 100
^ 12 meaning ‘to the power of 12’.
The detailed graphic describes the numbers per month:
- Monthly MRR churn = MRR end of month – initial MRR (at the start of the month)
- Monthly MRR churn rate = lost MRR * 100 / initial MRR (at the start of the month)
- The initial MRR value for each month = MRR value at the end of the previous month
Customer Churn
The graph contains a split per month (for the last 12 months) with details about Logo Churn (number of customers lost) and Logo Churn Rate.
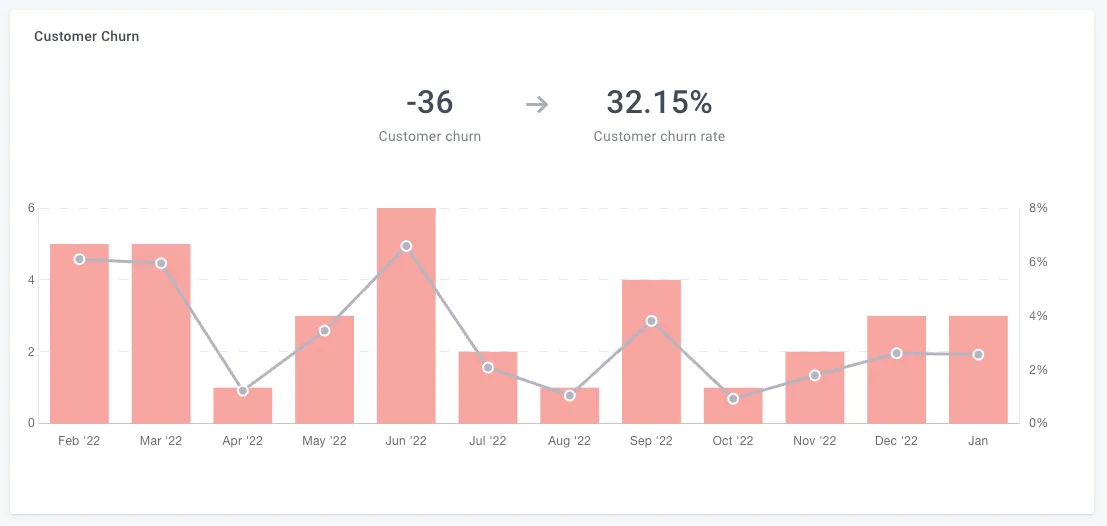
The numbers on top of the graph display the aggregated churn numbers for the last 12 months:
Customer churn = sum of monthly logo churn in the last 12 months
Customer churn rate = [1 – (1 – average monthly logo churn rate / 100] ^ 12) * 100
^ 12 meaning ‘to the power of 12’.
The detailed graphic describes the numbers per month:
- Monthly Logo churn = number of paying customers at the end of month – number of paying customers at the start of the month
- Monthly Logo churn rate = number of lost customers * 100 / number of paying customers at the start of the month
Cusitfy Tip: A customer is considered churned when MRR drops to 0. If the MRR attribute is greater than 0, the customer is considered a paying customer.
In both situations, the widget bars are clickable, so you can see the customers who churned per month, and what was the corresponding MRR lost.
Top Churn Reasons
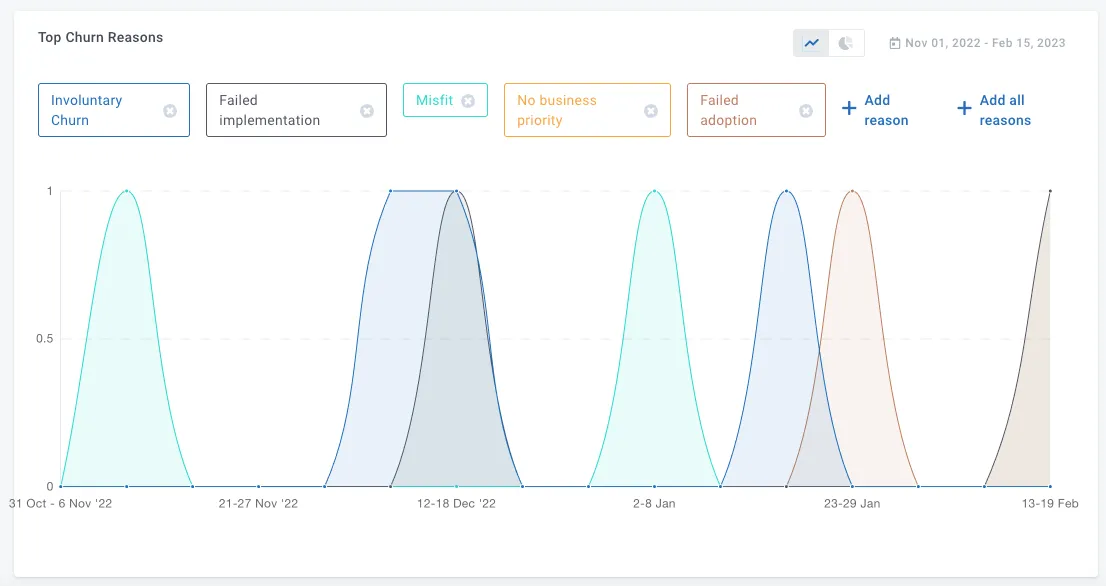
The third widget displays the top churn reasons in a customizable chart (you can choose the time frame and chart type). The top churn reasons chart is based on the default Churn Reason dropdown attribute and Churned at attribute.
Cohort Analysis
The cohort analysis report is a powerful tool that shows how the monthly new customer cohorts evolve over a 12-month timeframe.
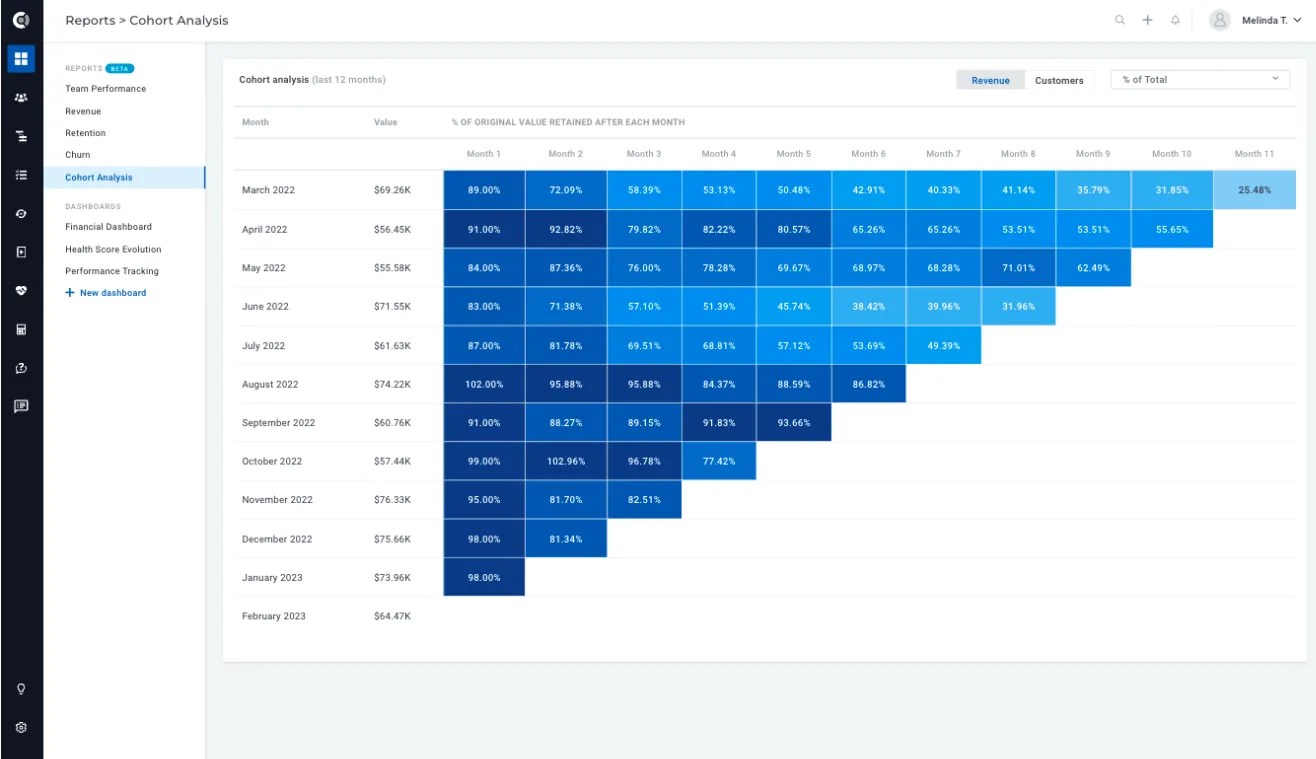
The graph shows the evolution for a 12-month rolling window, the month from the last row being the month before the current date (e.g. we are in March 2023, so the last shown month will be February 2023; the cohort analysis will start with March 2022).
The monthly cohorts represent the new customers that signed-up in that specific month (MRR > 0, the MRR attribute being selected under Settings – General). The cohort evolution shows how much revenue or how many customers are retained, compared to the initial values.
Available filters:
- Revenue vs Customers: choose if the graph should show revenue numbers or the number of customers for each month.
- % of Total: this calculates the percentage of retained revenue/logos for each month, compared to the initial value (e.g. if we had 10 new customers in March 2022, and there are 8 customers retained from the initial batch in April and also 8 in May, the values for April and May will be 80% );
- % of Previous: this calculates the percentage of retained revenue/logos for each month, compared to the previous month value (e.g. if we had 10 new customers in March 2022, and you 8 of them are still paying customers in April and only 6 in May, the value for April will be 80% and the value for May will be 75% – as you have fewer customers in May than you had in April).
- Total Value: absolute values for MRR / number of customers retained each month.
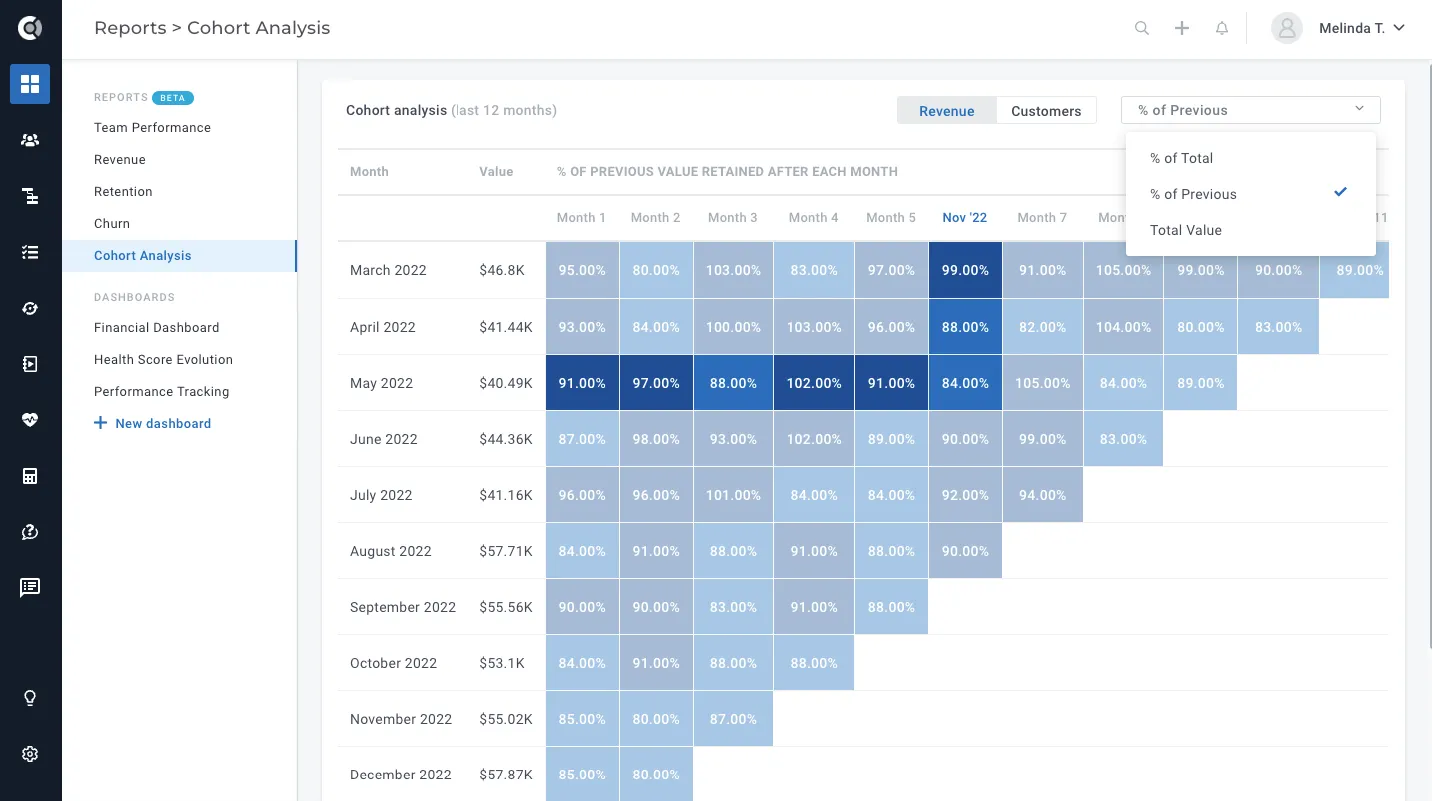
The Value column shows the details about the initial customer cohort (the column values are clickable, so you can see which customers are in each cohort, together with their MRR and other attributes). When expanding (clicking) on the monthly details for each cohort, you will get details about the remaining paying customers from the initial cohort on that specific month.
E.g. the Value field for March 2022 will show who are the customers who signed up in March 2022, then the details for each month for the March 2022 cohort will display the list of customers who were still paying during the year. If a customer churns in May, he will not show in the details when clicking on Month 2.
The increases and decreases are highlighted through different shades of blue (dark blue means 100% increase or more, while light blue indicates decreases).
Cashflow Forecasting
The cash flow forecasting report is a powerful tool that provides valuable insights into your company’s financial future by predicting its cash inflows. It helps in making informed decisions regarding investments, expenses, and financial planning.
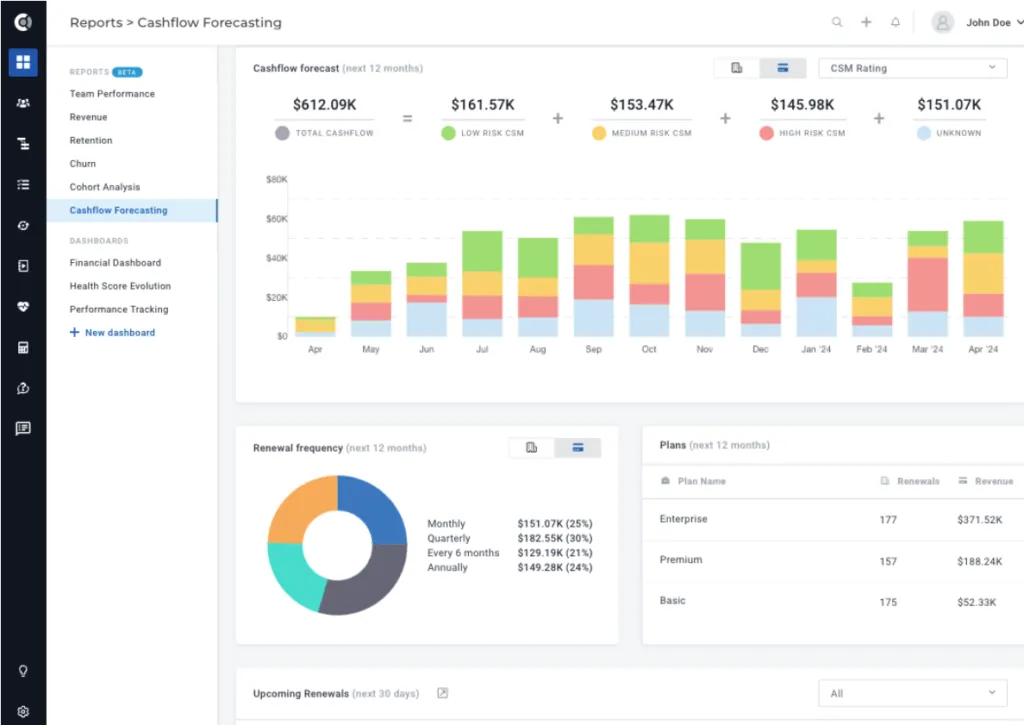
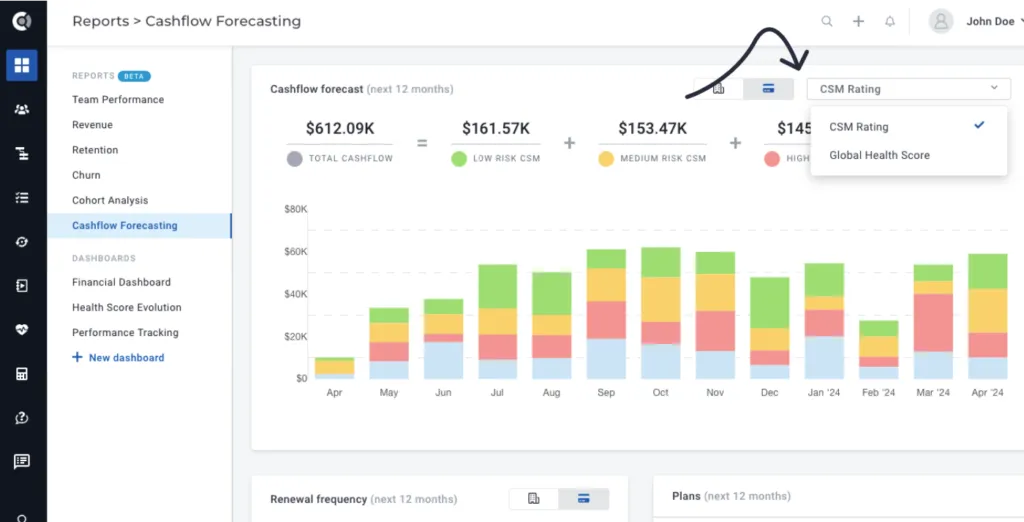
The Cashflow forecast graph displays the future renewals for a rolling 12-month period. The graph can be customized to display renewals split by either renewal count or renewal incoming revenue. Additionally, there are options available to split the renewals by CSM rating or Global Health Score, which can help highlight renewal risk. The graph includes sections for low risk, medium risk, and high-risk renewals, as well as an “unknown” section for customers without a Global Health Score or CSM rating. By using this graph, you can get a better understanding of your future cash flow and identify areas where you may need to focus on reducing renewal risk.
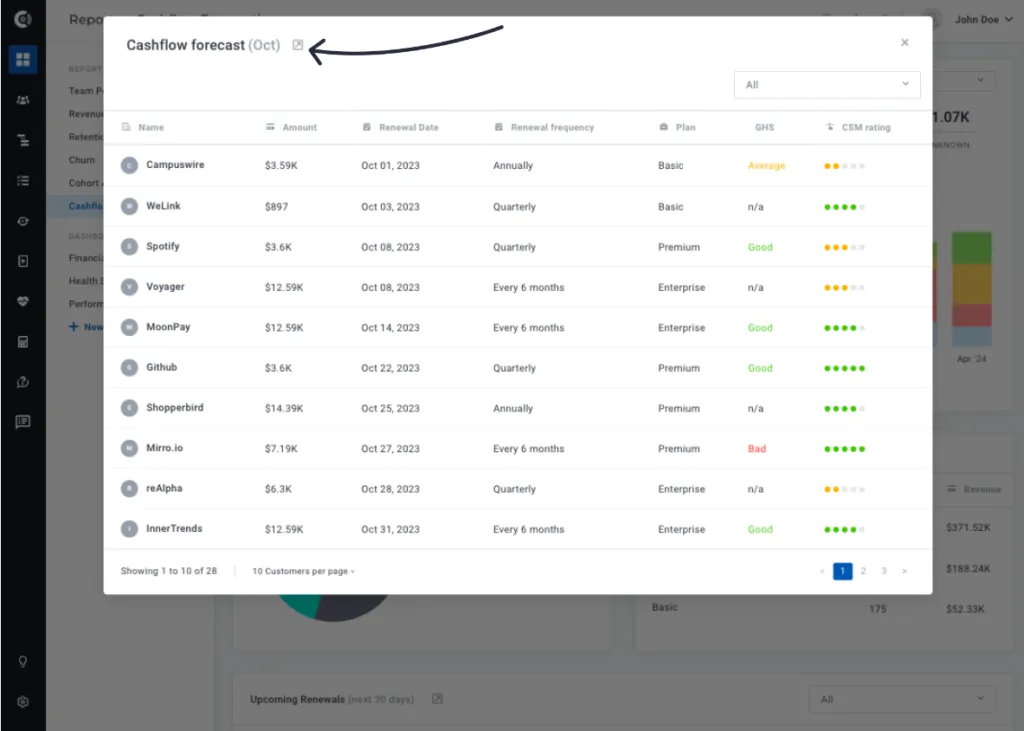
The chart bars are clickable, so you can easily see the customers that will renew each month, and you can even open the filtered view to analyze it directly in the Customer List View.
The next two widgets, Renewal Frequency and Plans show the upcoming renewals split by payment frequency and by plan.
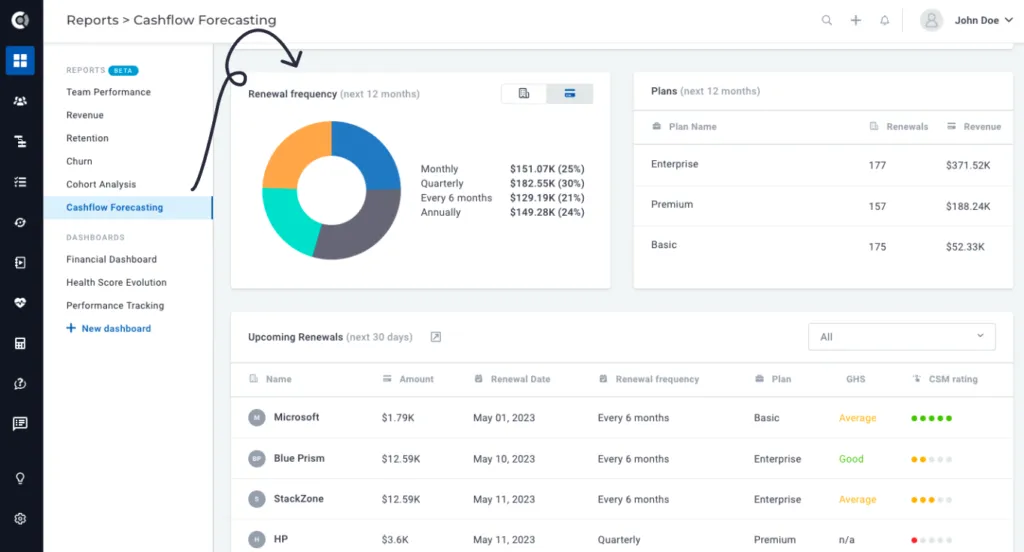
Observation: For Renewal Frequency, the graph can be split by renewal count and by renewal incoming revenue. For renewal count, we take into consideration all renewing subscriptions. For example, if you have 10 customers renewing in the next months, but two of them have 2 subscriptions, the renewal count will show be 12 (12 renewing subscriptions).
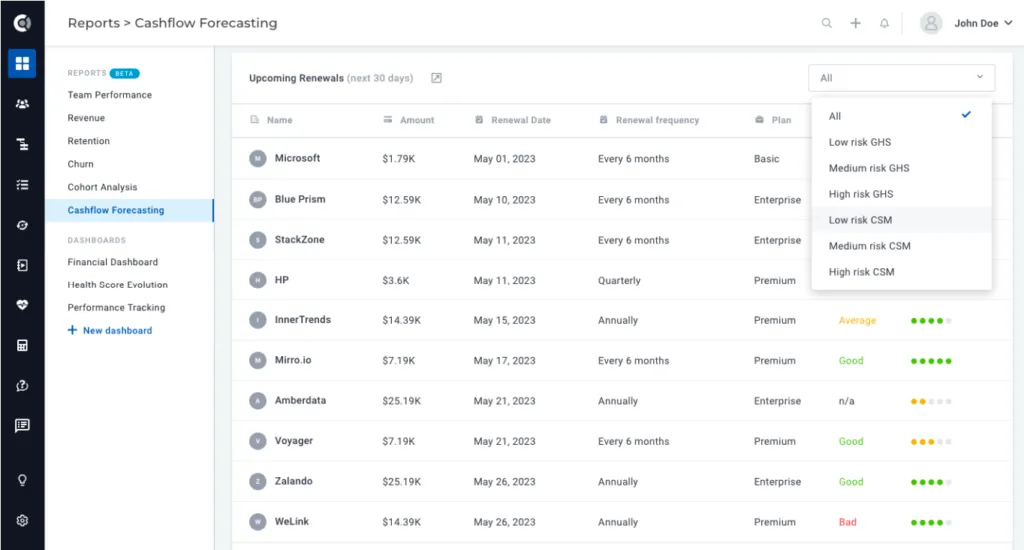
The last section of the report details the upcoming renewals for the next 30 days. You can see details about low/medium/high risk renewals split by Global Health Score or CSM rating, and you can also access the details behind the report in the Customer List View, for you to be able to apply more filters/to sort the table.
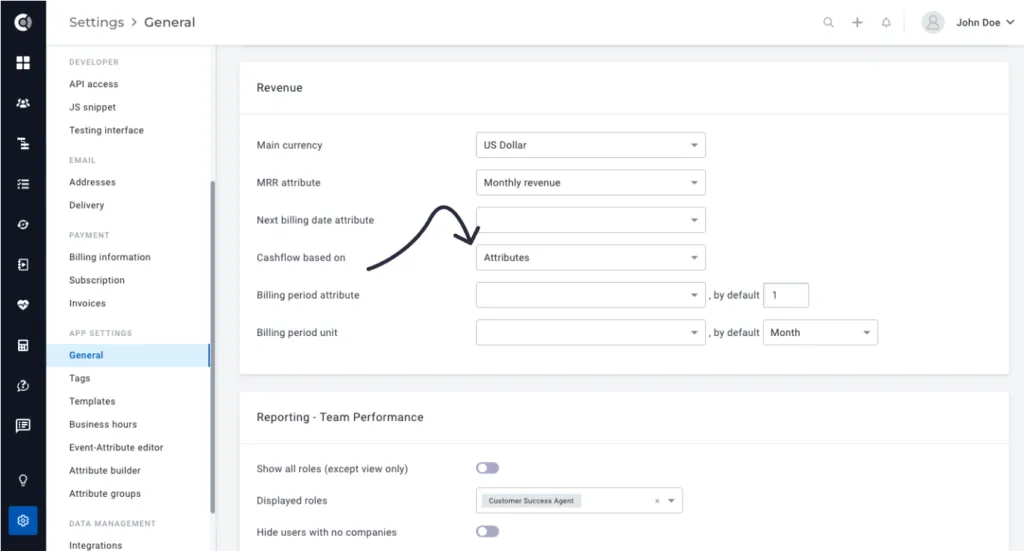
Observation: For the graph to be correctly populated, make sure you select the correct attributes under Settings – General – Revenue. For cashflow forecasting we use by default the data coming from Financial Subscriptions (imported from Stripe, Chargebee or Recurly). We extract the next billing amount and the billing frequency per subscription. For the situation where you don’t have a financial integration enabled, there is an option to manually select the attributes that will be used to populate the report.
2. Getting Started with Dashboards
With its powerful business intelligence engine, Custify lets you build your dashboards with the customer success metrics that matter to you.
Either you decide to have different dashboards for each CSM and allow them to define their most relevant widgets, or you just want to have general dashboards for product usage, revenue data or CSM performance, you can create an unlimited number of dashboards and have quick reports of your customers’ health.
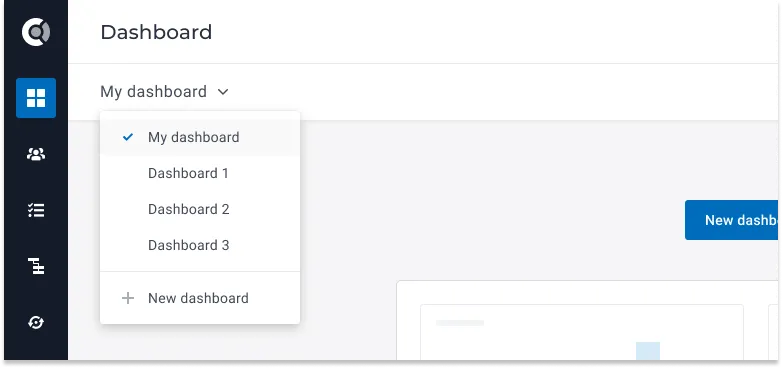
Tracking health scores or just need a lifecycle progress overview? Custify provides custom dashboards to easily oversee your most important customer success metrics.
Break down widgets by health score per segment, lifecycle progress and even by playbook evolution and engagement. Adapt them to segments or just per client.
Defining Dashboards
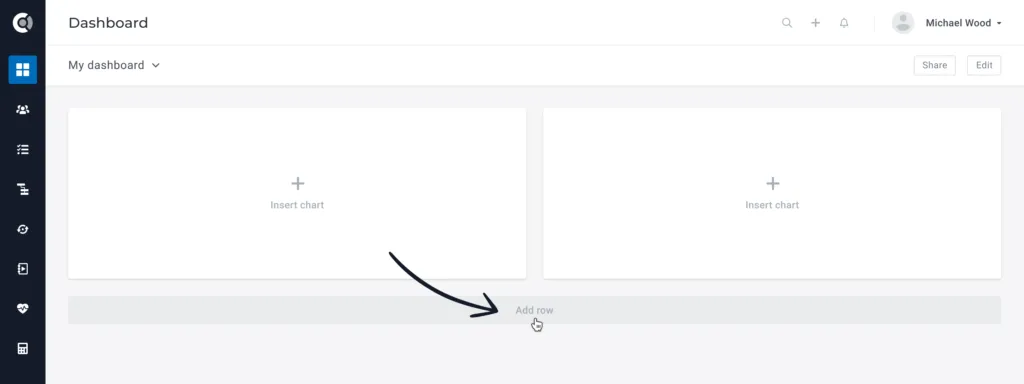
Start organizing your dashboard by adding Rows.
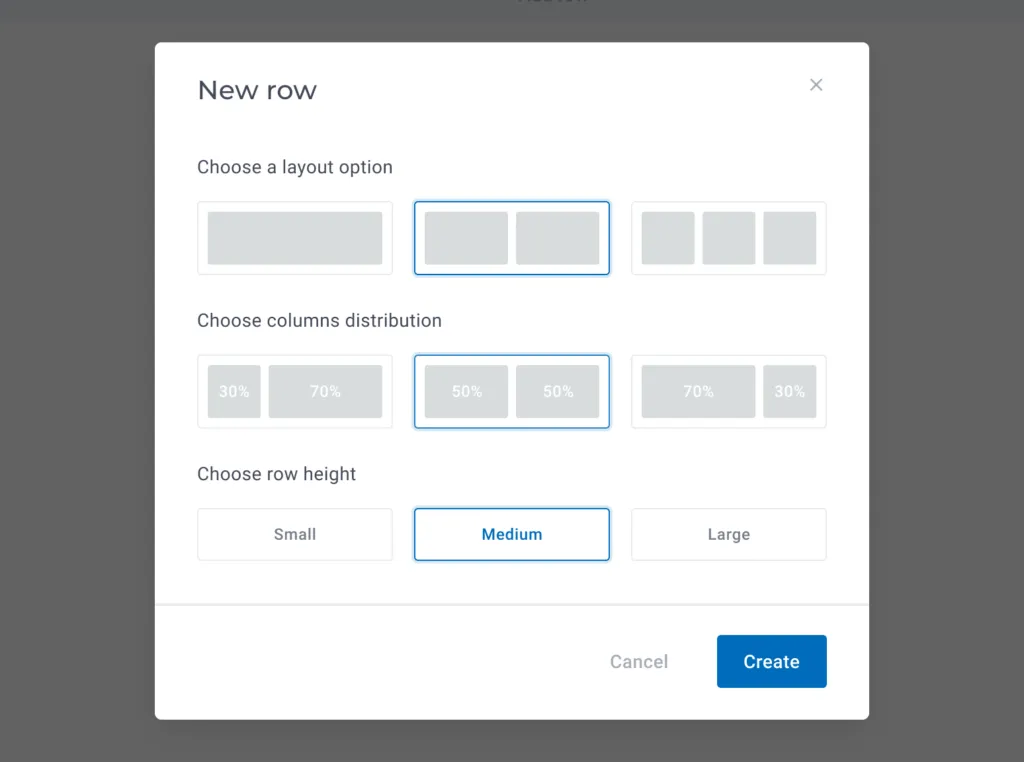
Choose the desired layout option, layout distribution and also the row height, depending on your needs.
Drag & drop widgets/rows to rearrange the page anytime.
Widgets enable you to add layout components. Available types of widgets:
- CSM Performance
- Health Score Distribution
- Health Score Evolution
- Segment Evolution
- Lifecycle Evolution
- Lifecycle Status
- Playbook Evolution
- Companies Data/Evolution
- Net Recurring Revenue
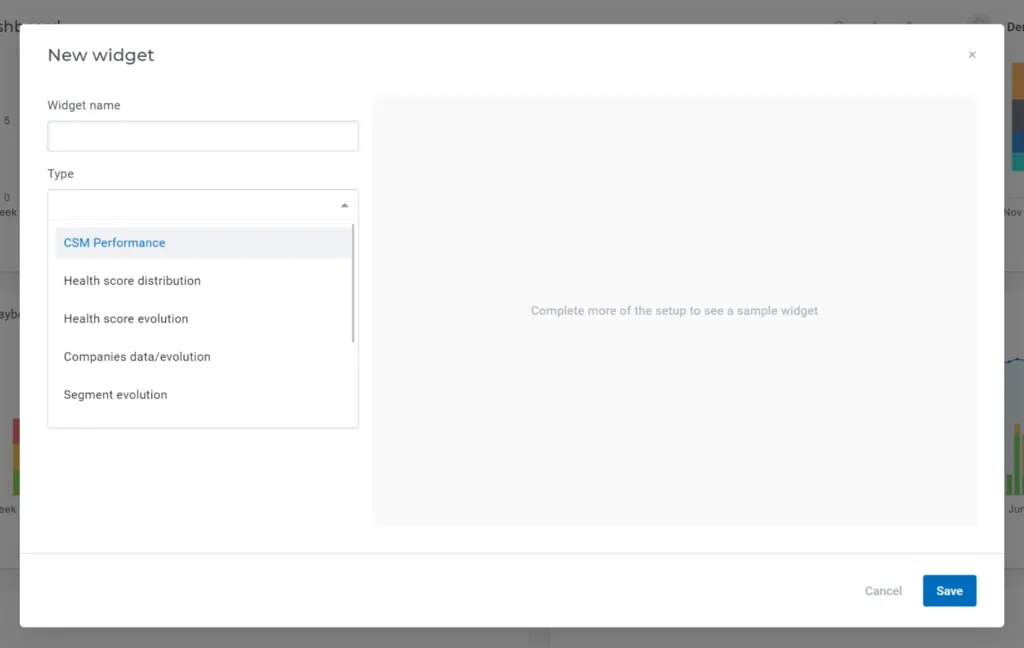
CSM Performance
Observe the impact of the CSMs on the customers’ health. The widget automatically breaks down specific KPIs (Health Metrics or Lifecycles) by the assigned CSM.
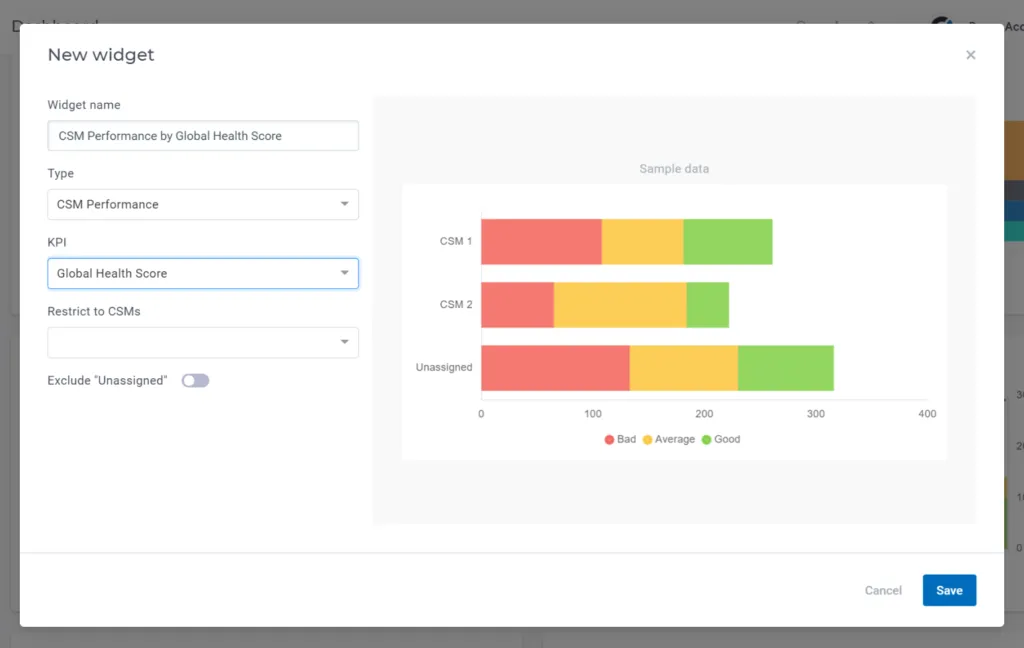
In the example above, the widget will display the Global Health Score for all the companies, split by the CSM assigned. The score thresholds (Bad-Average-Good) come from the KPI setup.
You can also choose to exclude customers that don’t have a CSM assigned by checking the Exclude “Unassigned” option.
Health Score Distribution vs Health Score Evolution
Choose how you want to display a Health Score in your graphics. The Health Score Distribution shows a snapshot of that Health Score, while the Health Score Evolution lets you select a timeframe for which you want to see how that score has evolved.
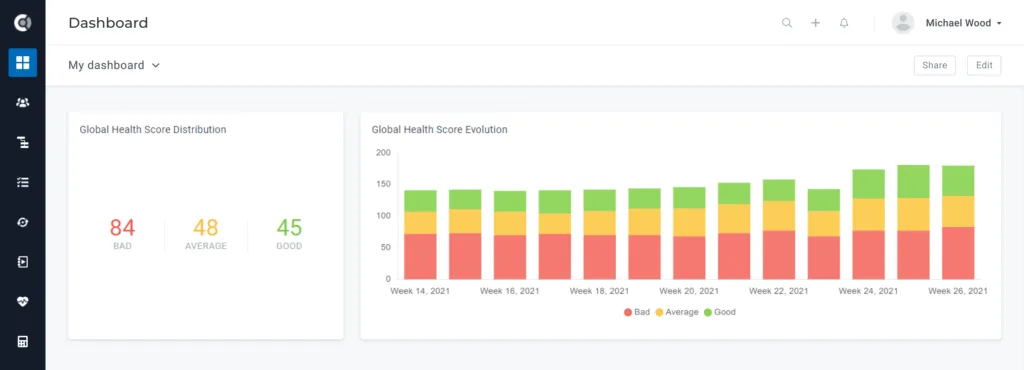
The Health Score data can be also restricted to specific segments if you choose to filter and display it only for people who meet specific criteria:
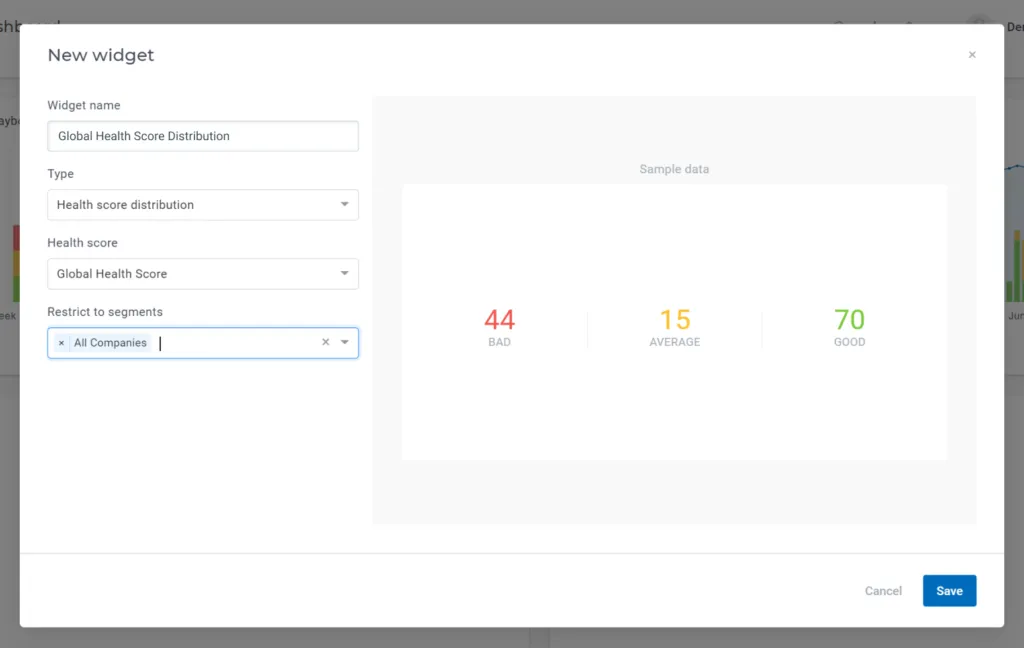
Observation: you can add multiple segments in the Restrict to segment field. This will calculate the widget for customers who are in a segment OR in another (the logical operator is OR, not AND).
The Health Score Distribution is a clickable widget – click on the numbers and you will be redirected to the companies’ list from each category (Bad – Average – Good).
Segment Evolution
Simply display the segment evolution by selecting a specific segment, a timeframe, and the preferred grouping (Daily/Weekly/Monthly).
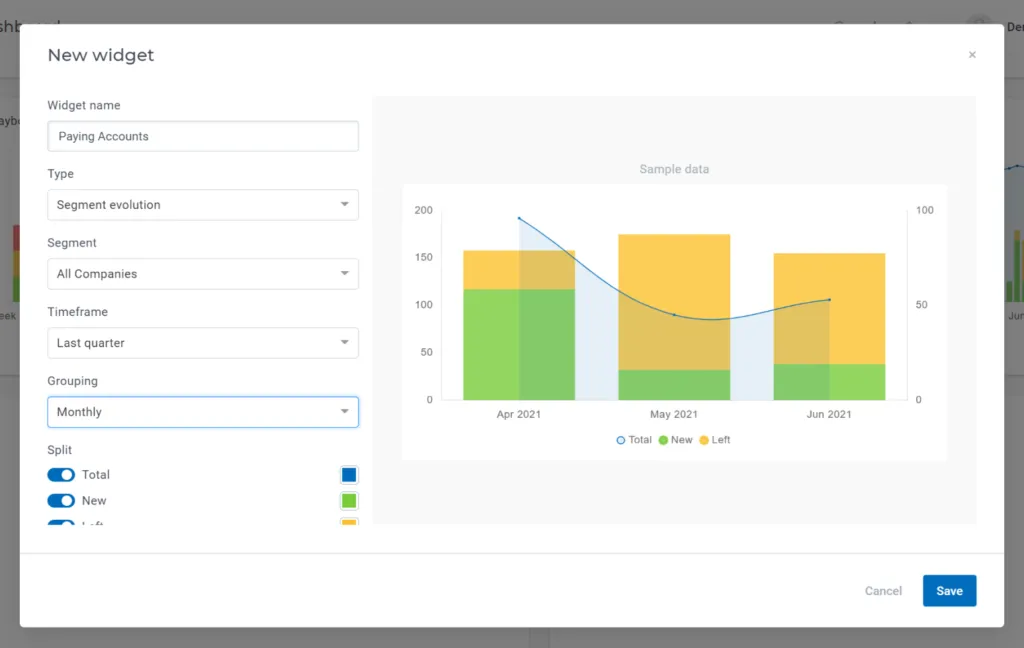
The example above will return the evolution of the All Companies segment (that contains all the active paying accounts), so you will know how many new paying accounts were added in the last quarter (marked in green) and how many customers left this segment, so are not your customers anymore (marked in yellow, but you can also mark them as red).
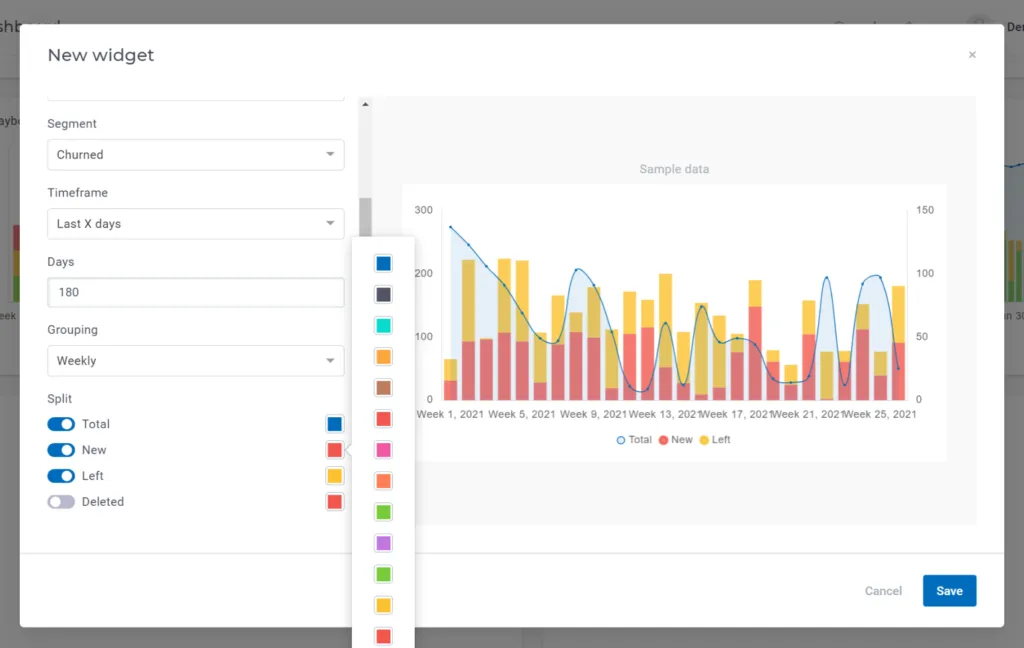
Churned customers can also be displayed as segment evolution. Use the Custify default segment, Churn, and display the new additions to this segment in red, to have a better view of how many customers churned for a given period of time.
The option "Compare with Segment" also allows you to compare totals across two segments side by side.
Lifecycle Status vs Lifecycle Evolution
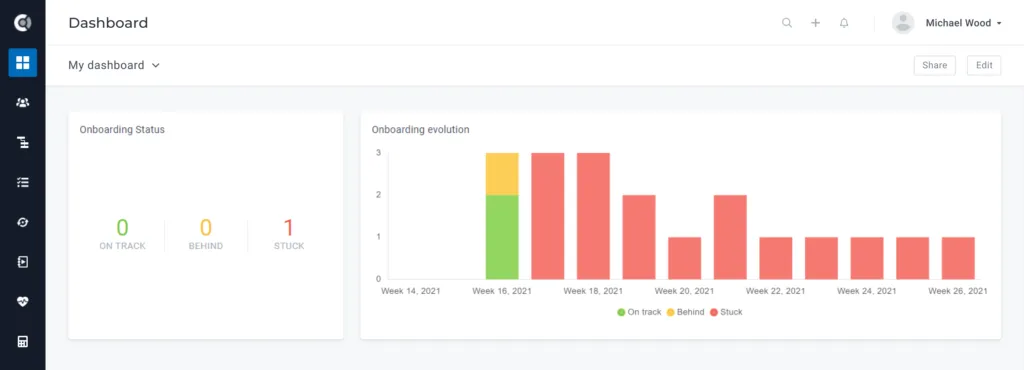
Visualize your customers’ lifecycles using graphics. You can either display the Lifecycle Status (current number of customers On Track/Behind/Stuck), or the Lifecycle Evolution (how many were On Track/Behind/Stuck during a certain period of time).
Playbook Evolution
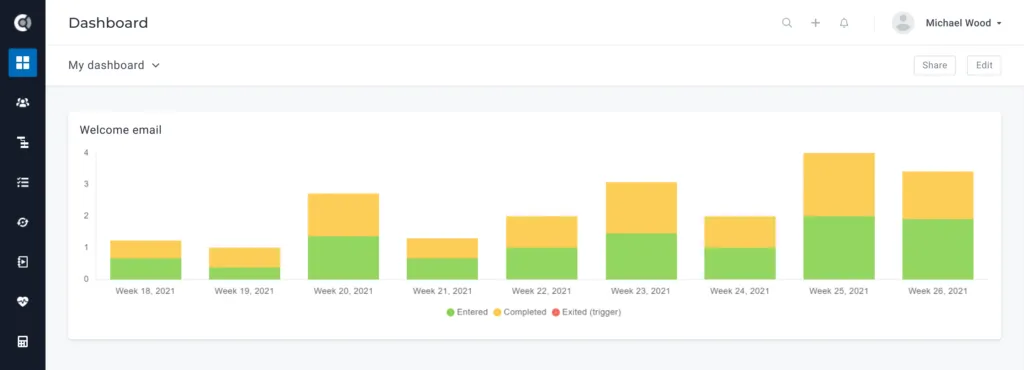
Observe the evolution of a playbook during a period of time. The graphic will show how many times the playbook was started (when someone has entered the trigger segment), completed, or exited (if you set up an exit trigger).
Companies Data/Evolution
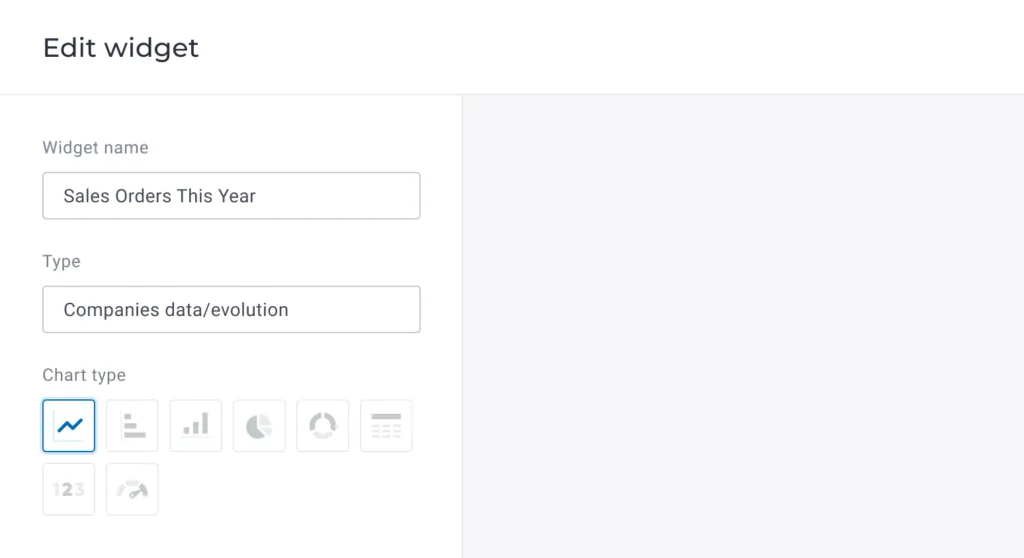
Customize your dashboards based on the events, attributes, and metrics you send.
Step 1: Choose the chart type:
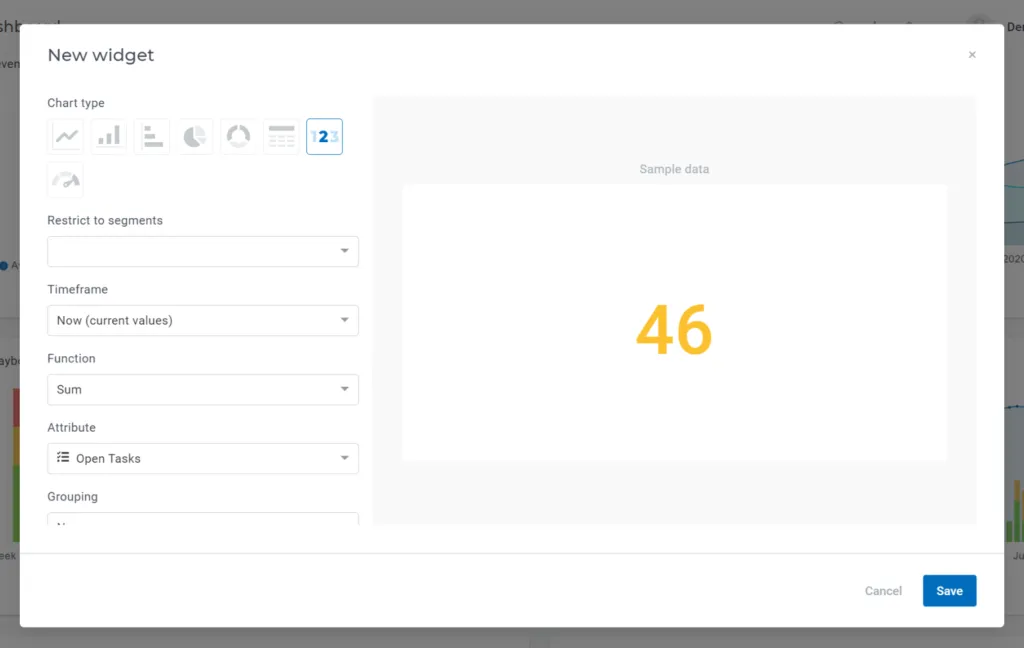
Step 2: Restrict the widget to a certain segment (optional), select a time frame the widget will be calculated for, then select a Function that will be applied to a specific event/attribute.
For example, below is how you can count your Total Open Tasks:
You can also use different formulas to play with data and display it split by attributes, health scores or by custom buckets.
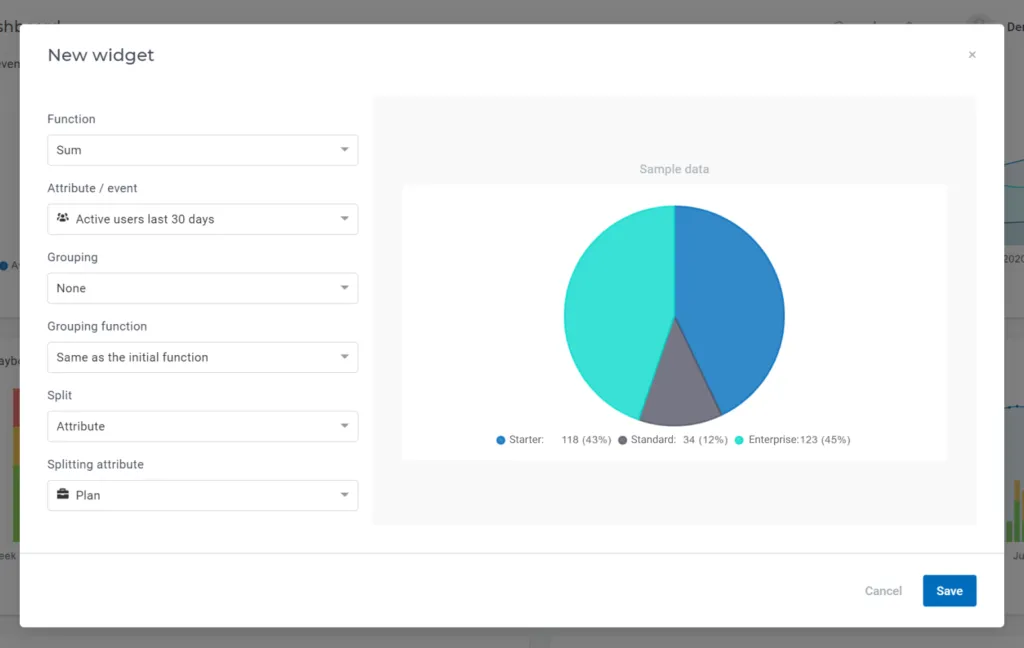
Let’s say you want to display the sum of Active users in the last 30 days, split by the Plan attribute, you’ll do the setup below:
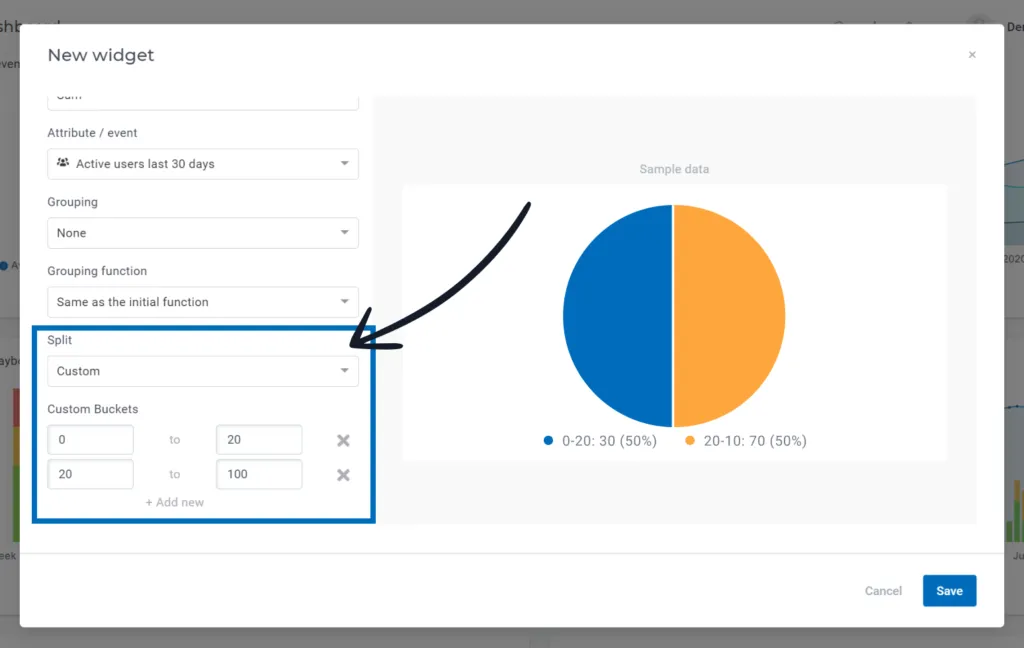
By choosing Custom Buckets instead of the attributes split, you can display values split by intervals you define. Taking the example above, let’s say you want to display the sum of Active Users in the last 30 days, but you want to split it into two custom intervals, one with values from 0 to 20, one with values from 20 to 100. The chart will look like this:
Count companies
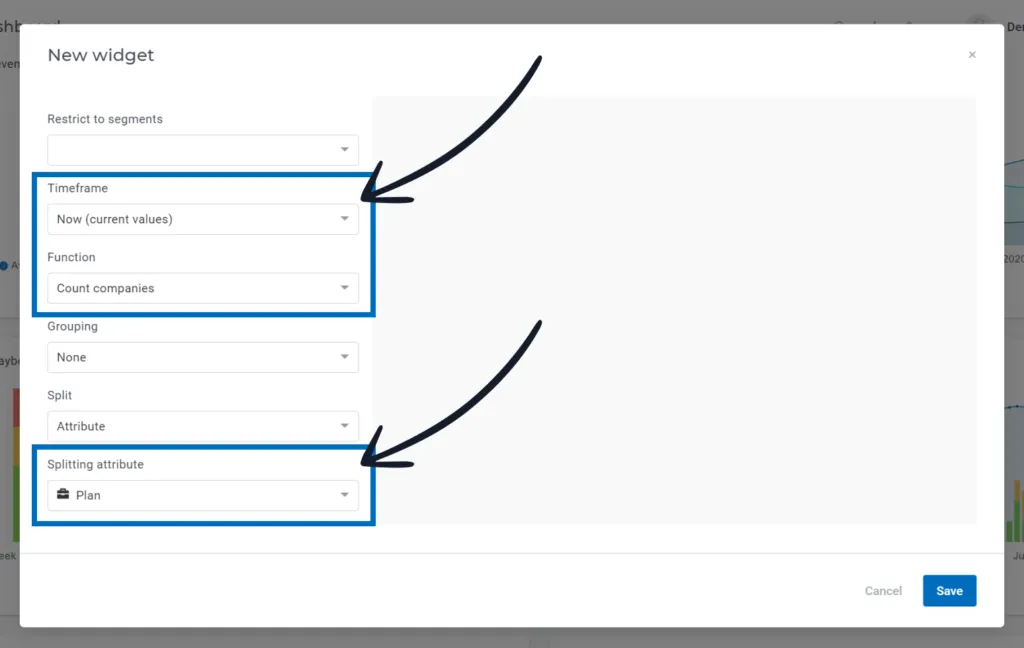
‘Count companies’ will be available only when you select ‘Now’ as a time frame. It allows you to display the total number of companies split by specific attributes. E.g.: count of companies split by plan.
Net Recurring Revenue
Easily observe your Net Recurring Revenue by building a graphic that will automatically calculate the New revenue, the Expansions, the Contractions and the Lost amounts.
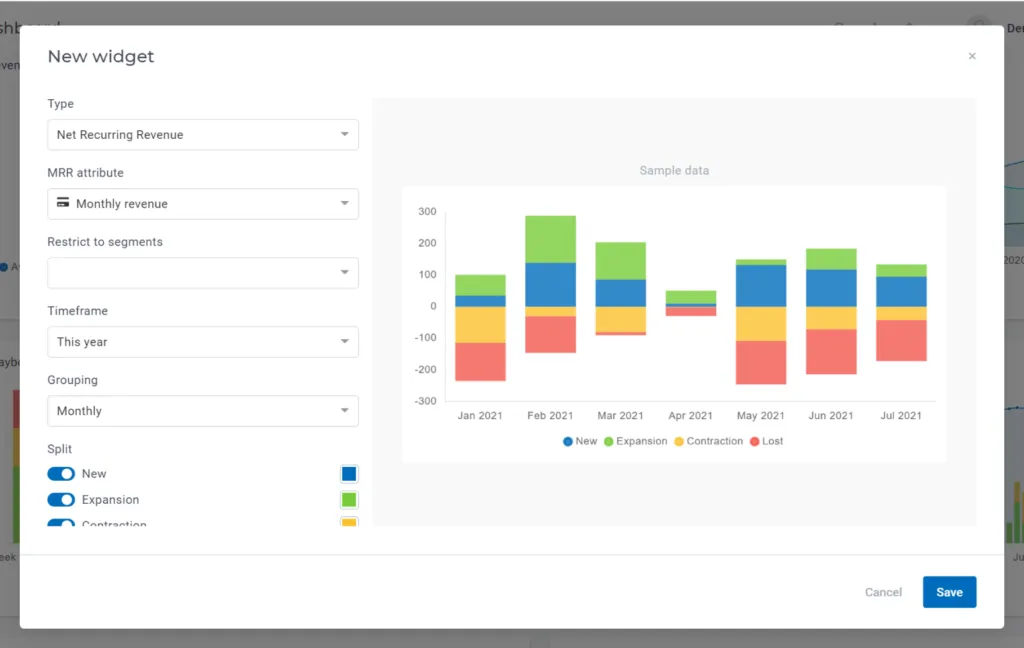
All you have to do is select the MRR attribute and the timeframe you want to display the MRR evolution for, then the widget will automatically return the number of customers in each category (New, Expansions, Contractions and Lost).
- New: total amount generated by new paying customers (started with MRR 0 at the beginning of the month and had the MRR greater than 0 by the end of the month)
- Expansion: total amount generated by customers with an increased MRR at the end of the month compared with the beginning of the month
- Contraction: negative value showing the total amount lost, coming from customers with a decreased MRR at the end of the month compared with the beginning of the month
- Lost: negative value showing the total amount lost, coming from lost customers (started with MRR greater than 0 at the beginning of the month and had the MRR = 0 by the end of the month).
Tasks, Notes and Meetings
With the ability to report on Tasks, Meetings, and Notes in Custify’s custom dashboards, you can gain actionable insights into task management, customer meetings, and notes, helping customer success teams make data-driven decisions and stay on top of their workflows.
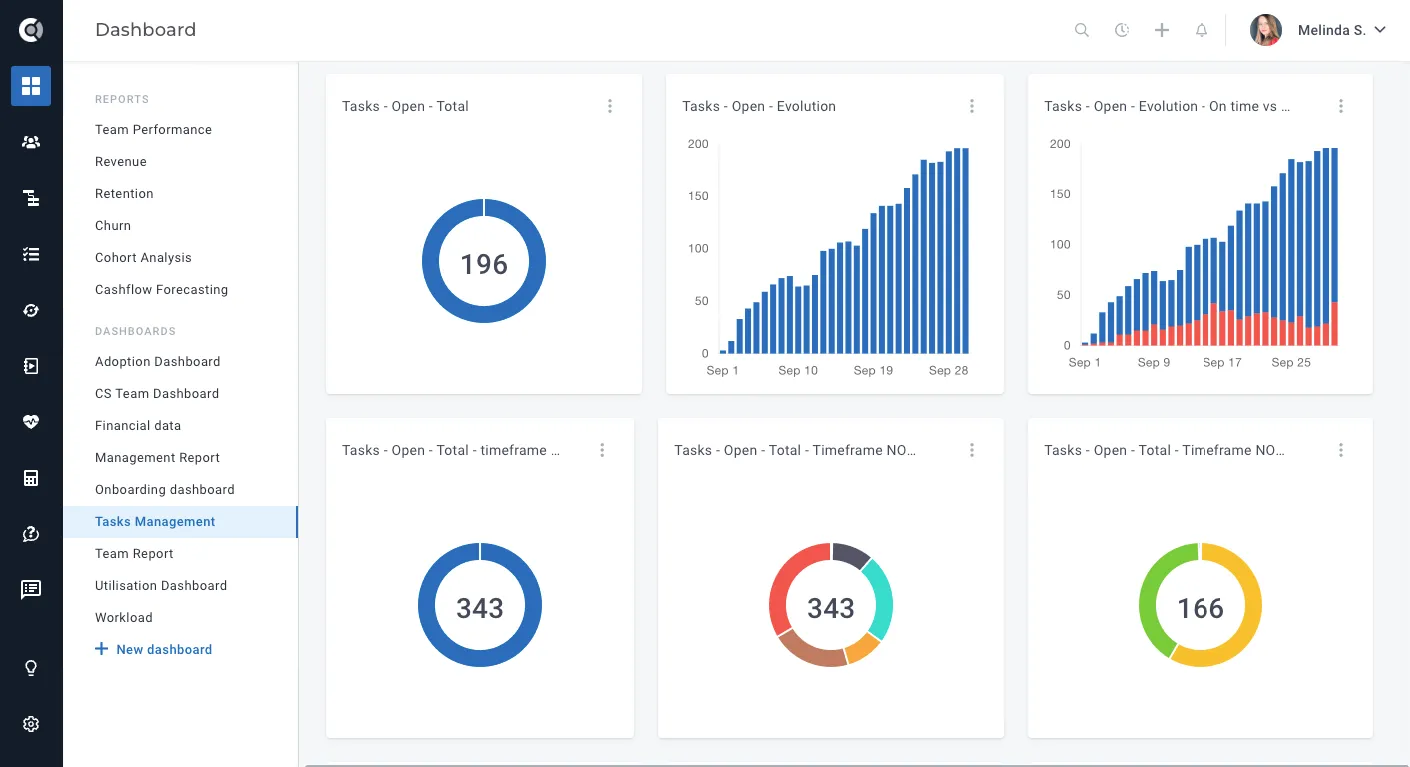
To configure the widget, choose first a relevant metric for the entity type:
- Tasks: Count of tasks, with status filters like Open, Completed, or Overdue.
- Meetings: Count of meetings or total meeting duration (displayed in HH format).
- Notes: Count of notes, with the option to include only manual notes.
- Filters: Restrict data by company segments, tags, or other relevant parameters.
- Timeframe: Define a reporting period. For open tasks, a "Now" timeframe option is available to show real-time data.
- Display Mode: Choose between total counts (donut chart), progress over time (bar chart), or both.
- Grouping & Splitting: Split the data by status (e.g., Open vs Completed for tasks), organizer (for meetings), author (for notes), or by tags.
Save and Visualize: Once your widget is configured, save it to see real-time insights displayed in your dashboard.
Observation: All the widgets that are based on timeframe Now are actionable. You can click on any widget on your dashboard that’s using the Timeframe Now setting and be automatically redirected to the filtered data behind that dashboard.
A handful of smaller widget and filter improvements landed across Insights and Dashboards:
• Survey filter on the Promoter Score widget: The widget now has a selector to compute the score by attribute (the default Promoter Score attribute or another numerical one) or by a specific Survey. Picking a Survey restricts the calculation to answers from that survey only, which makes it easier to track results per quarter or per segment without older responses skewing the number.
• NPS widget timeframe restriction: You can now restrict the NPS widget to a custom timeframe — for example, Last 30 days — instead of being limited to all-time scores. This is helpful for accounts that run multiple surveys by language or channel and want a unified rolling-window view on the Dashboard.
• Survey evolution graph: A new widget plots how a survey score evolves over time, similar to the chart on the survey page itself. It can be split by an attribute (region, plan, CSM, and so on), so you can see whether an improvement is uniform across teams or driven by a specific group.
• Fiscal quarter as default reporting period: Settings - General - Reporting - Default reporting period now includes a Fiscal quarter option. When selected, a Fiscal year start month dropdown appears so you can align reports with a non-calendar fiscal year — quarters are then labeled Fiscal Q1, Fiscal Q2, and so on.
• Cashflow Forecast by custom attribute: In addition to splitting by CSM rating or Global Health Score, the Cashflow Forecast can now split by a custom dropdown attribute (single selection, exactly three values: low, medium, high). Pick the attribute under Settings - General - Revenue, and it becomes available as a third splitting option in the report.
• Segment vs segment widget: The Segment Evolution widget has a new Compare with segment… option. When two segments are selected, the widget returns Total 1, Total 2, and % (1 of 2) across the chosen timeframe — useful for ratios like customers with onboarding completed / total active customers without faking attributes through Playbooks.
Managing Dashboards
Duplicate Dashboards
Duplicate dashboards and save time when you want to have the same dashboard structure, but use different filtering options (like for example one dashboard for each CSM).
You changed your mind and some of the dashboards you created are not needed? Keep your dashboards’ list clean by deleting unnecessary dashboards.
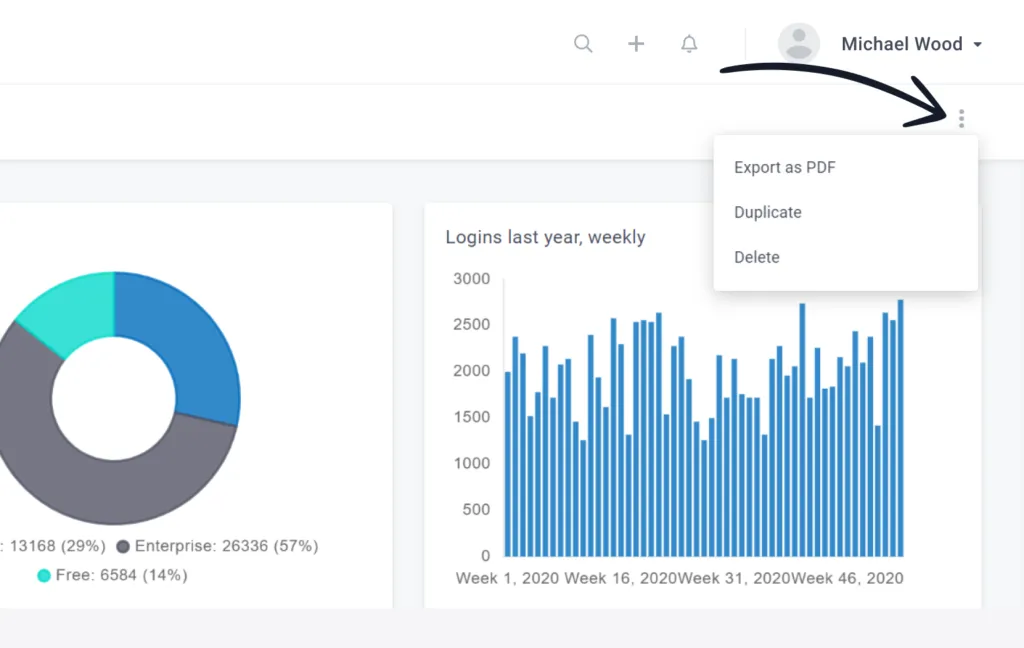
Share KPIs with your team
Make your customer success reports available for anyone in your organization. Want everyone on the same page? Share your preferred dashboards with them.
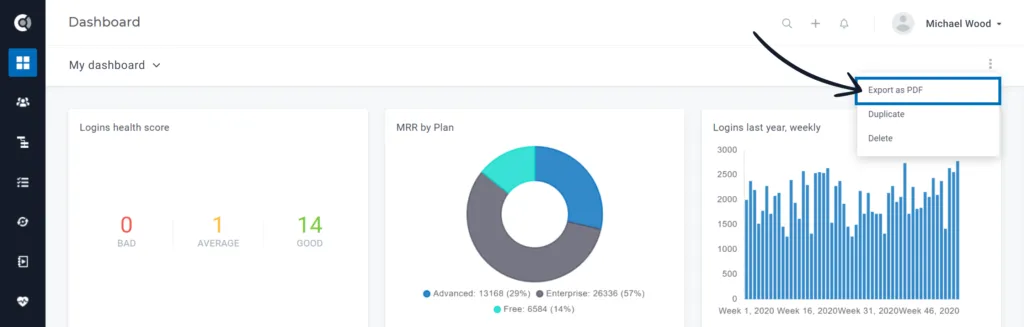
Use the Export as PDF option and obtain a pdf file that you can further use for team meetings, or as preparation for your presentations.
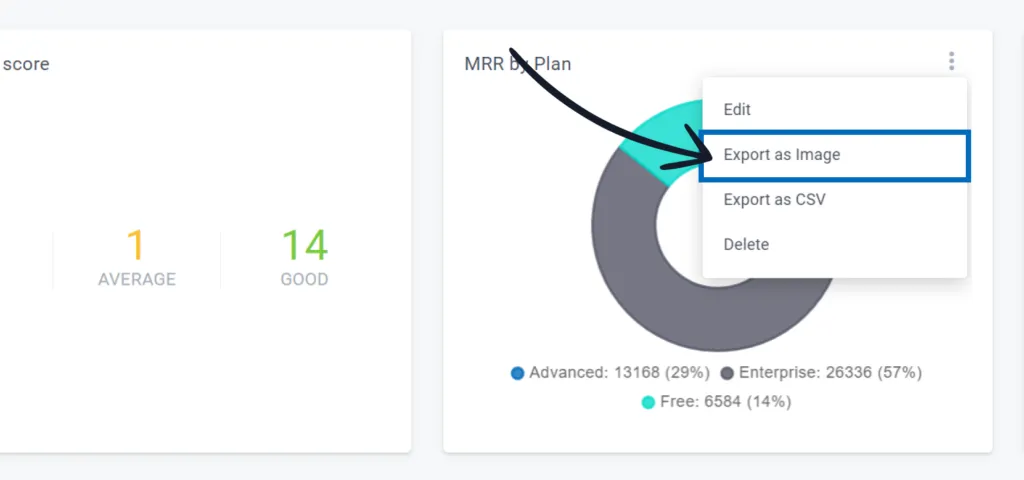
Or simply export the most relevant widgets as images.
Schedule emails with reports from Dashboards
You can schedule a Dashboard to email itself out as a recurring report. This is useful for executives, finance partners, or anyone who does not have a Custify login but still needs the numbers — instead of exporting the PDF and forwarding it manually each week, the report lands in their inbox on a fixed cadence.
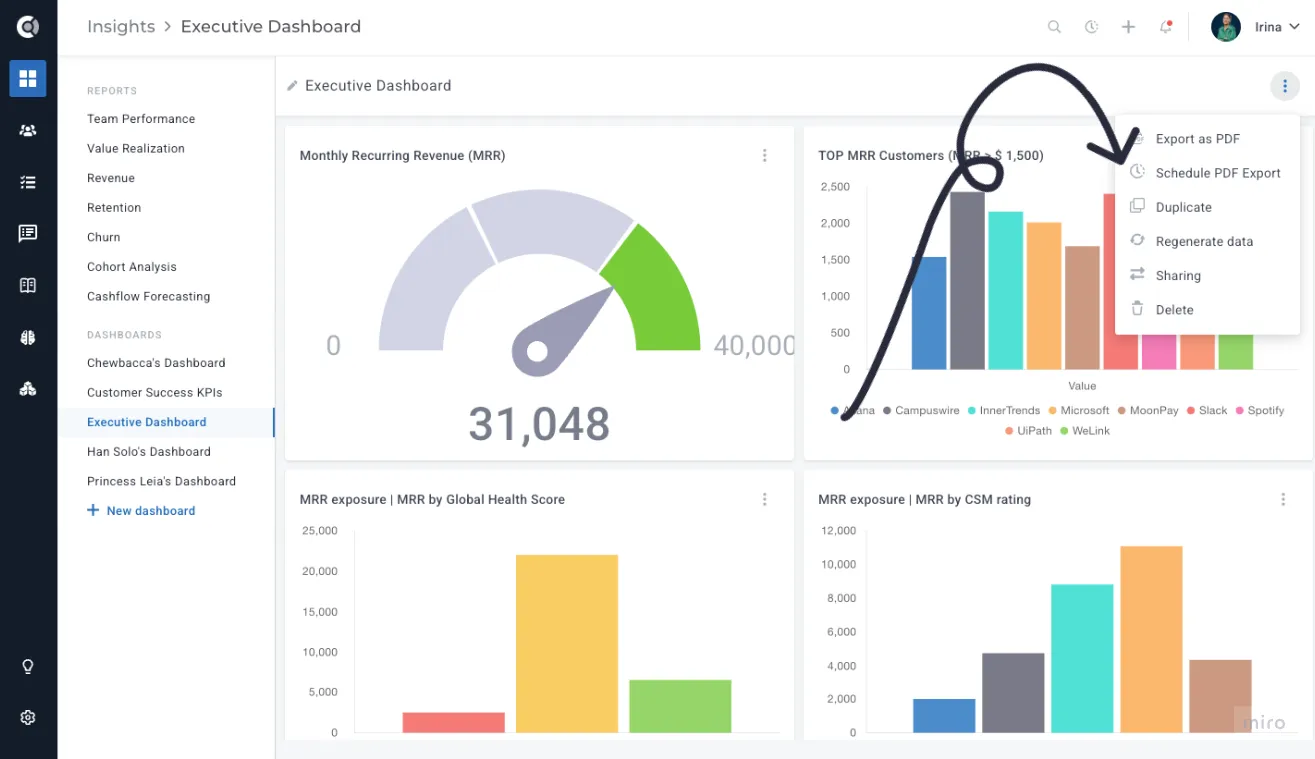
To set up a scheduled report, open the Dashboard you want to share and click Schedule report from the Action menu in the top right corner. A side panel opens where you configure:
• Recipients: Pick from existing Custify users, roles (the same way you select recipients for sharing), or add external email addresses for people who do not have an account.
• Frequency:
◦ Weekly — sent every Monday morning.
◦ Monthly — sent on the 1st of each month.
• Format: A PDF version of the Dashboard is generated server-side and attached to the email, so what arrives in the inbox matches what you see in the app.
You can schedule the same Dashboard multiple times with different recipient lists and frequencies — for example, a weekly snapshot to the CSM team and a monthly version to the leadership group.
Each scheduled report shows up under Scheduled reports on the Dashboard, where you can edit the recipients, change the frequency, pause it, or delete it. Pausing keeps the configuration intact so you can resume later without recreating it.
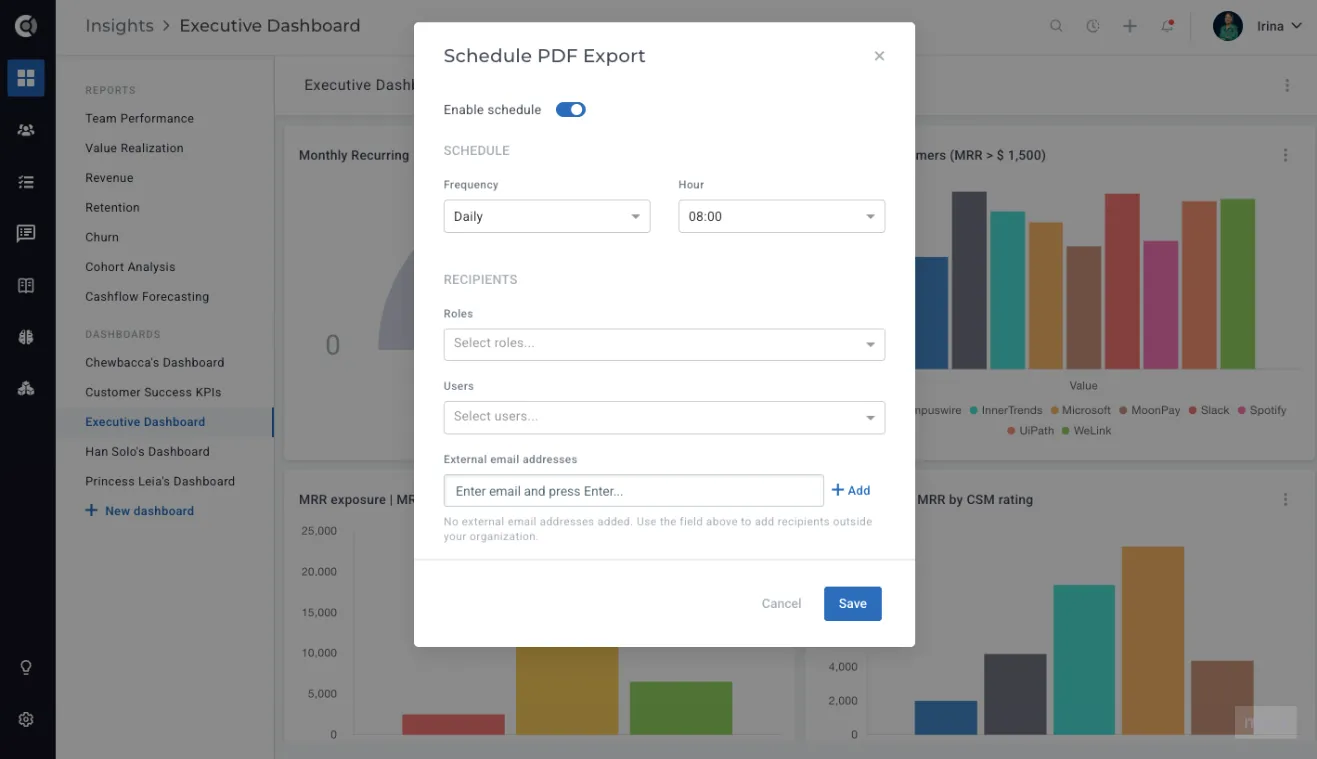
Custify Tip: External recipients receive the PDF as an attachment without a link back to Custify, so you can share dashboards with stakeholders who do not need an account. If a recipient should be able to interact with the data, give them a Custify user instead and share the Dashboard directly.