Offboarding Wizard
Reassign every customer, task, and automation a teammate owns before they leave or change roles, all from one guided flow.
Overview
The User Offboarding Wizard is an admin-only tool that walks you through everything a departing teammate owns inside your Custify workspace and helps you quickly hand it off. When a CSM leaves the company or moves into a new role, their account in Custify still lists them as the customer owner, the assignee for open Tasks, the sender of automated emails, and the recipient of personal dashboards and saved views. The wizard scans for every one of these references, lets you pick replacements, and applies the changes in the right order, with the option to also deactivate the user as the final step.
This is for offboarding users of your Custify workspace (your teammates), not for offboarding end customers from the platform. Use it whenever a CSM, account manager, or admin in your team is leaving or changing roles.
The wizard covers the following in a single run:
- Customer ownership (the CSM and account manager fields in companies)
- Task assignees on open Tasks
- Task assignments embedded in Playbooks and Lifecycles
- Personal dashboards and saved views in Insights and the Customer List View
- Custom user-type fields on companies (any custom attribute whose type points to a user)
The wizard also surfaces items it cannot reassign automatically and asks you to acknowledge each group before continuing, so nothing gets quietly missed.
Starting an offboarding run
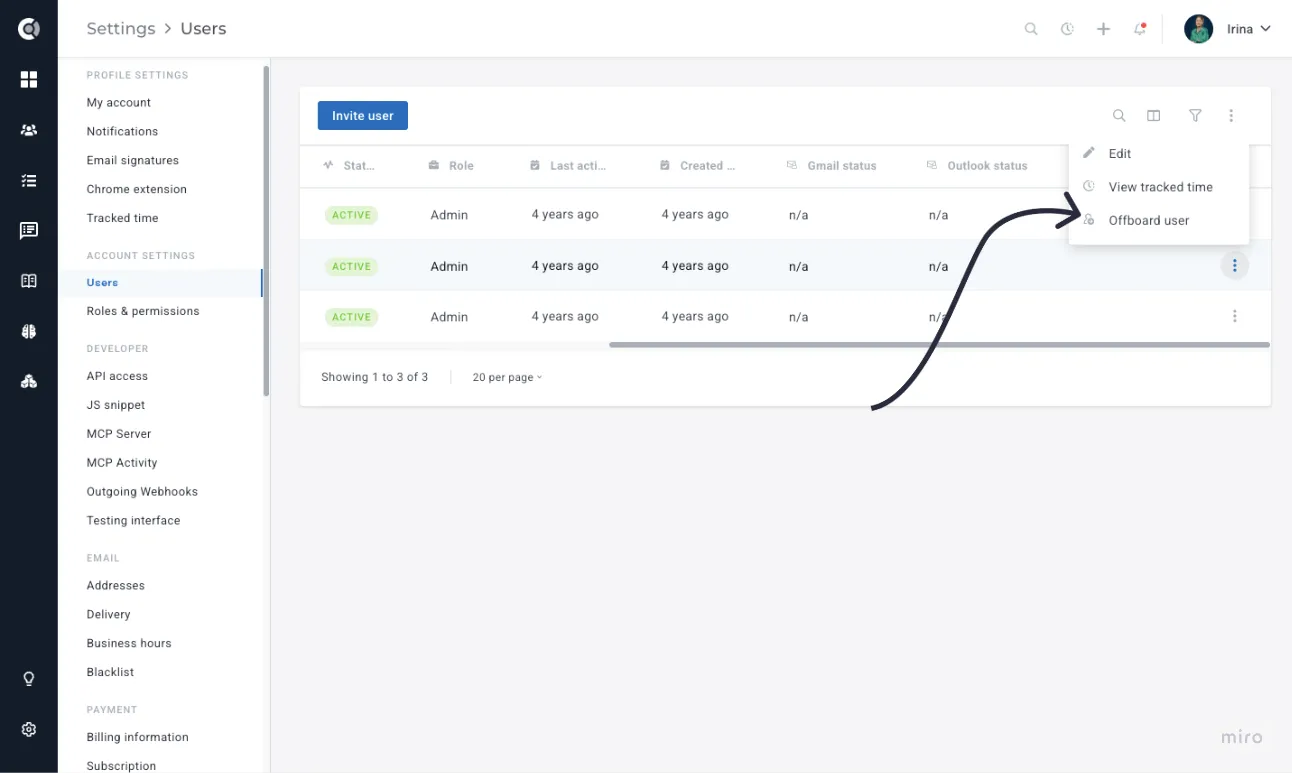
You start a run from the user detail page in Settings - Users. Open the user you want to offboard and click Offboard user.
There are two ways the wizard gets opened in practice:
- You go to the user's profile and start it manually with the Offboard user.
- You try to set the user to Inactive directly from Settings - Users and the user still owns work. Custify will intercept the deactivation with a warning modal and offer to open the wizard instead. If the user owns nothing, the deactivation goes through as usual without the modal.
Once a run is in progress, the Offboard user button on the same user's profile changes to Resume offboarding so you can pick up where you left off. If the most recent run for that user ended in partial completion or failure, a contextual banner appears on the profile linking you to the review screen.
Custify Tip: Decide your replacement assignments before starting. The wizard lets you pick a default replacement per category (customers, Tasks, email senders, etc.) and override it for specific accounts or items, so it helps to know up front who is taking over which book of business.
You cannot offboard yourself. The Offboard user button is hidden when you're viewing your own user profile, even if you're an admin. Ask another admin to run the wizard against your account.
The five-step wizard
The wizard is structured as five sequential steps. You can move backward to revise earlier choices until you start the live execution, after which the run is locked.
Step 1: Impact Scan
The wizard scans your account and shows everything tied to the departing user, grouped into two categories: will be reassigned (items the wizard can hand off automatically) and needs manual follow-up (items you'll have to address yourself outside the wizard).
For each group, you'll see a count and a detail table that paginates for users with large books of business.
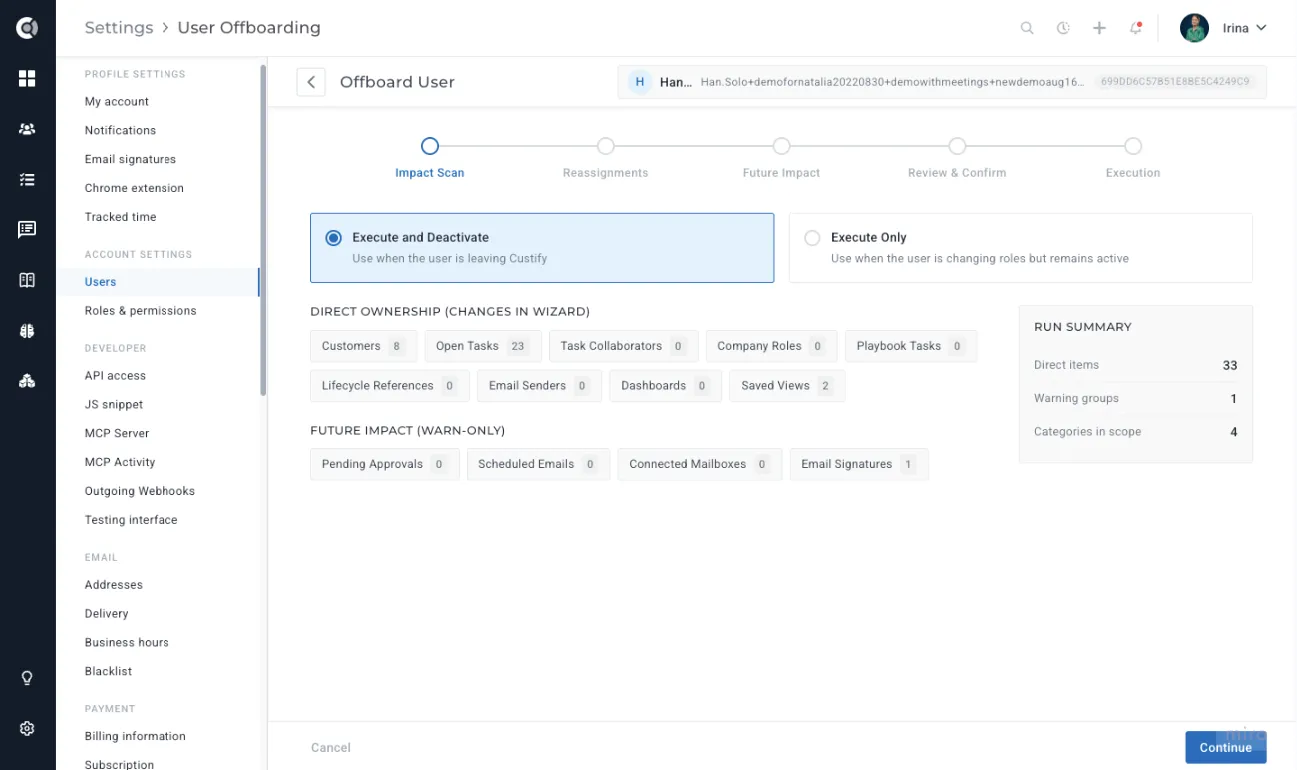
This is also where you choose the execution mode for the run. See the Execution modes section below for what each one does.
Step 2: Reassignments
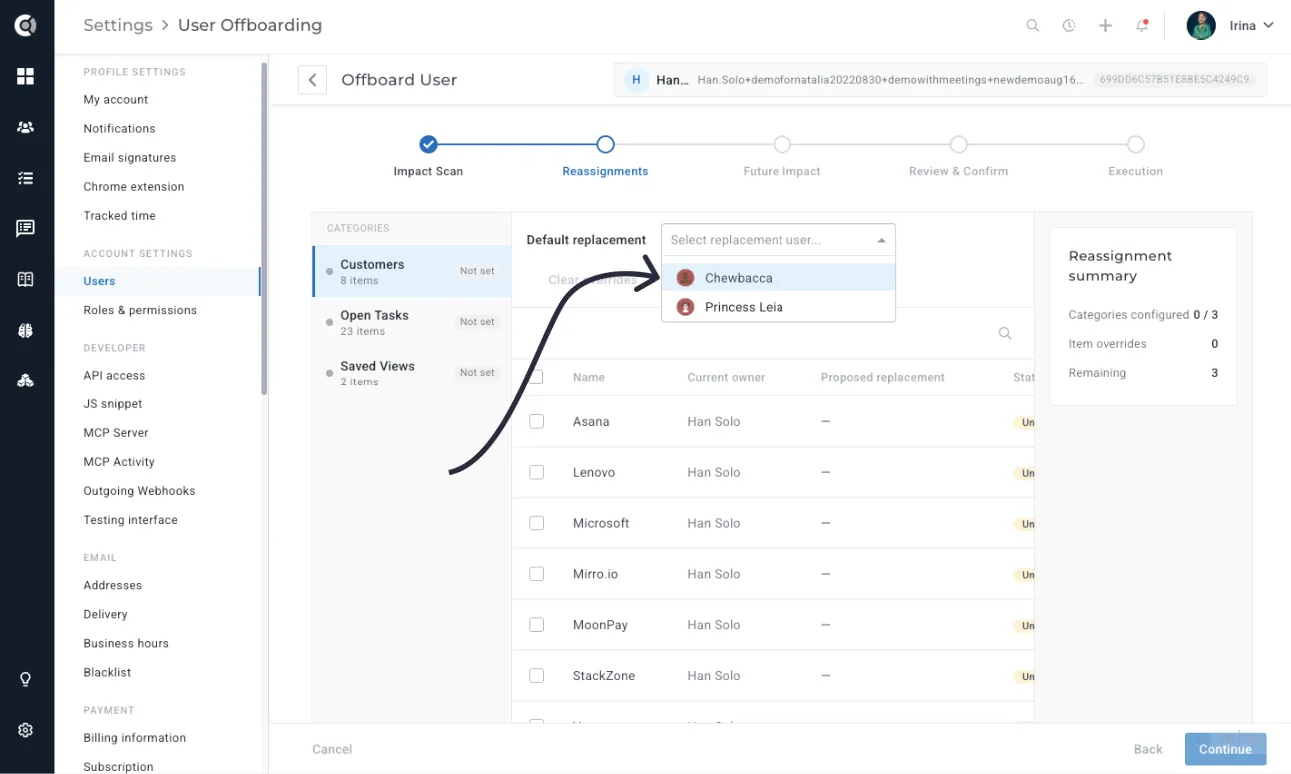
For each "will be reassigned" category, you pick a default replacement user. The wizard applies the default to every item in that category unless you override it.
The categories you'll see depend on what the departing user actually owns. They include:
- Customers (CSM and account manager fields)
- Open Tasks assigned to the user
- Playbook task assignments (Tasks that get auto-created when a customer enters a Playbook step)
- Lifecycle task assignments (Tasks that get auto-created when a customer enters a Lifecycle stage)
- Personal dashboards and saved views
- Custom user-type fields on companies
For each category you can:
- Set a default replacement that applies to every item in that group
- Open the detail table and override the replacement for specific accounts, Tasks, or items
- Sort and search within the table to find specific records
Custify Tip: For email senders inside Playbooks, make sure the replacement user has a valid sender setup (mailbox connected, signature configured) before you confirm. The wizard does not migrate the departing user's mailbox or signature to the replacement, only the reference to who should be the sender.
Step 3: Future Impact Checks
This step lists items the wizard does not auto-fix and asks you to acknowledge each group before you can continue. The categories are:
- Pending approvals the departing user has in the Approval Flow queue (Touchpoints - Pending Approval)
- Scheduled emails the user queued for future delivery
- Connected mailboxes (Gmail, Outlook) belonging to the user
- Signatures configured for the user
- API tokens issued to the user
- Playbook email steps where the deactivated user is the sender
For each group, the wizard shows a count and a deep link to the relevant settings area so you can resolve them in another tab. You then tick the acknowledgement checkbox for that group to confirm you've handled it (or that you've consciously decided to leave it as-is).
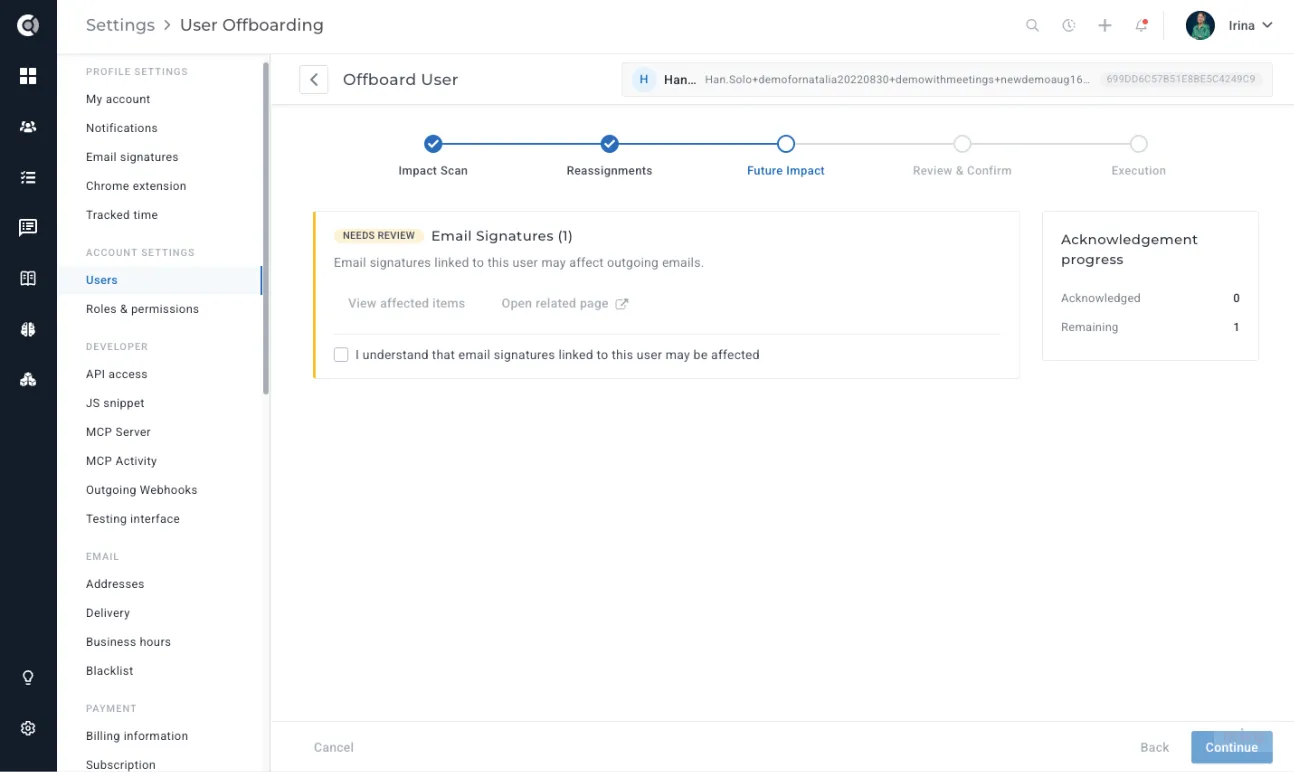
The Continue button stays disabled until every acknowledgement checkbox on this step is ticked. This is intentional. You're confirming you've seen each warning, even if you choose not to act on it.
Do not skip the API tokens warning lightly. If the departing user has personal API tokens still active in your account, those tokens will keep working even after the user is deactivated. Revoke them in Settings - Developer before you complete the run.
Step 4: Review & Confirm
The Review step gives you a clear preview of what will change and what stays untouched. You'll see:
- The execution mode that will run
- A category-by-category summary of reassignments (counts of items per replacement user)
- The acknowledged manual follow-up items
- The exact list of steps the wizard will execute, in order
Required checkboxes at the bottom of the screen gate the Start button. After you click Start, a final confirmation modal asks you to confirm the run before the live execution begins.
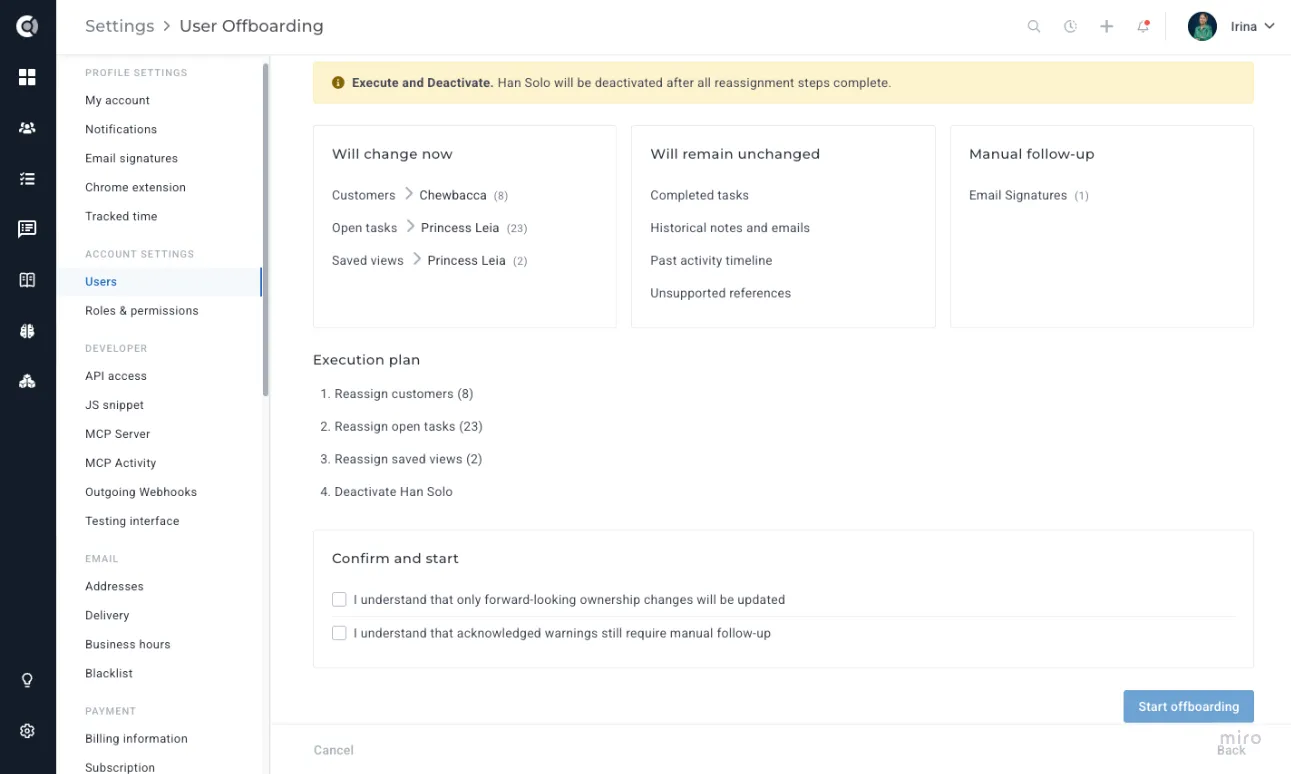
Step 5: Execution Progress
Once the run starts, the execution screen locks in place and shows each step progressing live. Every reassignment step is shown with its current state:
- Queued — the step has not started yet
- Running — the step is in progress
- Completed — the step finished successfully
- Failed — the step encountered an error and is reported with an inline message
You cannot navigate away from the wizard while the run is executing. If your browser tab loses its real-time connection, the UI falls back to polling and continues updating the step states within a few seconds.
When the run finishes, a banner at the top of the screen summarises the outcome (success, partial completion, or failure) and links you to the user's profile or to the review screen for any failed items. Customer owner changes and Task assignment changes appear automatically in each company's Activity timeline using the standard activity logging.
Observation: Two admins cannot run parallel offboardings against the same user. If a run is already in progress and another admin clicks Offboard user on the same profile, they're shown the existing run rather than starting a second one.
Execution modes
You choose between two execution modes on the Impact Scan step. The mode determines what happens after all reassignment steps complete.
- Execute and Deactivate — runs every reassignment step and then sets the user to Inactive as the final step. Use this when the teammate is leaving the company or otherwise losing access to your workspace. Deactivation only happens after every reassignment step completes; if any step fails, the deactivation is marked "not run" and the user stays active so you can review and retry.
- Execute Only — runs every reassignment step but does not deactivate the user at the end. Use this when the user is changing roles internally and needs to keep their seat (for example, moving from a CSM role to a sales role and handing over their book of business). When the run finishes, you'll see a final reminder that the user is still active and a pointer to Settings - Users if you decide to deactivate them later.
Custify Tip: If the user is already inactive, the Execute and Deactivate option is hidden and Execute Only is pre-selected. There's nothing to deactivate, so the wizard simply reassigns whatever the user still owns.
Manual follow-up items the wizard does not auto-fix
Some categories of work cannot be safely reassigned by the wizard and stay your responsibility. The Future Impact step surfaces each of these groups with counts and deep-link buttons, and gates the Continue button on your acknowledgement.
The categories are:
- Pending approvals — emails the departing user has queued in the Touchpoints Pending Approval view. Reassign or approve them yourself before continuing.
- Scheduled emails — emails the user has scheduled for later delivery. Decide whether to send them on the user's behalf, reschedule them under a new sender, or cancel them. See Sending Bulk EmailsSend Bulk Emails for context on how scheduled emails work.
- Connected mailboxes — Gmail or Outlook mailboxes the user has connected. Disconnect them in Settings - Email before deactivation if the mailbox should not keep syncing.
- Signatures — email signatures the user has configured. These belong to the user and won't transfer.
- API tokens — personal API tokens the user has generated. Revoke them in Settings - Developer if you don't want the tokens to keep working after deactivation.
Acknowledging a group is a confirmation that you've reviewed it, not a guarantee that you've fixed it. Treat the acknowledgement step as a checklist, not as automation.
Resuming and reviewing past runs
Offboarding runs are persistent. If you start a run, configure reassignments, and close the wizard before clicking Start, the wizard saves your progress. The next time you open the user's profile, the Offboard user button is replaced with Resume offboarding and you can pick up where you left off.
After a run completes, the user's profile shows a contextual banner if the run finished with partial completion or failure. The banner links to a review screen listing the failed steps with their inline error messages so you can decide what to retry manually. Activity entries for successful reassignments appear in each affected company's timeline as part of the standard Customer 360 Profile activity feed.
Permissions and self-offboarding
The wizard is admin-only. Non-admin users do not see the Offboard user button on user profiles, and the wizard route is not accessible to them. Roles and permissions are configured in Settings - Roles & Permissions and follow the same admin model as the rest of the Settings module.
Self-offboarding is disabled. Even if you're an admin, you cannot run the wizard against your own user. Ask another admin in your workspace to offboard you. This safeguard exists so an admin cannot accidentally lock themselves out of their own account mid-run.
Observation: The wizard is available automatically to admins in any workspace. There's no setting to enable or disable it, and no customer setup required. It only runs when an admin manually starts it from Settings - Users.